This article is the second in a four-part series on object detection with YOLO. If you haven't seen the first one, I'd recommend you do check it out before you work through this one.
This article will teach you how to use YOLO and OpenCV to detect objects in both images and video streams. As always, you can find all the code covered in this article on my Github.
Install OpenCV GPU
Standardly OpenCV has no support for GPU, which makes YOLO inference very slow – especially on a live video stream.
Since OpenCV version 4.2, the dnn module supports NVIDIA GPUs. PyImageSearch has a great tutorial showing you how to compile and install OpenCV's dnn module with NVIDIA GPU, CUDA, and cuDNN support.
Downloading a pre-trained model
For this article, we'll make use of a pre-trained YOLOV3 model, which can be downloaded by executing the following commands:
mkdir model
cd model/
wget https://pjreddie.com/media/files/yolov3.weights
wget https://raw.githubusercontent.com/pjreddie/darknet/master/cfg/yolov3.cfg
https://raw.githubusercontent.com/pjreddie/darknet/master/data/coco.names
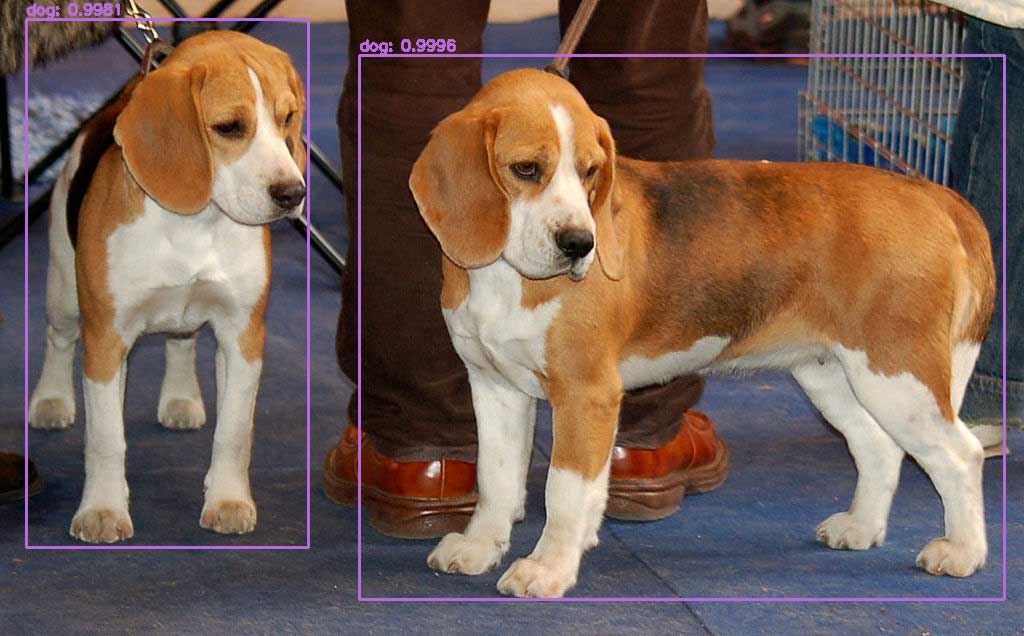
YOLO Object Detection on images
First, we import our required packages and parse some command-line arguments using argparse.
import numpy as np
import argparse
import cv2
import os
import time

if __name__ == '__main__':
    parser = argparse.ArgumentParser()
    parser.add_argument('-w', '--weights', type=str, default='model/yolov3.weights', help='Path to model weights')
    parser.add_argument('-cfg', '--config', type=str, default='model/yolov3.cfg', help='Path to configuration file')
    parser.add_argument('-l', '--labels', type=str, default='model/coco.names', help='Path to label file')
    parser.add_argument('-c', '--confidence', type=float, default=0.5, help='Minimum confidence for a box to be detected.')
    parser.add_argument('-t', '--threshold', type=float, default=0.3, help='Threshold for Non-Max Suppression')
    parser.add_argument('-u', '--use_gpu', default=False, action='store_true', help='Use GPU (OpenCV must be compiled for GPU). For more info checkout: https://www.pyimagesearch.com/2020/02/03/how-to-use-opencvs-dnn-module-with-nvidia-gpus-cuda-and-cudnn/')
    parser.add_argument('-s', '--save', default=False, action='store_true', help='Whether or not the output should be saved')
    parser.add_argument('-sh', '--show', default=True, action="store_false", help='Show output')
    parser.add_argument('-i', '--image_path', type=str, default='', help='Path to the image file.')
    args = parser.parse_args()
Command-line arguments allow us to change inputs to our script from the terminal. This is great because that way, we don't have to hardcode a path to our model and the input image. Our command-line arguments include:
--weights: Path to the YOLO model weights.--config: Path to the YOLO cfg file.--labels: Path to the labels (default=model/coco.names).--confidence: Minimum confidence for a box to be detected (default=0.5).--threshold: Threshold for Non-Max Suppression--use_gpu: Whether to use a GPU or not (only works if OpenCV is compiled correctly, default=False).--save: Whether or not the output should be saved (default=False)--show: If the output should be shown (default=True)--image_path: Path to the input image
After parsing the arguments, we continue by loading the labels, creating a random color for each label, and loading the model using the dnn module.
# Get the labels
labels = open(args.labels).read().strip().split('\n')

# Create a list of colors for the labels
colors = np.random.randint(0, 255, size=(len(labels), 3), dtype='uint8')

# Load weights using OpenCV
net = cv2.dnn.readNetFromDarknet(args.config, args.weights)
If the --use_gpu flag was set to true, the backend must be changed to CUDA:
if args.use_gpu:
    print('Using GPU')
    net.setPreferableBackend(cv2.dnn.DNN_BACKEND_CUDA)
    net.setPreferableTarget(cv2.dnn.DNN_TARGET_CUDA)
Now we'll get the name of the last layer, load the image into memory, and call the make_prediction method.
# Get the ouput layer names
layer_names = net.getLayerNames()
layer_names = [layer_names[i[0] - 1] for i in net.getUnconnectedOutLayers()]

image = cv2.imread(args.image_path)

boxes, confidences, classIDs, idxs = make_prediction(net, layer_names, labels, image, args.confidence, args.threshold)
The make_prediction method is a custom method, which looks as follows:
def make_prediction(net, layer_names, labels, image, confidence, threshold):
    height, width = image.shape[:2]

    # Create a blob and pass it through the model
    blob = cv2.dnn.blobFromImage(image, 1 / 255.0, (416, 416), swapRB=True, crop=False)
    net.setInput(blob)
    outputs = net.forward(layer_names)

    # Extract bounding boxes, confidences and classIDs
    boxes, confidences, classIDs = extract_boxes_confidences_classids(outputs, confidence, width, height)

    # Apply Non-Max Suppression
    idxs = cv2.dnn.NMSBoxes(boxes, confidences, confidence, threshold)

    return boxes, confidences, classIDs, idxs
First, we are getting the width and height of the image. Then we create a blob and pass it through the model. Afterward, we'll extract the bounding boxes by calling extract_boxes_confidences_classids and apply Non-Max Suppression.
extract_boxes_confidences_classids is another custom method that takes the outputs and extracts the bounding boxes.
Note that a YOLO model is outputting the center coordinates and the width and height of a bounding box. We will transform the output to get the upper left corner coordinates instead.
def extract_boxes_confidences_classids(outputs, confidence, width, height):
    boxes = []
    confidences = []
    classIDs = []

    for output in outputs:
        for detection in output:
            # Extract the scores, classid, and the confidence of the prediction
            scores = detection[5:]
            classID = np.argmax(scores)
            conf = scores[classID]

            # Consider only the predictions that are above the confidence threshold
            if conf > confidence:
                # Scale the bounding box back to the size of the image
                box = detection[0:4] * np.array([width, height, width, height])
                centerX, centerY, w, h = box.astype('int')

                # Use the center coordinates, width and height to get the coordinates of the top left corner
                x = int(centerX - (w / 2))
                y = int(centerY - (h / 2))

                boxes.append([x, y, int(w), int(h)])
                confidences.append(float(conf))
                classIDs.append(classID)

    return boxes, confidences, classIDs
Lastly, we can draw the bounding boxes on top of the image using another custom method called draw_bounding_boxes. After that, we can display and/or save the image depending on the command line arguments.
image = draw_bounding_boxes(image, boxes, confidences, classIDs, idxs, colors)

# show the output image
if args.show:
    cv2.imshow('YOLO Object Detection', image)
    cv2.waitKey(0)

if args.save:
    cv2.imwrite(f'output/{args.image_path.split("/")[-1]}', image)
cv2.destroyAllWindows()
The draw_bounding_boxes method draws the bounding boxes and confidences onto the image using the cv2.rectangle and cv2.putText methods.
def draw_bounding_boxes(image, boxes, confidences, classIDs, idxs, colors):
    if len(idxs) > 0:
        for i in idxs.flatten():
            # extract bounding box coordinates
            x, y = boxes[i][0], boxes[i][1]
            w, h = boxes[i][2], boxes[i][3]

            # draw the bounding box and label on the image
            color = [int(c) for c in colors[classIDs[i]]]
            cv2.rectangle(image, (x, y), (x + w, y + h), color, 2)
            text = "{}: {:.4f}".format(labels[classIDs[i]], confidences[i])
            cv2.putText(image, text, (x, y - 5), cv2.FONT_HERSHEY_SIMPLEX, 0.5, color, 2)

    return image
Full code:
import numpy as np
import argparse
import cv2
import os
import time


def extract_boxes_confidences_classids(outputs, confidence, width, height):
    boxes = []
    confidences = []
    classIDs = []

    for output in outputs:
        for detection in output:
            # Extract the scores, classid, and the confidence of the prediction
            scores = detection[5:]
            classID = np.argmax(scores)
            conf = scores[classID]

            # Consider only the predictions that are above the confidence threshold
            if conf > confidence:
                # Scale the bounding box back to the size of the image
                box = detection[0:4] * np.array([width, height, width, height])
                centerX, centerY, w, h = box.astype('int')

                # Use the center coordinates, width and height to get the coordinates of the top left corner
                x = int(centerX - (w / 2))
                y = int(centerY - (h / 2))

                boxes.append([x, y, int(w), int(h)])
                confidences.append(float(conf))
                classIDs.append(classID)

    return boxes, confidences, classIDs


def draw_bounding_boxes(image, boxes, confidences, classIDs, idxs, colors):
    if len(idxs) > 0:
        for i in idxs.flatten():
            # extract bounding box coordinates
            x, y = boxes[i][0], boxes[i][1]
            w, h = boxes[i][2], boxes[i][3]

            # draw the bounding box and label on the image
            color = [int(c) for c in colors[classIDs[i]]]
            cv2.rectangle(image, (x, y), (x + w, y + h), color, 2)
            text = "{}: {:.4f}".format(labels[classIDs[i]], confidences[i])
            cv2.putText(image, text, (x, y - 5), cv2.FONT_HERSHEY_SIMPLEX, 0.5, color, 2)

    return image


def make_prediction(net, layer_names, labels, image, confidence, threshold):
    height, width = image.shape[:2]

    # Create a blob and pass it through the model
    blob = cv2.dnn.blobFromImage(image, 1 / 255.0, (416, 416), swapRB=True, crop=False)
    net.setInput(blob)
    outputs = net.forward(layer_names)

    # Extract bounding boxes, confidences and classIDs
    boxes, confidences, classIDs = extract_boxes_confidences_classids(outputs, confidence, width, height)

    # Apply Non-Max Suppression
    idxs = cv2.dnn.NMSBoxes(boxes, confidences, confidence, threshold)

    return boxes, confidences, classIDs, idxs


if __name__ == '__main__':
    parser = argparse.ArgumentParser()
    parser.add_argument('-w', '--weights', type=str, default='model/yolov3.weights', help='Path to model weights')
    parser.add_argument('-cfg', '--config', type=str, default='model/yolov3.cfg', help='Path to configuration file')
    parser.add_argument('-l', '--labels', type=str, default='model/coco.names', help='Path to label file')
    parser.add_argument('-c', '--confidence', type=float, default=0.5, help='Minimum confidence for a box to be detected.')
    parser.add_argument('-t', '--threshold', type=float, default=0.3, help='Threshold for Non-Max Suppression')
    parser.add_argument('-u', '--use_gpu', default=False, action='store_true', help='Use GPU (OpenCV must be compiled for GPU). For more info checkout: https://www.pyimagesearch.com/2020/02/03/how-to-use-opencvs-dnn-module-with-nvidia-gpus-cuda-and-cudnn/')
    parser.add_argument('-s', '--save', default=False, action='store_true', help='Whether or not the output should be saved')
    parser.add_argument('-sh', '--show', default=True, action="store_false", help='Show output')
    parser.add_argument('-i', '--image_path', type=str, default='', help='Path to the image file.')

    args = parser.parse_args()

    # Get the labels
    labels = open(args.labels).read().strip().split('\n')

    # Create a list of colors for the labels
    colors = np.random.randint(0, 255, size=(len(labels), 3), dtype='uint8')

    # Load weights using OpenCV
    net = cv2.dnn.readNetFromDarknet(args.config, args.weights)

    if args.use_gpu:
        print('Using GPU')
        net.setPreferableBackend(cv2.dnn.DNN_BACKEND_CUDA)
        net.setPreferableTarget(cv2.dnn.DNN_TARGET_CUDA)

    if args.save:
        print('Creating output directory if it doesn\'t already exist')
        os.makedirs('output', exist_ok=True)

    # Get the ouput layer names
    layer_names = net.getLayerNames()
    layer_names = [layer_names[i[0] - 1] for i in net.getUnconnectedOutLayers()]

    image = cv2.imread(args.image_path)

    boxes, confidences, classIDs, idxs = make_prediction(net, layer_names, labels, image, args.confidence, args.threshold)

    image = draw_bounding_boxes(image, boxes, confidences, classIDs, idxs, colors)

    # show the output image
    if args.show:
        cv2.imshow('YOLO Object Detection', image)
        cv2.waitKey(0)

    if args.save:
        cv2.imwrite(f'output/{args.image_path.split("/")[-1]}', image)
    cv2.destroyAllWindows()
To run the script, open a command line and execute the following commands:
!wget https://raw.githubusercontent.com/tensorflow/models/master/research/object_detection/test_images/image1.jpg
!python3 yolo.py -w model/yolov3.weights -cfg model/yolov3.cfg -l model/coco.names -i image1.jpg -s

Extending the script to work with a video stream
Extending the script to also work for video streams is quite simple. First, we'll add a new command-line argument called --video_path. Then, we will combine the --image_path and --video_path arguments into a mutually exclusive group so that only one of the two arguments can be specified.
input_group = parser.add_mutually_exclusive_group()
input_group.add_argument('-i', '--image_path', type=str, default='', help='Path to the image file.')
input_group.add_argument('-v', '--video_path', type=str, default='', help='Path to the video file.')
If the image_path is specified, we'll execute the code above. If a video_path is specified, we'll run the code repeatedly until the video is over. If both arguments are empty, the script will use a webcam.
if args.image_path != '':
    # Code from above
else:
    if args.video_path != '':
        cap = cv2.VideoCapture(args.video_path)
    else:
        cap = cv2.VideoCapture(0)

    if args.save:
        width = int(cap.get(3))
        height = int(cap.get(4))
        fps = cap.get(cv2.CAP_PROP_FPS)
        name = args.video_path.split("/")[-1] if args.video_path else 'camera.avi'
        out = cv2.VideoWriter(f'output/{name}', cv2.VideoWriter_fourcc('M','J','P','G'), fps, (width, height))

    while cap.isOpened():
        ret, image = cap.read()

        if not ret:
            print('Video file finished.')
            break

        boxes, confidences, classIDs, idxs = make_prediction(net, layer_names, labels, image, args.confidence, args.threshold)

        image = draw_bounding_boxes(image, boxes, confidences, classIDs, idxs, colors)

        if args.show:
            cv2.imshow('YOLO Object Detection', image)
            if cv2.waitKey(1) & 0xFF == ord('q'):
                break

        if args.save:
            out.write(image)

    cap.release()
    if args.save:
        out.release()
cv2.destroyAllWindows()
Full code:
import numpy as np
import argparse
import cv2
import os
import time


def extract_boxes_confidences_classids(outputs, confidence, width, height):
    boxes = []
    confidences = []
    classIDs = []

    for output in outputs:
        for detection in output:
            # Extract the scores, classid, and the confidence of the prediction
            scores = detection[5:]
            classID = np.argmax(scores)
            conf = scores[classID]

            # Consider only the predictions that are above the confidence threshold
            if conf > confidence:
                # Scale the bounding box back to the size of the image
                box = detection[0:4] * np.array([width, height, width, height])
                centerX, centerY, w, h = box.astype('int')

                # Use the center coordinates, width and height to get the coordinates of the top left corner
                x = int(centerX - (w / 2))
                y = int(centerY - (h / 2))

                boxes.append([x, y, int(w), int(h)])
                confidences.append(float(conf))
                classIDs.append(classID)

    return boxes, confidences, classIDs


def draw_bounding_boxes(image, boxes, confidences, classIDs, idxs, colors):
    if len(idxs) > 0:
        for i in idxs.flatten():
            # extract bounding box coordinates
            x, y = boxes[i][0], boxes[i][1]
            w, h = boxes[i][2], boxes[i][3]

            # draw the bounding box and label on the image
            color = [int(c) for c in colors[classIDs[i]]]
            cv2.rectangle(image, (x, y), (x + w, y + h), color, 2)
            text = "{}: {:.4f}".format(labels[classIDs[i]], confidences[i])
            cv2.putText(image, text, (x, y - 5), cv2.FONT_HERSHEY_SIMPLEX, 0.5, color, 2)

    return image


def make_prediction(net, layer_names, labels, image, confidence, threshold):
    height, width = image.shape[:2]

    # Create a blob and pass it through the model
    blob = cv2.dnn.blobFromImage(image, 1 / 255.0, (416, 416), swapRB=True, crop=False)
    net.setInput(blob)
    outputs = net.forward(layer_names)

    # Extract bounding boxes, confidences and classIDs
    boxes, confidences, classIDs = extract_boxes_confidences_classids(outputs, confidence, width, height)

    # Apply Non-Max Suppression
    idxs = cv2.dnn.NMSBoxes(boxes, confidences, confidence, threshold)

    return boxes, confidences, classIDs, idxs


if __name__ == '__main__':
    parser = argparse.ArgumentParser()
    parser.add_argument('-w', '--weights', type=str, default='model/yolov3.weights', help='Path to model weights')
    parser.add_argument('-cfg', '--config', type=str, default='model/yolov3.cfg', help='Path to configuration file')
    parser.add_argument('-l', '--labels', type=str, default='model/coco.names', help='Path to label file')
    parser.add_argument('-c', '--confidence', type=float, default=0.5, help='Minimum confidence for a box to be detected.')
    parser.add_argument('-t', '--threshold', type=float, default=0.3, help='Threshold for Non-Max Suppression')
    parser.add_argument('-u', '--use_gpu', default=False, action='store_true', help='Use GPU (OpenCV must be compiled for GPU). For more info checkout: https://www.pyimagesearch.com/2020/02/03/how-to-use-opencvs-dnn-module-with-nvidia-gpus-cuda-and-cudnn/')
    parser.add_argument('-s', '--save', default=False, action='store_true', help='Whether or not the output should be saved')
    parser.add_argument('-sh', '--show', default=True, action="store_false", help='Show output')

    input_group = parser.add_mutually_exclusive_group()
    input_group.add_argument('-i', '--image_path', type=str, default='', help='Path to the image file.')
    input_group.add_argument('-v', '--video_path', type=str, default='', help='Path to the video file.')

    args = parser.parse_args()

    # Get the labels
    labels = open(args.labels).read().strip().split('\n')

    # Create a list of colors for the labels
    colors = np.random.randint(0, 255, size=(len(labels), 3), dtype='uint8')

    # Load weights using OpenCV
    net = cv2.dnn.readNetFromDarknet(args.config, args.weights)

    if args.use_gpu:
        print('Using GPU')
        net.setPreferableBackend(cv2.dnn.DNN_BACKEND_CUDA)
        net.setPreferableTarget(cv2.dnn.DNN_TARGET_CUDA)

    if args.save:
        print('Creating output directory if it doesn\'t already exist')
        os.makedirs('output', exist_ok=True)

    # Get the ouput layer names
    layer_names = net.getLayerNames()
    layer_names = [layer_names[i[0] - 1] for i in net.getUnconnectedOutLayers()]


    if args.image_path != '':
        image = cv2.imread(args.image_path)

        boxes, confidences, classIDs, idxs = make_prediction(net, layer_names, labels, image, args.confidence, args.threshold)

        image = draw_bounding_boxes(image, boxes, confidences, classIDs, idxs, colors)

        # show the output image
        if args.show:
            cv2.imshow('YOLO Object Detection', image)
            cv2.waitKey(0)

        if args.save:
            cv2.imwrite(f'output/{args.image_path.split("/")[-1]}', image)
    else:
        if args.video_path != '':
            cap = cv2.VideoCapture(args.video_path)
        else:
            cap = cv2.VideoCapture(0)

        if args.save:
            width = int(cap.get(3))
            height = int(cap.get(4))
            fps = cap.get(cv2.CAP_PROP_FPS)
            name = args.video_path.split("/")[-1] if args.video_path else 'camera.avi'
            out = cv2.VideoWriter(f'output/{name}', cv2.VideoWriter_fourcc('M','J','P','G'), fps, (width, height))

        while cap.isOpened():
            ret, image = cap.read()

            if not ret:
                print('Video file finished.')
                break

            boxes, confidences, classIDs, idxs = make_prediction(net, layer_names, labels, image, args.confidence, args.threshold)

            image = draw_bounding_boxes(image, boxes, confidences, classIDs, idxs, colors)

            if args.show:
                cv2.imshow('YOLO Object Detection', image)
                if cv2.waitKey(1) & 0xFF == ord('q'):
                    break

            if args.save:
                out.write(image)

        cap.release()
        if args.save:
            out.release()
    cv2.destroyAllWindows()
Now you can run YOLO object detection on a video by passing a video file with the --video_path argument.
!wget http://www.robots.ox.ac.uk/ActiveVision/Research/Projects/2009bbenfold_headpose/Datasets/TownCentreXVID.avi
!python3 yolo.py -w model/yolov3.weights -cfg model/yolov3.cfg -l model/coco.names -v TownCentreXVID.avi -s
Conclusion
In this article, you have learned how to perform YOLO object detection with OpenCV. If you have any questions or want to chat with me, feel free to contact me via EMAIL or social media.