
Object detection is the craft of detecting instances of a particular class, like animals, humans, and many more, in an image or video.
In this article, I will go over how to use a yolo3 object detection model and how to create your own using keras-yolo3, a Keras implementation of YOLOv3.
What is Yolo?
YOLO is one of the primary three types of object detectors you'll encounter:
- R-CNN
- SSD (Single Shot Detectors)
- YOLO (You only look once).
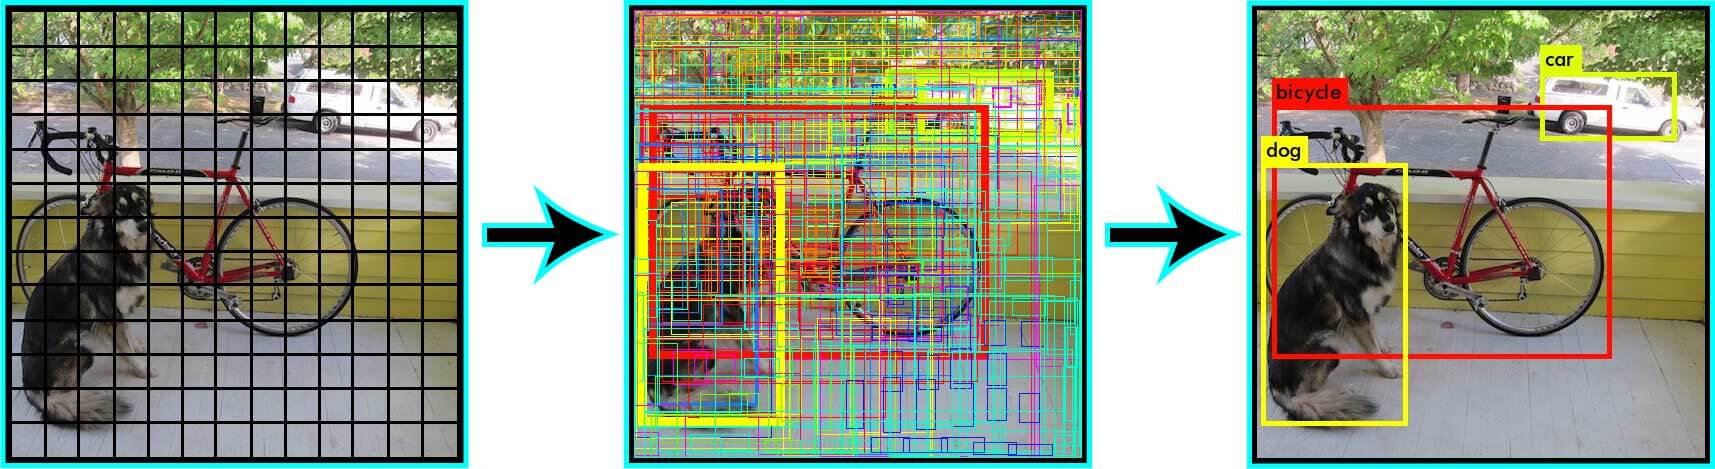
YOLO works differently than most other object detection architectures. Most methods apply the model to an image at multiple locations and scales. High scoring regions of the image are considered detections. Yolo, on the other hand, applies a single neural network to the full image. The network divides the image into regions and predicts bounding boxes and probabilities for each region. These bounding boxes are weighted by the predicted probabilities.
Check out the 'You Only Look Once:Unified, Real-Time Object Detection' for more information.
Installation
To run keras-yolo3, you'll have to install the following packages:
- Tensorflow
- Keras
- Pillow
The library was built for older Keras versions, so you might experience problems using the newest versions.
Tested versions:
- Keras 2.1.5
- Tensorflow 1.6.0
After you've installed the needed dependencies, you need to clone the repository using the following command:
git clone https://github.com/qqwweee/keras-yolo3.git
Using Docker
If you don't want to install keras-yolo3 locally, I created a Docker image, which will automatically install all the required dependencies and clone the repository.
You can find the Dockerfile and docker-compose.yml in the Docker directory.
Testing installation by running a pre-trained model
You can test your installation by following the below steps:
- Download YOLOv3 weights from the YOLO website.
- Convert the Darknet YOLO model to a Keras model.
- Run YOLO detection.
We'll work through this step-by-step.
You can download the weights for all YOLO models from https://pjreddie.com/. For example, I'll download the weights for the yolo3 model by running the below command:
wget https://pjreddie.com/media/files/yolov3.weights
The model can be converted to a Keras compatible file using the convert.py script.
python convert.py yolov3.cfg yolov3.weights model_data/yolo.h5
Now you should have a file called yolo.h5 in the model_data directory. This model can now be used for inference with the yolo_video.py file. Unfortunately, the yolo_video.py file in the repository contains a bug concerning the parsing of the argument. This was fixed by Github User Xiaokeai18, who opened a pull request fixing the error, which unfortunately wasn't accepted into the repository yet.
You can find the yolo_video.py change with the bug fixes in my Github repository.
Running the yolo_video.py script
Using the yolo_video.py script, you can run the object detection model on images and videos. You can find a list of all the arguments you can parse to yolo_video.py by specifying the --help flag.
usage: yolo_video.py [-h] [--model MODEL] [--anchors ANCHORS]
                     [--classes CLASSES] [--gpu_num GPU_NUM] [--image]
                     [--input] [--output]

positional arguments:
  --input        Video input path
  --output       Video output path

optional arguments:
  -h, --help         show this help message and exit
  --model MODEL      path to model weight file, default model_data/yolo.h5
  --anchors ANCHORS  path to anchor definitions, default
                     model_data/yolo_anchors.txt
  --classes CLASSES  path to class definitions, default
                     model_data/coco_classes.txt
  --gpu_num GPU_NUM  Number of GPU to use, default 1
  --image            Image detection mode, will ignore all positional arguments
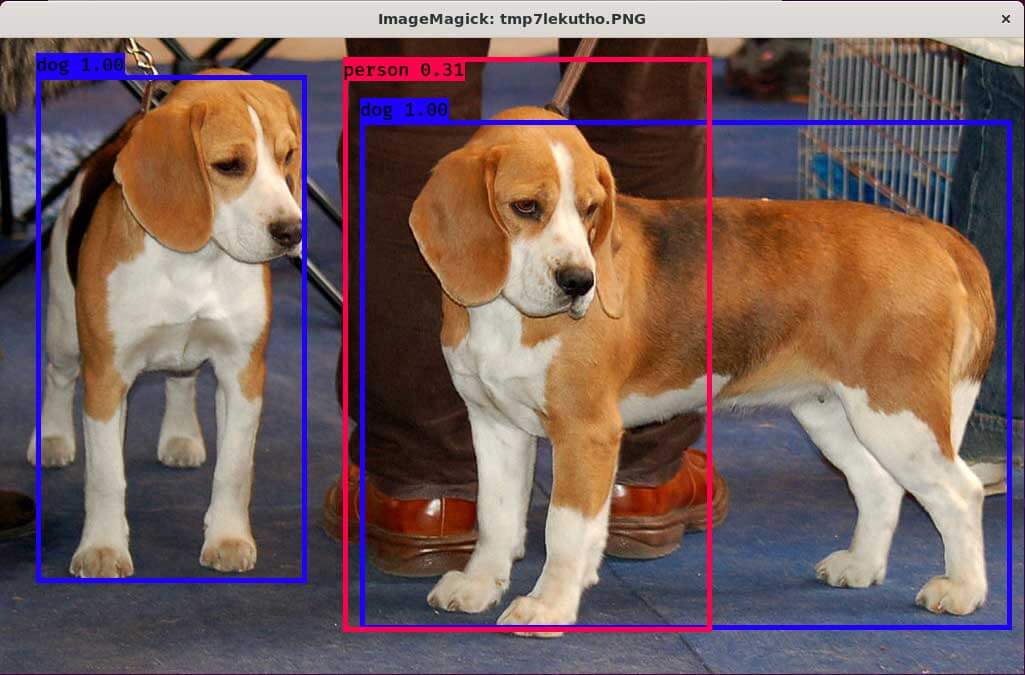
Running model on an image:
wget https://raw.githubusercontent.com/tensorflow/models/master/research/object_detection/test_images/image1.jpg

python yolo_video.py --model model_data/yolo.h5 --classes model_data/coco_classes.txt --image
After entering the above commands, the model will load into memory, and you'll be able to specify the path to an image. After specifying the path, the model will try to detect all objects inside that image and show the result using matplotlib.
Running model on video
If you don't specify the --image flag, you'll have to specify the path to a video and a path to save the output in.
wget http://www.robots.ox.ac.uk/ActiveVision/Research/Projects/2009bbenfold_headpose/Datasets/TownCentreXVID.avi

python yolo_video.py --input TownCentreXVID.avi --output pedestrian_detection.avi
Training a custom model
keras-yolo3 also allows you to train your own custom YOLO models. To do so, you need to follow the below steps (taken from the official README):
- Generate your own annotation file and class names file.
One row for one image;
Row format:image_file_path box1 box2 ... boxN;
Box format:x_min,y_min,x_max,y_max,class_id(no space).
For a VOC dataset, trypython voc_annotation.py
Here is an example:
path/to/img1.jpg 50,100,150,200,0 30,50,200,120,3
path/to/img2.jpg 120,300,250,600,2
...
2. Make sure you have run python convert.py -w yolov3.cfg yolov3.weights model_data/yolo_weights.h5. The file model_data/yolo_weights.h5 is used to load pretrained weights.
3. Modify train.py and start training.python train.py
Use your trained weights or checkpoint weights with the command-line option --model model_file when using yolo_video.py. Remember to modify the class path or anchor path with --classes class_file and --anchors anchor_file.
Training custom model example
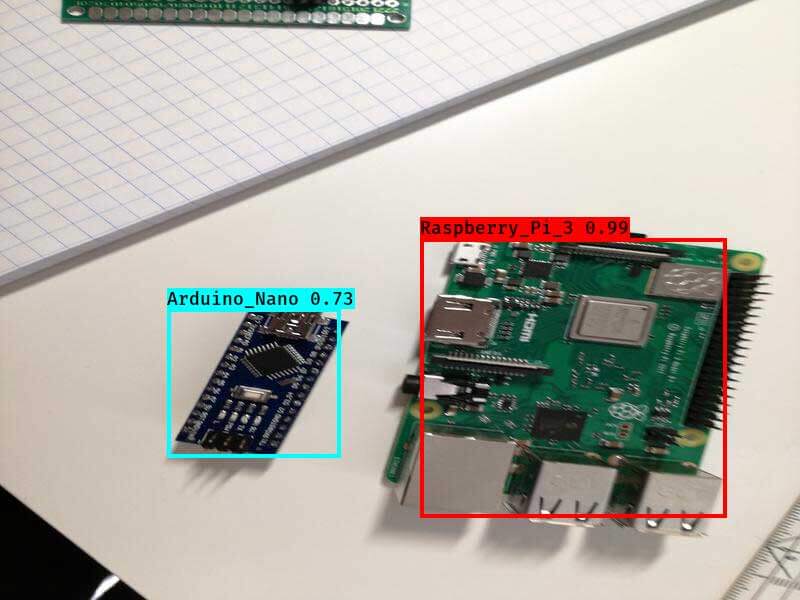
To make the steps more transparent, we'll work through a real-world example. For the example, we'll use my microcontroller detection data-set, which is available on my Kaggle account.
kaggle datasets download -d tannergi/microcontroller-detection
1. Generate your own annotation file and class names file.
We have two options to generate the Yolo txt file from the microcontroller-detection data-set. We can either read in the CSV files generated with the xml_to_csv.py file, or we can load in the XML files generated with labelImg directly.
CSV to txt
You can convert the CSV file to txt by executing the csv_to_yolo_annotation.py script.
usage: csv_to_yolo_annotation.py [-h] -i INPUT [-f FOLDER] [-o OUTPUT]

CSV to Yolo

optional arguments:
  -h, --help            show this help message and exit
  -i INPUT, --input INPUT
                        Path to csv file
  -f FOLDER, --folder FOLDER
                        Image folder (if filenames are relativ)
  -o OUTPUT, --output OUTPUT
                        Output path
For the microcontroller_dataset, the command looks like the following:
python csv_to_yolo_annotation.py -i train_labels.py -f train -o ./
XML to TXT
You can convert the XML file to txt by executing the voc_annotation.py script.
usage: voc_annotation.py [-h] -i INPUT [-f FOLDER] -c CLASSES [CLASSES ...]
                         [-o OUTPUT]

VOC to YOLO

optional arguments:
  -h, --help            show this help message and exit
  -i INPUT, --input INPUT
                        Path to input folder
  -f FOLDER, --folder FOLDER
                        Image folder (if filenames are relativ)
  -c CLASSES [CLASSES ...], --classes CLASSES [CLASSES ...]
                        Classes
  -o OUTPUT, --output OUTPUT
                        Output path
For the microcontroller_dataset, the command looks like the following:
python voc_annotation.py -i train/ -f train/ -c Arduino_Nano Heltec_ESP32_Lora ESP8266 Raspberry_Pi_3 -o ./
2. Make sure you have run python convert.py -w yolov3.cfg yolov3.weights model_data/yolo_weights.h5. The file model_data/yolo_weights.h5 is used to load pretrained weights.
3. Modify train.py and start training.
Inside the train.py file, you'll have to change the annotation_path and classes_path to match the paths to the files created in step 1. Depending on how much VRAM your graphics card has, you also might need to change the batch_size in lines 57 and 76. After changing the train.py file, you can start training by calling python train.py. This will start the training process and save all the files inside the specified log directory.
Using the custom model
After the training has finished, you can use the model as I described in the "Testing installation by running a pre-trained model" section.
python yolo_video.py --model logs/000/trained_weights_final.h5 --classes classes.txt --image
Conclusion
YOLO is one of the primary three types of object detectors you'll encounter. It works by dividing the image into regions and predicting bounding boxes and probabilities for each region. keras-yolo3 is a library that allows us to use and train YOLO models in Python with Keras.
That's all from this article. If you have any questions or want to chat with me, feel free to contact me via EMAIL or social media.