
Over the last year, the Tensorflow Object Detection API (OD API) team migrated the OD API to support Tensorflow 2. Now, the waiting has finally come to an end. The Tensorflow Object Detection API officially supports Tensorflow 2 now.
The release includes:
- New binaries for train/eval/export that are eager mode compatible
- A suite of TF2 compatible (Keras-based) models – including popular TF1 models like MobileNET and Faster R-CNN – as well as a few new architectures including CenterNet, a simple and effective anchor-free architecture based on the recent Objects as Points paper and EfficientDet – a recent family of SOTA models discovered with the help of Neural Architecture Search.
- COCO pre-trained weights for all of the models provided as TF2 style object-based checkpoints
- Access to DistributionStrategies for distributed training
- Colab demonstrations of eager mode compatible few-shot training and inference
- First-class support for keypoint estimation, including multi-class estimation, more data augmentation support, better visualizations, and COCO evaluation.
For more information, check out their blog post.
In this article, I will walk you through the most important information about the new update, including:
- How to install the Tensorflow Object Detection API
- How to run a pre-trained model on an image and a video stream
- How to fine-tune a pre-trained model on custom data
Installation
You can install the TensorFlow Object Detection API with Python Package Installer (pip) or Docker, an open-source platform for deploying and managing containerized applications. For running the Tensorflow Object Detection API locally, Docker is recommended. If you aren't familiar with Docker though, it might be easier to install it using pip.
First clone the master branch of the Tensorflow Models repository:
git clone https://github.com/tensorflow/models.git
Docker Installation
# From the root of the git repository (inside the models directory)
docker build -f research/object_detection/dockerfiles/tf2/Dockerfile -t od .
docker run -it od
Python Package Installation
cd models/research
# Compile protos.
protoc object_detection/protos/*.proto --python_out=.
# Install TensorFlow Object Detection API.
cp object_detection/packages/tf2/setup.py .
python -m pip install .
Note: The *.proto designating all files does not work protobuf version 3.5 and higher. If you are using version 3.5, you have to go through each file individually. To make this easier, I created a python script that loops through a directory and converts all proto files one at a time.
import os
import sys
args = sys.argv
directory = args[1]
protoc_path = args[2]
for file in os.listdir(directory):
    if file.endswith(".proto"):
        os.system(protoc_path+" "+directory+"/"+file+" --python_out=.")
python use_protobuf.py <path to directory> <path to protoc file>
To test the installation run:
# Test the installation.
python object_detection/builders/model_builder_tf2_test.py
If everything was installed correctly, you should see something like:
...
[       OK ] ModelBuilderTF2Test.test_create_ssd_models_from_config
[ RUN      ] ModelBuilderTF2Test.test_invalid_faster_rcnn_batchnorm_update
[       OK ] ModelBuilderTF2Test.test_invalid_faster_rcnn_batchnorm_update
[ RUN      ] ModelBuilderTF2Test.test_invalid_first_stage_nms_iou_threshold
[       OK ] ModelBuilderTF2Test.test_invalid_first_stage_nms_iou_threshold
[ RUN      ] ModelBuilderTF2Test.test_invalid_model_config_proto
[       OK ] ModelBuilderTF2Test.test_invalid_model_config_proto
[ RUN      ] ModelBuilderTF2Test.test_invalid_second_stage_batch_size
[       OK ] ModelBuilderTF2Test.test_invalid_second_stage_batch_size
[ RUN      ] ModelBuilderTF2Test.test_session
[  SKIPPED ] ModelBuilderTF2Test.test_session
[ RUN      ] ModelBuilderTF2Test.test_unknown_faster_rcnn_feature_extractor
[       OK ] ModelBuilderTF2Test.test_unknown_faster_rcnn_feature_extractor
[ RUN      ] ModelBuilderTF2Test.test_unknown_meta_architecture
[       OK ] ModelBuilderTF2Test.test_unknown_meta_architecture
[ RUN      ] ModelBuilderTF2Test.test_unknown_ssd_feature_extractor
[       OK ] ModelBuilderTF2Test.test_unknown_ssd_feature_extractor
----------------------------------------------------------------------
Ran 20 tests in 91.767s

OK (skipped=1)
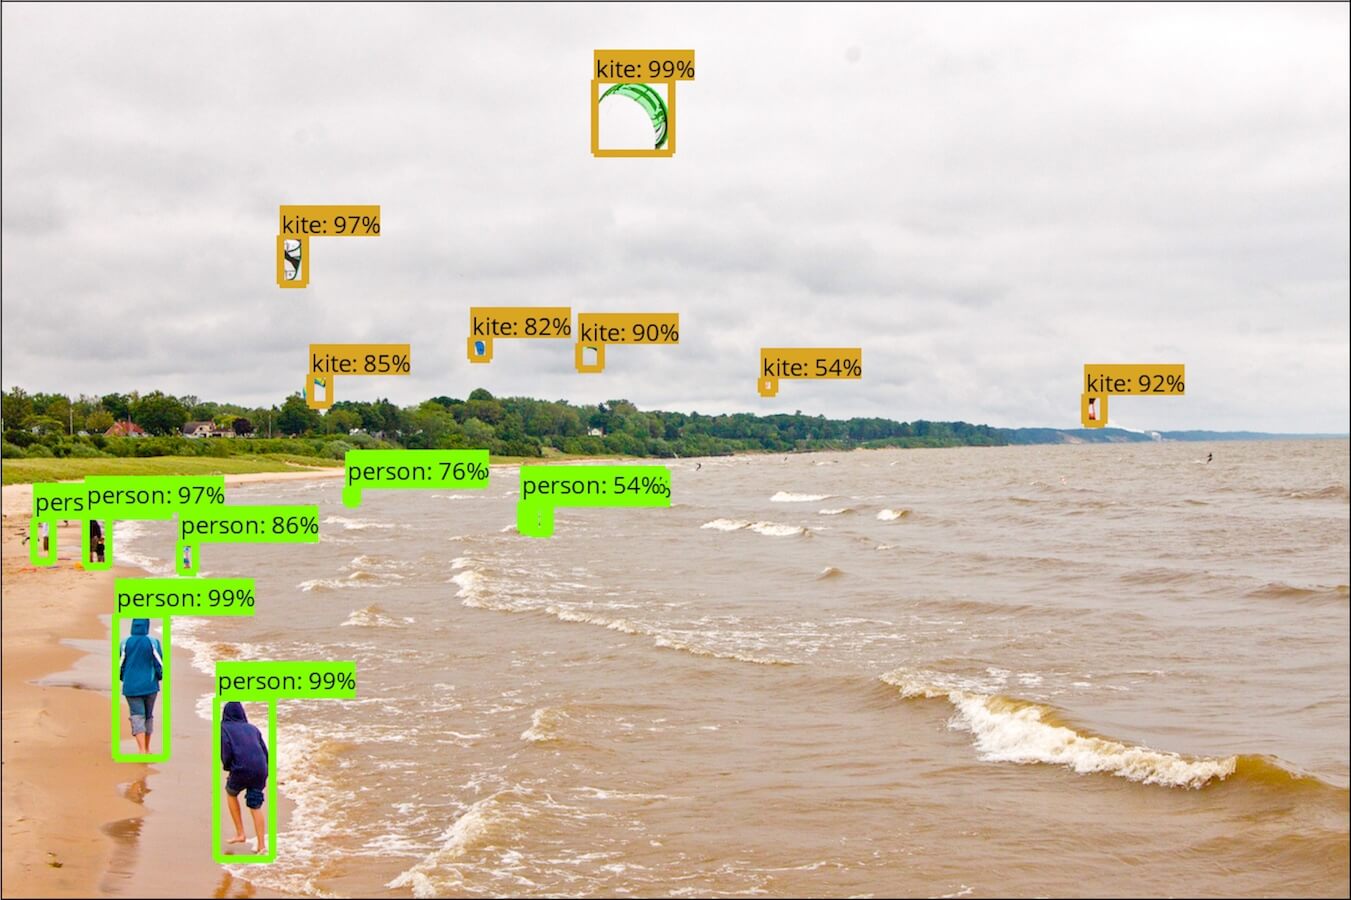
Run a pre-trained model
The object_detection_tutorial.ipynb notebook walks you through the process of using a pre-trained model to detect objects in an image. To try it out, I recommend running it inside Google Colab.
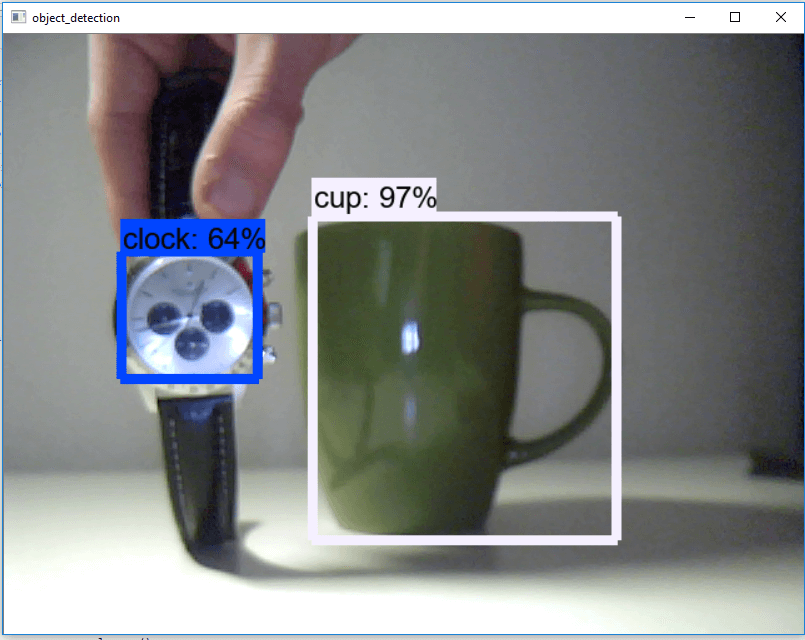
Use object detection on a video stream
The above example can be easily rewritten to work with video streams by replacing the show_inference method with:
import cv2
cap = cv2.VideoCapture(0) # or cap = cv2.VideoCapture("<video-path>")

def run_inference(model, cap):
    while cap.isOpened():
        ret, image_np = cap.read()
        # Actual detection.
        output_dict = run_inference_for_single_image(model, image_np)
        # Visualization of the results of a detection.
        vis_util.visualize_boxes_and_labels_on_image_array(
            image_np,
            output_dict['detection_boxes'],
            output_dict['detection_classes'],
            output_dict['detection_scores'],
            category_index,
            instance_masks=output_dict.get('detection_masks_reframed', None),
            use_normalized_coordinates=True,
            line_thickness=8)
        cv2.imshow('object_detection', cv2.resize(image_np, (800, 600)))
        if cv2.waitKey(25) & 0xFF == ord('q'):
            cap.release()
            cv2.destroyAllWindows()
            break

run_inference(detection_model, cap)
You can find the code as a notebook or python file on my Github.
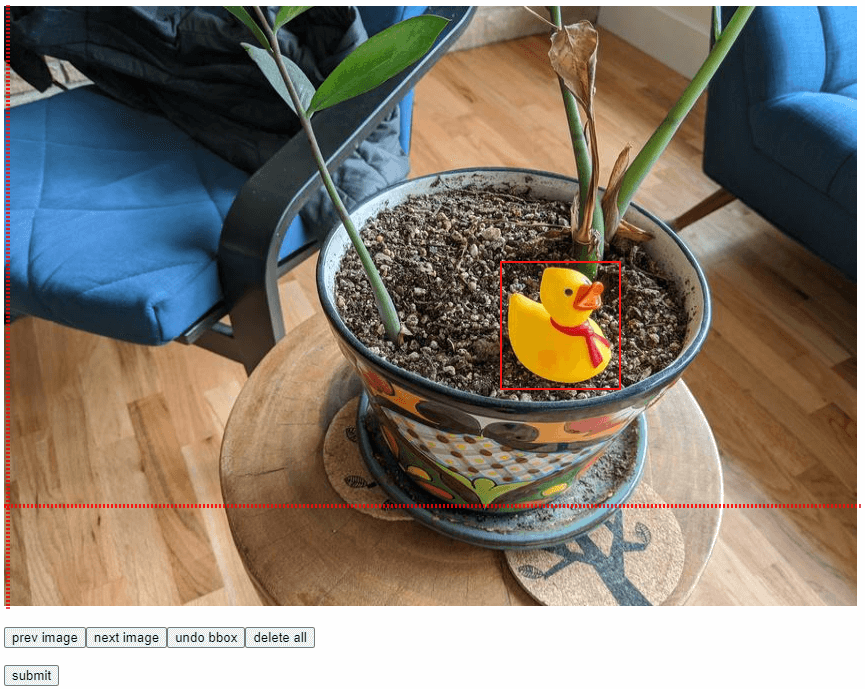
Fine-tune a pre-trained model on custom data
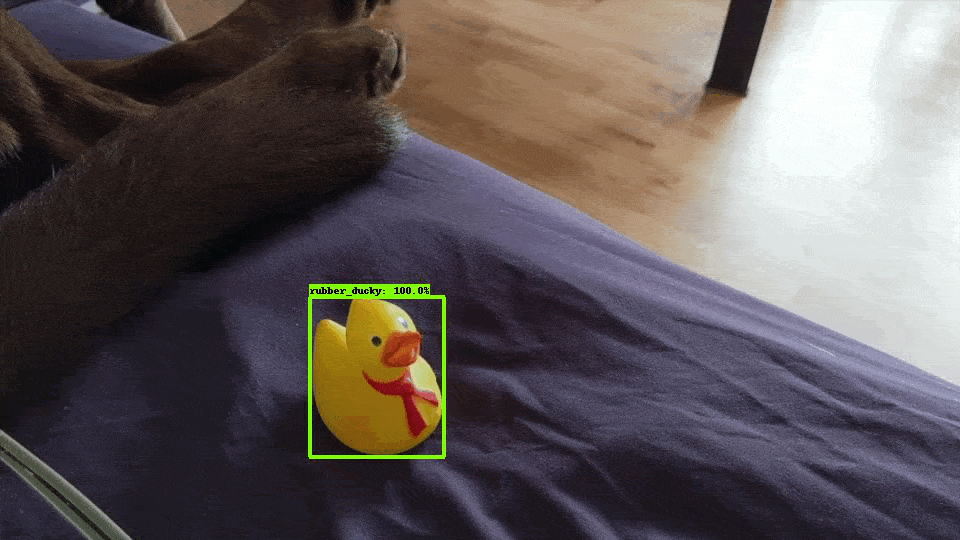
The new release also comes with another notebook showing us how to fine-tune a RetinaNet pre-trained model to detect rubber duckies with only 5 images and <5 minutes of training time in Google Colab.
Inside the notebook, they first import all the needed libraries and load the images into memory. After that, they label the images. For this, they provide two cells. One of them has hardcoded labels, while the other shows a new OD API utility for Google Colab that allows you to label images.
// Hardcoded labes for the five images
gt_boxes = [
            np.array([[0.436, 0.591, 0.629, 0.712]], dtype=np.float32),
            np.array([[0.539, 0.583, 0.73, 0.71]], dtype=np.float32),
            np.array([[0.464, 0.414, 0.626, 0.548]], dtype=np.float32),
            np.array([[0.313, 0.308, 0.648, 0.526]], dtype=np.float32),
            np.array([[0.256, 0.444, 0.484, 0.629]], dtype=np.float32)
]
// Label images yourself
gt_boxes = []
colab_utils.annotate(train_images_np, box_storage_pointer=gt_boxes)
Then they convert the boxes and labels (in this case, there is only one label) to tensors and one-hot encode the labels.
# By convention, our non-background classes start counting at 1.  Given
# that we will be predicting just one class, we will therefore assign it a
# `class id` of 1.
duck_class_id = 1
num_classes = 1

category_index = {duck_class_id: {'id': duck_class_id, 'name': 'rubber_ducky'}}

# Convert class labels to one-hot; convert everything to tensors.
# The `label_id_offset` here shifts all classes by a certain number of indices;
# we do this here so that the model receives one-hot labels where non-background
# classes start counting at the zeroth index.  This is ordinarily just handled
# automatically in our training binaries, but we need to reproduce it here.
label_id_offset = 1
train_image_tensors = []
gt_classes_one_hot_tensors = []
gt_box_tensors = []
for (train_image_np, gt_box_np) in zip(
    train_images_np, gt_boxes):
  train_image_tensors.append(tf.expand_dims(tf.convert_to_tensor(
      train_image_np, dtype=tf.float32), axis=0))
  gt_box_tensors.append(tf.convert_to_tensor(gt_box_np, dtype=tf.float32))
  zero_indexed_groundtruth_classes = tf.convert_to_tensor(
      np.ones(shape=[gt_box_np.shape[0]], dtype=np.int32) - label_id_offset)
  gt_classes_one_hot_tensors.append(tf.one_hot(
      zero_indexed_groundtruth_classes, num_classes))
print('Done prepping data.')
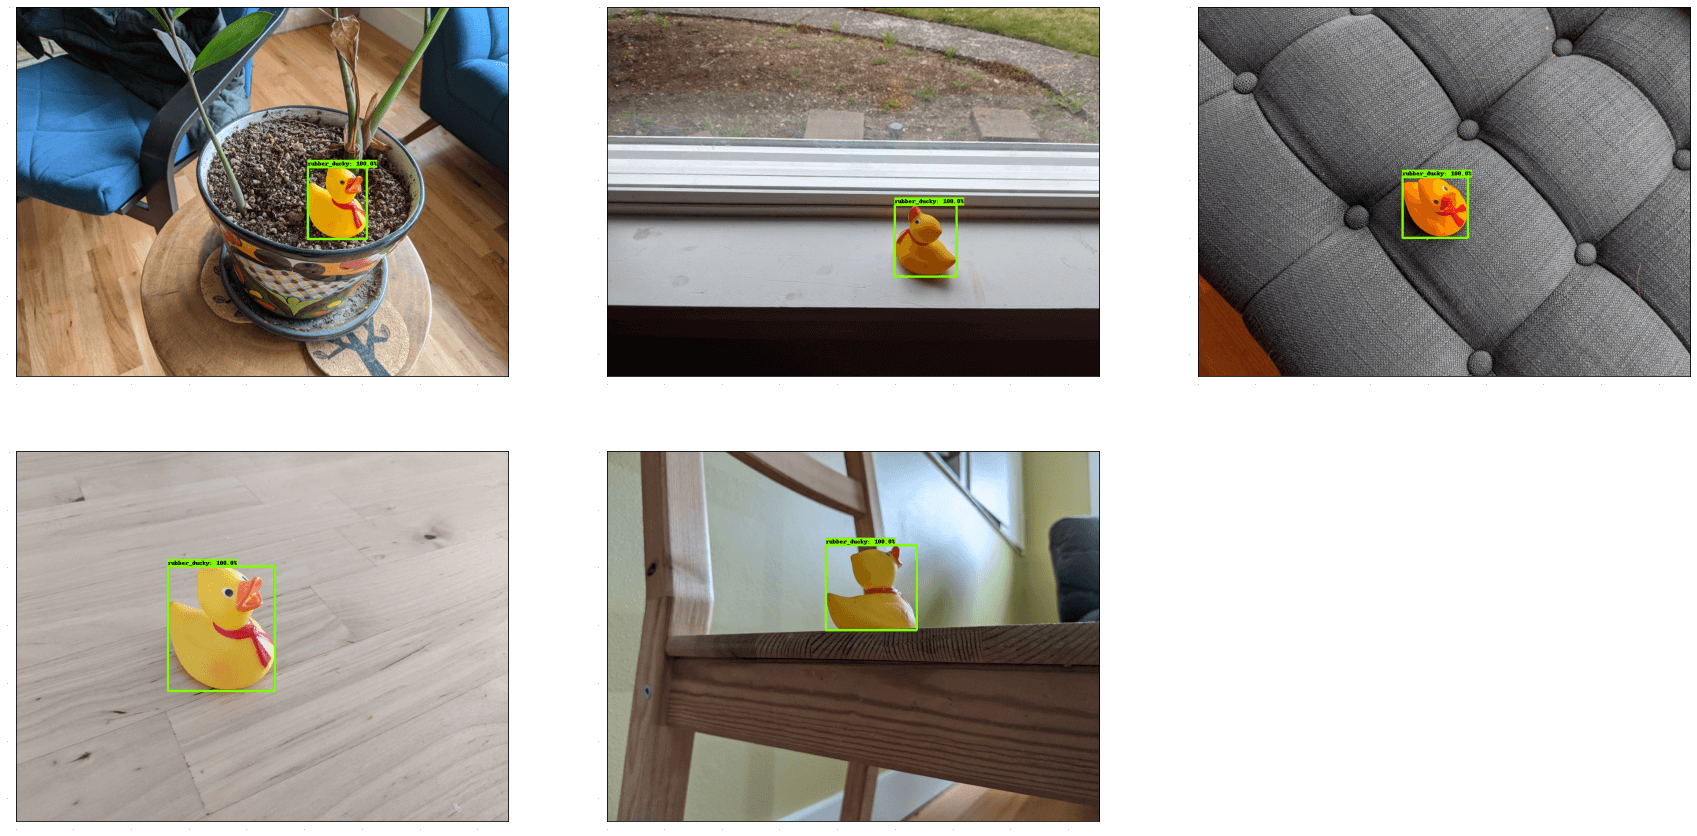
The data can now be displayed using the plot_detections method.
dummy_scores = np.array([1.0], dtype=np.float32)  # give boxes a score of 100%

plt.figure(figsize=(30, 15))
for idx in range(5):
  plt.subplot(2, 3, idx+1)
  plot_detections(
      train_images_np[idx],
      gt_boxes[idx],
      np.ones(shape=[gt_boxes[idx].shape[0]], dtype=np.int32),
      dummy_scores, category_index)
plt.show()
Now that they have the data, they download the RetinaNet model from the model zoo and load it into memory.
# Download the checkpoint and put it into models/research/object_detection/test_data/

!wget http://download.tensorflow.org/models/object_detection/tf2/20200711/ssd_resnet50_v1_fpn_640x640_coco17_tpu-8.tar.gz
!tar -xf ssd_resnet50_v1_fpn_640x640_coco17_tpu-8.tar.gz
!mv ssd_resnet50_v1_fpn_640x640_coco17_tpu-8/checkpoint models/research/object_detection/test_data/

tf.keras.backend.clear_session()

print('Building model and restoring weights for fine-tuning...', flush=True)
num_classes = 1
pipeline_config = 'models/research/object_detection/configs/tf2/ssd_resnet50_v1_fpn_640x640_coco17_tpu-8.config'
checkpoint_path = 'models/research/object_detection/test_data/checkpoint/ckpt-0'

# Load pipeline config and build a detection model.
#
# Since we are working off of a COCO architecture which predicts 90
# class slots by default, we override the `num_classes` field here to be just
# one (for our new rubber ducky class).
configs = config_util.get_configs_from_pipeline_file(pipeline_config)
model_config = configs['model']
model_config.ssd.num_classes = num_classes
model_config.ssd.freeze_batchnorm = True
detection_model = model_builder.build(
      model_config=model_config, is_training=True)

# Set up object-based checkpoint restore --- RetinaNet has two prediction
# `heads` --- one for classification, the other for box regression.  We will
# restore the box regression head but initialize the classification head
# from scratch (we show the omission below by commenting out the line that
# we would add if we wanted to restore both heads)
fake_box_predictor = tf.compat.v2.train.Checkpoint(
    _base_tower_layers_for_heads=detection_model._box_predictor._base_tower_layers_for_heads,
    # _prediction_heads=detection_model._box_predictor._prediction_heads,
    #    (i.e., the classification head that we *will not* restore)
    _box_prediction_head=detection_model._box_predictor._box_prediction_head,
    )
fake_model = tf.compat.v2.train.Checkpoint(
          _feature_extractor=detection_model._feature_extractor,
          _box_predictor=fake_box_predictor)
ckpt = tf.compat.v2.train.Checkpoint(model=fake_model)
ckpt.restore(checkpoint_path).expect_partial()

# Run model through a dummy image so that variables are created
image, shapes = detection_model.preprocess(tf.zeros([1, 640, 640, 3]))
prediction_dict = detection_model.predict(image, shapes)
_ = detection_model.postprocess(prediction_dict, shapes)
print('Weights restored!')
Lastly, the notebook retrains the model using a custom training loop.
tf.keras.backend.set_learning_phase(True)

# These parameters can be tuned; since our training set has 5 images
# it doesn't make sense to have a much larger batch size, though we could
# fit more examples in memory if we wanted to.
batch_size = 4
learning_rate = 0.01
num_batches = 100

# Select variables in top layers to fine-tune.
trainable_variables = detection_model.trainable_variables
to_fine_tune = []
prefixes_to_train = [
  'WeightSharedConvolutionalBoxPredictor/WeightSharedConvolutionalBoxHead',
  'WeightSharedConvolutionalBoxPredictor/WeightSharedConvolutionalClassHead']
for var in trainable_variables:
  if any([var.name.startswith(prefix) for prefix in prefixes_to_train]):
    to_fine_tune.append(var)

# Set up forward + backward pass for a single train step.
def get_model_train_step_function(model, optimizer, vars_to_fine_tune):
  """Get a tf.function for training step."""

  # Use tf.function for a bit of speed.
  # Comment out the tf.function decorator if you want the inside of the
  # function to run eagerly.
  @tf.function
  def train_step_fn(image_tensors,
                    groundtruth_boxes_list,
                    groundtruth_classes_list):
    """A single training iteration.

    Args:
      image_tensors: A list of [1, height, width, 3] Tensor of type tf.float32.
        Note that the height and width can vary across images, as they are
        reshaped within this function to be 640x640.
      groundtruth_boxes_list: A list of Tensors of shape [N_i, 4] with type
        tf.float32 representing groundtruth boxes for each image in the batch.
      groundtruth_classes_list: A list of Tensors of shape [N_i, num_classes]
        with type tf.float32 representing groundtruth boxes for each image in
        the batch.

    Returns:
      A scalar tensor representing the total loss for the input batch.
    """
    shapes = tf.constant(batch_size * [[640, 640, 3]], dtype=tf.int32)
    model.provide_groundtruth(
        groundtruth_boxes_list=groundtruth_boxes_list,
        groundtruth_classes_list=groundtruth_classes_list)
    with tf.GradientTape() as tape:
      preprocessed_images = tf.concat(
          [detection_model.preprocess(image_tensor)[0]
           for image_tensor in image_tensors], axis=0)
      prediction_dict = model.predict(preprocessed_images, shapes)
      losses_dict = model.loss(prediction_dict, shapes)
      total_loss = losses_dict['Loss/localization_loss'] + losses_dict['Loss/classification_loss']
      gradients = tape.gradient(total_loss, vars_to_fine_tune)
      optimizer.apply_gradients(zip(gradients, vars_to_fine_tune))
    return total_loss

  return train_step_fn

optimizer = tf.keras.optimizers.SGD(learning_rate=learning_rate, momentum=0.9)
train_step_fn = get_model_train_step_function(
    detection_model, optimizer, to_fine_tune)

print('Start fine-tuning!', flush=True)
for idx in range(num_batches):
  # Grab keys for a random subset of examples
  all_keys = list(range(len(train_images_np)))
  random.shuffle(all_keys)
  example_keys = all_keys[:batch_size]

  # Note that we do not do data augmentation in this demo.  If you want a
  # a fun exercise, we recommend experimenting with random horizontal flipping
  # and random cropping :)
  gt_boxes_list = [gt_box_tensors[key] for key in example_keys]
  gt_classes_list = [gt_classes_one_hot_tensors[key] for key in example_keys]
  image_tensors = [train_image_tensors[key] for key in example_keys]

  # Training step (forward pass + backwards pass)
  total_loss = train_step_fn(image_tensors, gt_boxes_list, gt_classes_list)

  if idx % 10 == 0:
    print('batch ' + str(idx) + ' of ' + str(num_batches)
    + ', loss=' +  str(total_loss.numpy()), flush=True)

print('Done fine-tuning!')
The training only takes a couple of seconds but gives impressive results.
Conclusion
The Tensorflow Object Detection API now officially supports Tensorflow 2, and with the release come exciting features, including:
- New binaries for train/eval/export that are eager mode compatible
- A suite of TF2 compatible (Keras-based) models – including popular TF1 models like MobileNET and Faster R-CNN – as well as a few new architectures including CenterNet, a simple and effective anchor-free architecture based on the recent Objects as Points paper and EfficientDet – a recent family of SOTA models discovered with the help of Neural Architecture Search.
In this article, I tried to give you a basic overview of the most significant changes. If you want to train your own custom object detection model with the Tensorflow Object Detection API, check out my article.