The Arduino Nano 33 BLE Sense is an evolution of the traditional Arduino Nano, but featuring a lot more powerful processor, the nRF52840 from Nordic Semiconductors, a 32-bit ARM® Cortex™-M4 CPU running at 64 MHz. This will allow you to make larger programs than with the Arduino Uno (it has 1MB of program memory, 32 times bigger), and with a lot more variables (the RAM is 128 times bigger). The main processor includes other amazing features like Bluetooth® pairing via NFC and ultra low power consumption modes. - ARDUINO NANO 33 BLE SENSE Official Website
Buy the Arduino Nano 33 BLE Sense:
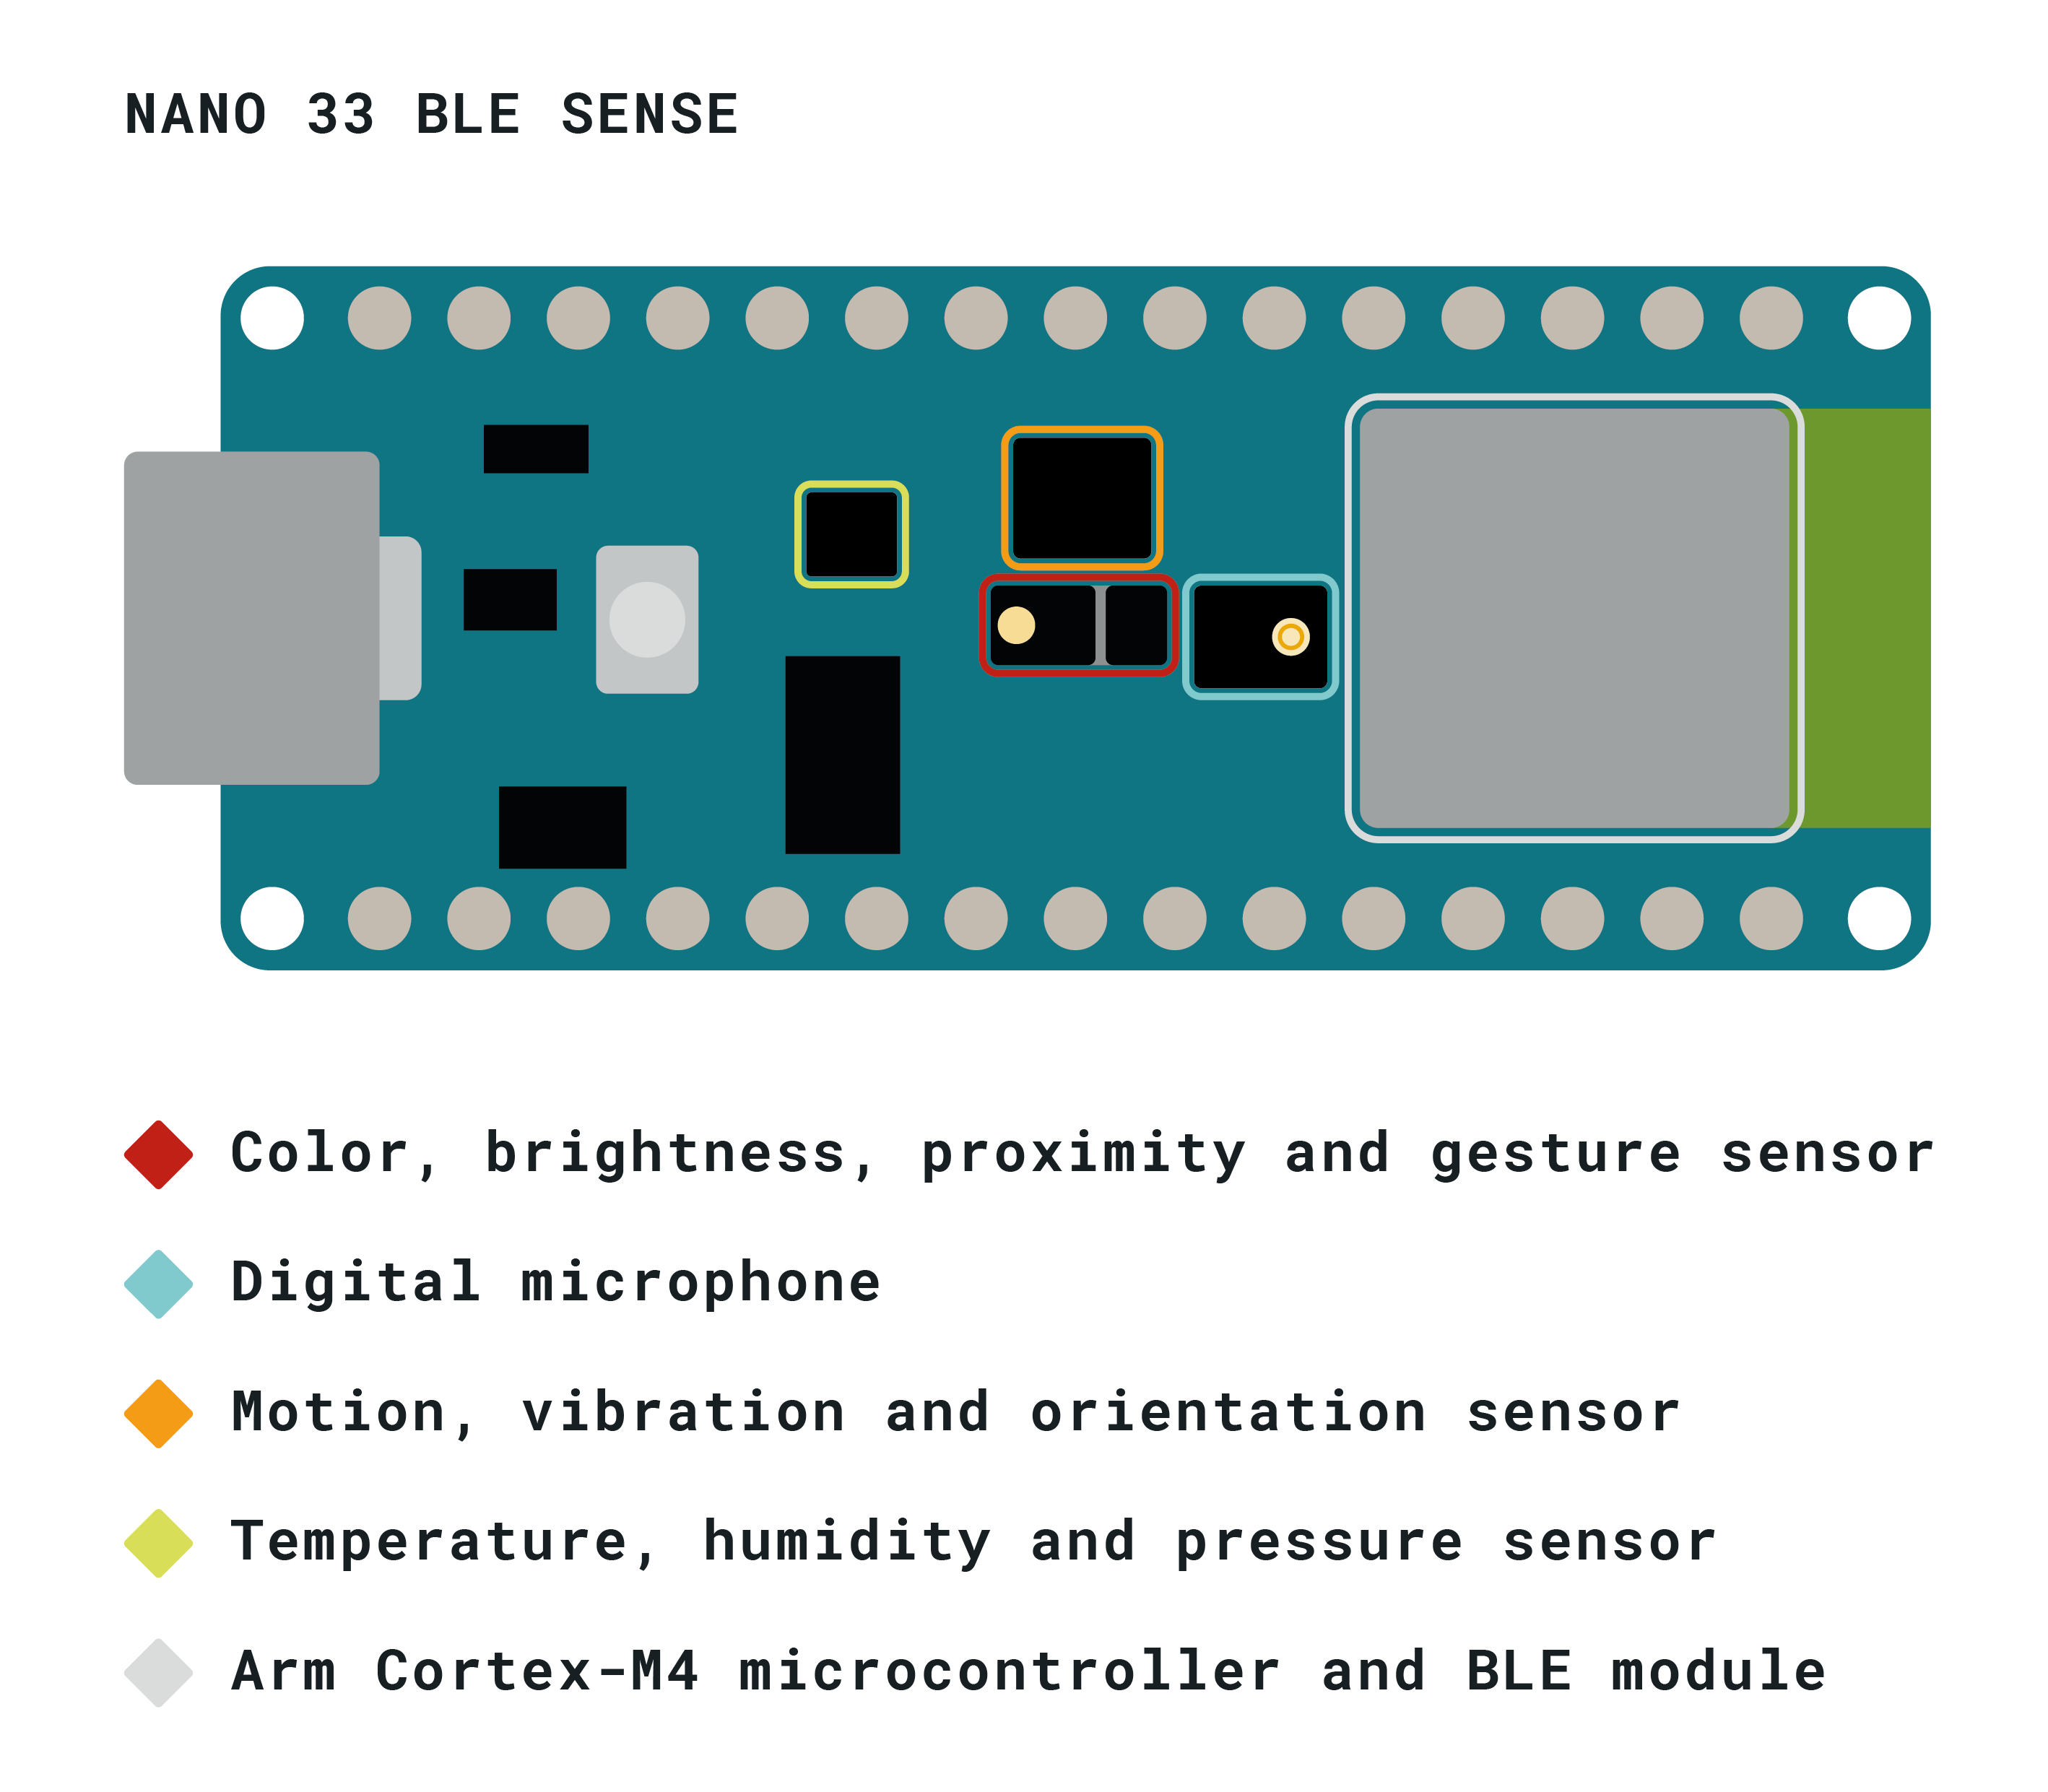
Hardware Overview
| Microcontroller | nRF52840 (datasheet) |
| Operating Voltage | 3.3V |
| Input Voltage (limit) | 21V |
| DC Current per I/O Pin | 15mA |
| Clock Speed | 64MHz |
| CPU Flash Memory | 1MB (nRF52840) |
| SRAM | 256KB (nRF52840) |
| EEPROM | none |
| Digital Input / Output Pins | 14 |
| PWM Pins | all digital pins |
| UART | 1 |
| SPI | 1 |
| I2C | 1 |
| Analog Input Pins | 8 (ADC 12 bit 200 ksamples) |
| Analog Output Pins | Only through PWM (no DAC) |
| External Interrupts | all digital pins |
| LED_BUILTIN | 13 |
| USB | Native in the nRF52840 Processor |
| IMU | LSM9DS1 (datasheet) |
| Microphone | MP34DT05 (datasheet) |
| Gesture, light, proximity | APDS9960 (datasheet) |
| Barometric pressure | LPS22HB (datasheet) |
| Temperature, humidity | HTS221 (datasheet) |
| Length | 45 mm |
| Width | 18 mm |
| Weight | 5 gr (with headers) |
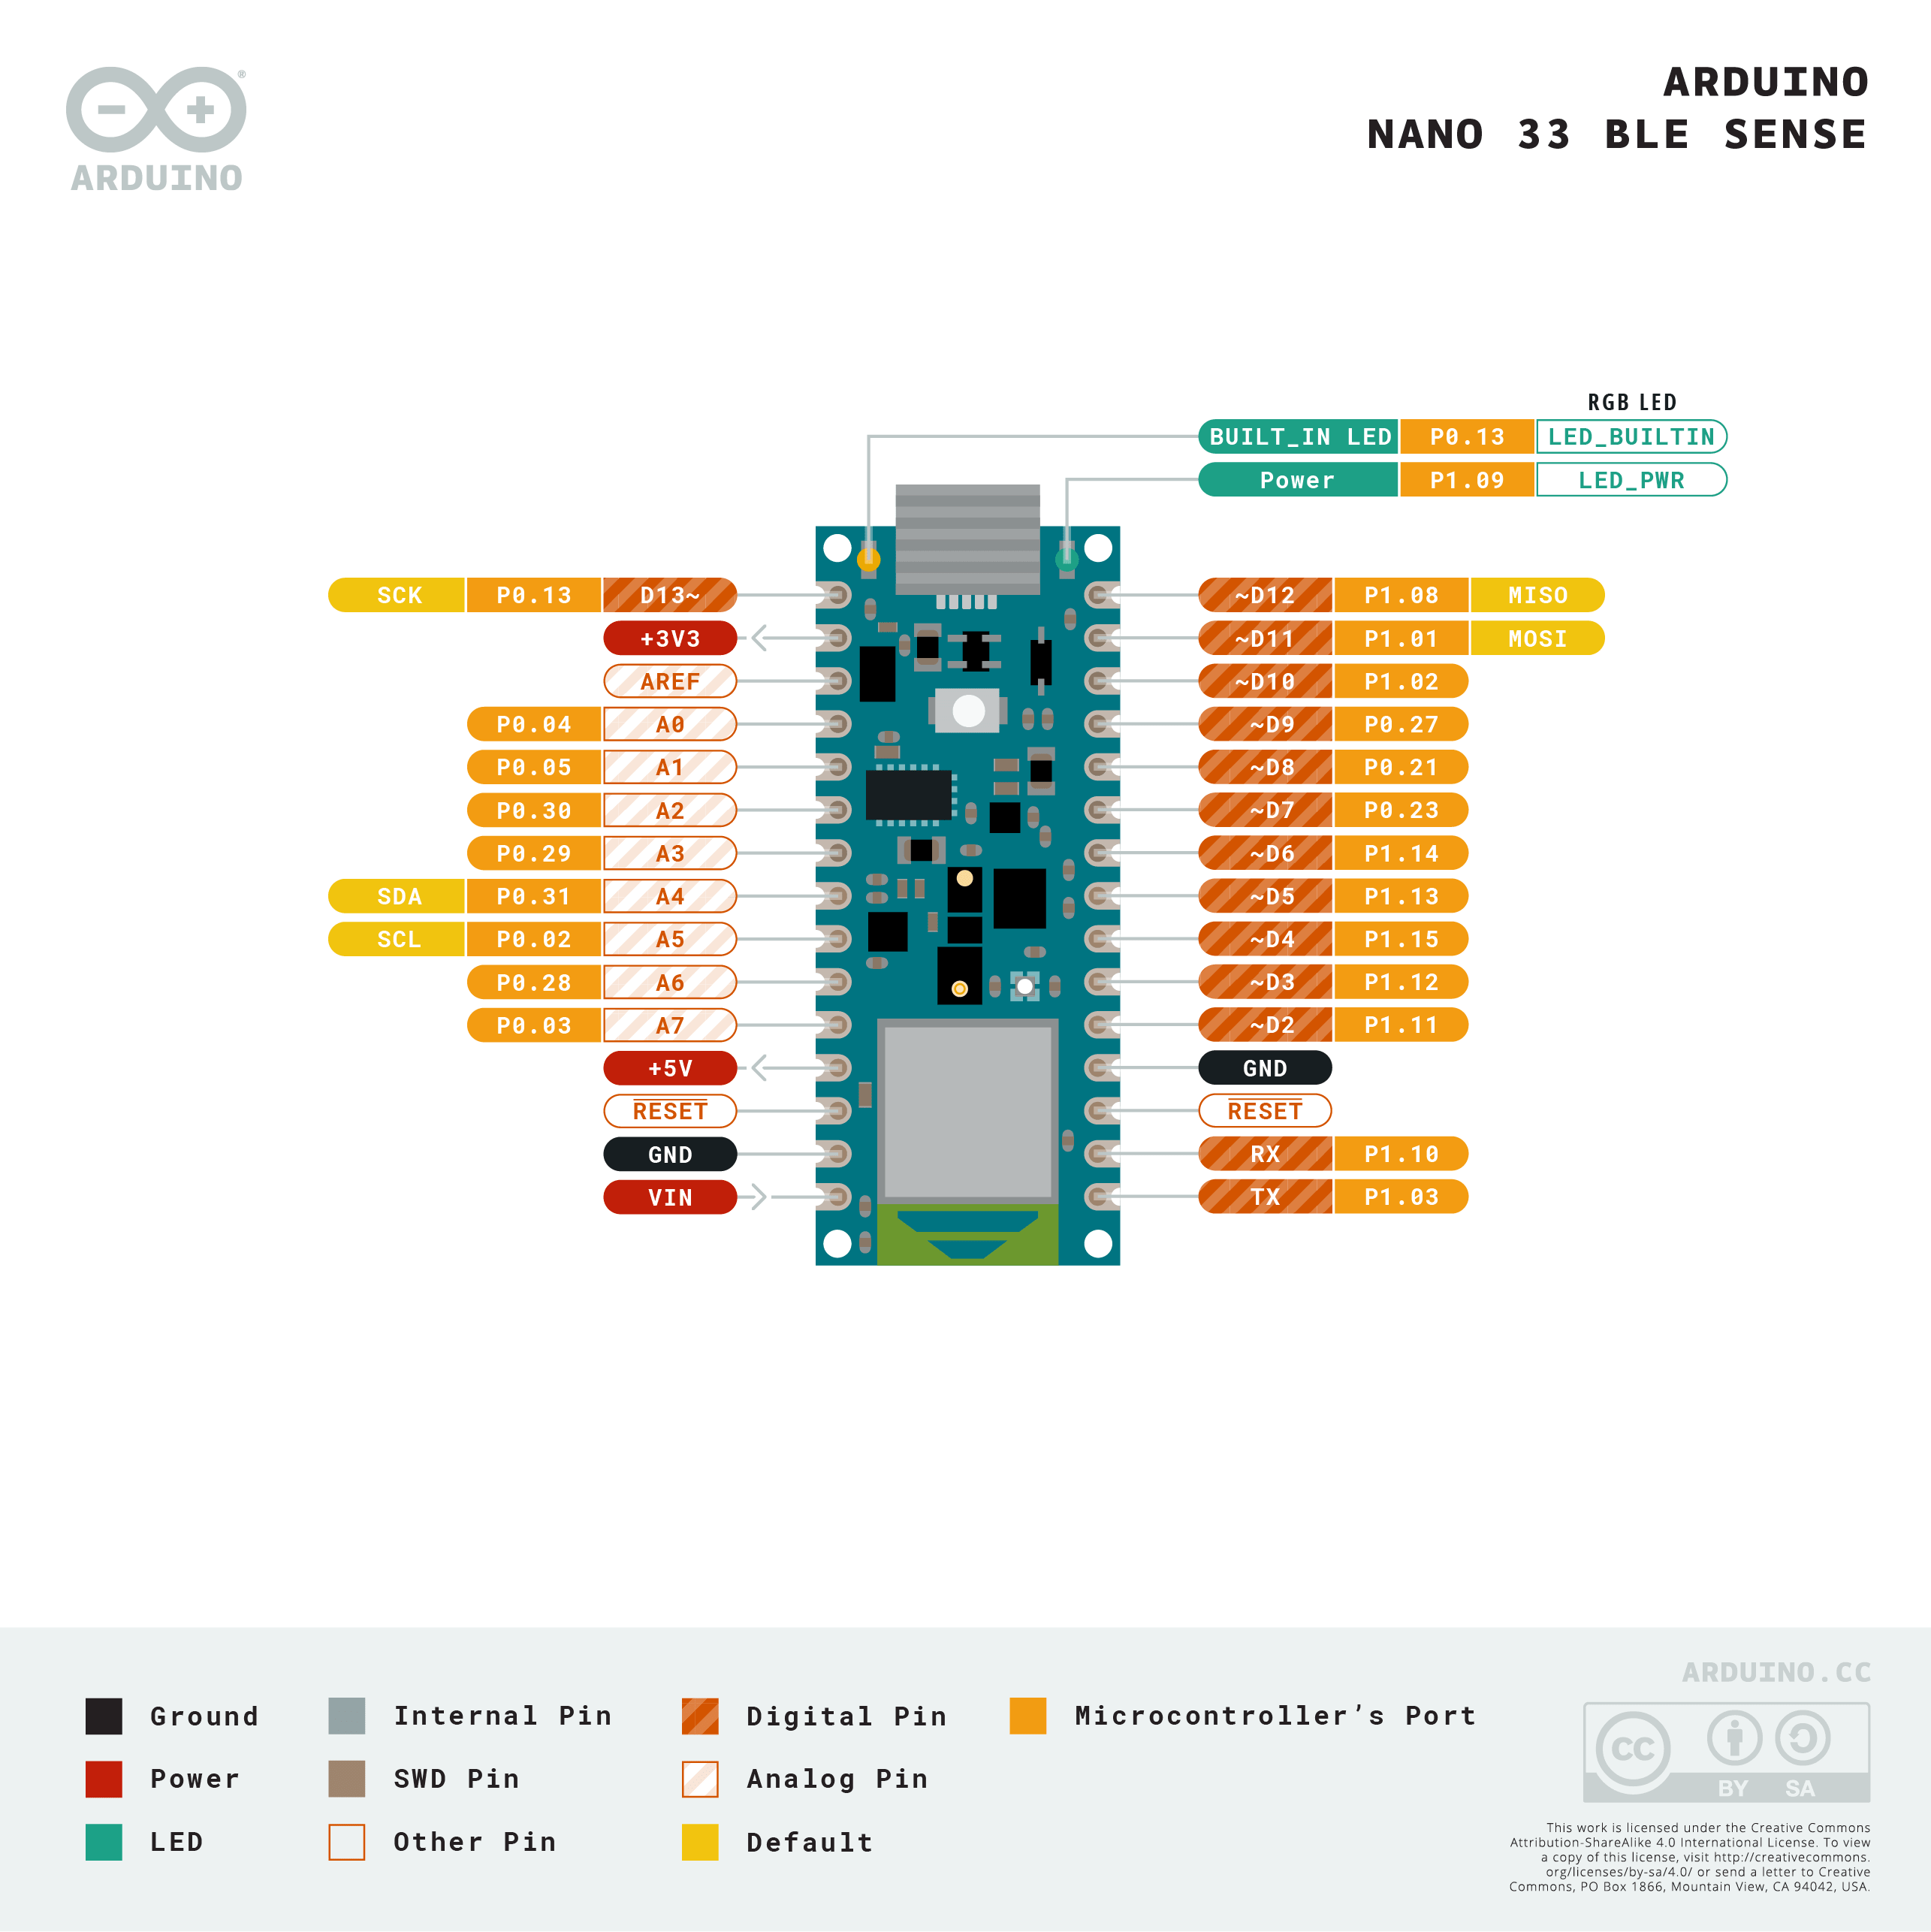
Pinout:
Power consumption:
Software Improvements
Like all Arduino boards, the Arduino Nano 33 BLE Sense can be programmed with the Arduino IDE. But the nRF52840, which is used inside the Arduino Nano 33 BLE Sense, can also be programmed using ARM Mbed OS, a real-time operating system for low power devices. With Mbed OS, you can run multiple threads at the same time. It also has features to reduce the power consumption by entering tickles mode during delay statements.
HTS221 - Capacitive digital sensor for relative humidity and temperature
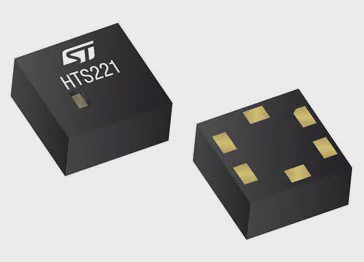
The HTS221 is an ultra-compact sensor for relative humidity and temperature. It includes a sensing element and a mixed-signal ASIC to provide the measurement information through digital serial interfaces.
The sensing element consists of a polymer dielectric planar capacitor structure capable of detecting relative humidity variations and is manufactured using a dedicated ST process. The HTS221 is available in a small top-holed cap land grid array (HLGA) package guaranteed to operate over a temperature range from -40 °C to +120 °C.
Resources:
Key features:
- 0 to 100% relative humidity range
- Supply voltage: 1.7 to 3.6 V
- Low power consumption: 2 μA @ 1 Hz ODR
- Selectable ODR from 1 Hz to 12.5 Hz
- High rH sensitivity: 0.004% rH/LSB
- Humidity accuracy: ± 3.5% rH, 20 to +80% rH
- Temperature accuracy: ± 0.5 °C,15 to +40 °C
- Embedded 16-bit ADC
- 16-bit humidity and temperature output data
- SPI and I²C interfaces
- Factory calibrated
- Tiny 2 x 2 x 0.9 mm package
- ECOPACK® compliant
Code Example
The HTS221 sensor on the Arduino Nano 33 BLE Sense can be accessed through the ArduinoHTS221 library.
ReadSensors Example:
#include <Arduino_HTS221.h>

void setup() {
  Serial.begin(9600);
  while (!Serial);

  if (!HTS.begin()) {
    Serial.println("Failed to initialize humidity temperature sensor!");
    while (1);
  }
}

void loop() {
  // read all the sensor values
  float temperature = HTS.readTemperature();
  float humidity    = HTS.readHumidity();

  // print each of the sensor values
  Serial.print("Temperature = ");
  Serial.print(temperature);
  Serial.println(" °C");

  Serial.print("Humidity    = ");
  Serial.print(humidity);
  Serial.println(" %");

  // print an empty line
  Serial.println();

  // wait 1 second to print again
  delay(1000);
}
Output:
Temperature = 28.50 °C
Humidity    = 36.24 %

Temperature = 28.57 °C
Humidity    = 35.93 %

Temperature = 28.59 °C
Humidity    = 35.94 %

Temperature = 28.59 °C
Humidity    = 35.91 %

...
LPS22HB - MEMS nano pressure sensor: 260-1260 hPa absolute digital output barometer
The LPS22HB is an ultra-compact piezoresistive absolute pressure sensor that functions as a digital output barometer. The device comprises a sensing element and an IC interface that communicates through I2C or SPI from the sensing element to the application.
The sensing element, which detects absolute pressure, consists of a suspended membrane manufactured using a dedicated process developed by ST.
The LPS22HB is available in a full-mold, holed LGA package (HLGA). It is guaranteed to operate over a temperature range extending from -40 °C to +85 °C. The package is holed to allow external pressure to reach the sensing element.
Resources:
Key features:
- 260 to 1260 hPa absolute pressure range
- Current consumption down to 3 μA
- High overpressure capability: 20x full-scale
- Embedded temperature compensation
- 24-bit pressure data output
- 16-bit temperature data output
- ODR from 1 Hz to 75 Hz
- SPI and I²C interfaces
- Embedded FIFO
- Interrupt functions: Data Ready, FIFO flags, pressure thresholds
- Supply voltage: 1.7 to 3.6 V
- High shock survivability: 22,000 g
- Small and thin package
- ECOPACK® lead-free compliant
Code Example
The LPS22HB sensor on the Arduino Nano 33 BLE Sense can be accessed through the ArduinoLPS22HB library.
ReadPressure Example:
#include <Arduino_LPS22HB.h>

void setup() {
  Serial.begin(9600);
  while (!Serial);

  if (!BARO.begin()) {
    Serial.println("Failed to initialize pressure sensor!");
    while (1);
  }
}

void loop() {
  // read the sensor value
  float pressure = BARO.readPressure();

  // print the sensor value
  Serial.print("Pressure = ");
  Serial.print(pressure);
  Serial.println(" kPa");

  // print an empty line
  Serial.println();

  // wait 1 second to print again
  delay(1000);
}
Output:
Pressure = 90.25 kPa

Pressure = 90.25 kPa

Pressure = 90.25 kPa

Pressure = 90.25 kPa

...
MP34DT05-A - MEMS audio sensor omnidirectional digital microphone
The MP34DT05-A is an ultra-compact, low-power, omnidirectional, digital MEMS microphone built with a capacitive sensing element and an IC interface.
The sensing element, capable of detecting acoustic waves, is manufactured using a specialized silicon micromachining process dedicated to producing audio sensors.
The IC interface is manufactured using a CMOS process that allows designing a dedicated circuit able to provide a digital signal externally in PDM format.
The MP34DT05-A is a low-distortion digital microphone with a 64 dB signal-to-noise ratio and –26 dBFS ±3 dB sensitivity.
The MP34DT05-A is available in a top-port, SMD-compliant, EMI-shielded package and is guaranteed to operate over an extended temperature range from -40 °C to +85 °C.
Resources:
Key features:
- Single supply voltage
- Low power consumption
- AOP = 122.5 dBSPL
- 64 dB signal-to-noise ratio
- Omnidirectional sensitivity
- –26 dBFS ±3 dB sensitivity
- PDM output
- HCLGA package
- Top-port design
- SMD-compliant
- EMI-shielded
- ECOPACK, RoHS, and "Green" compliant
Code Example
The MP34DT05-A sensor on the Arduino Nano 33 BLE Sense can be accessed through the PDM library and the Arduino Sound library, which uses the PDM library in the background:
PDMSerialPlotter Example:
#include <PDM.h>

// buffer to read samples into, each sample is 16-bits
short sampleBuffer[256];

// number of samples read
volatile int samplesRead;

void setup() {
  Serial.begin(9600);
  while (!Serial);

  // configure the data receive callback
  PDM.onReceive(onPDMdata);

  // optionally set the gain, defaults to 20
  // PDM.setGain(30);

  // initialize PDM with:
  // - one channel (mono mode)
  // - a 16 kHz sample rate
  if (!PDM.begin(1, 16000)) {
    Serial.println("Failed to start PDM!");
    while (1);
  }
}

void loop() {
  // wait for samples to be read
  if (samplesRead) {

    // print samples to the serial monitor or plotter
    for (int i = 0; i < samplesRead; i++) {
      Serial.println(sampleBuffer[i]);
    }

    // clear the read count
    samplesRead = 0;
  }
}

void onPDMdata() {
  // query the number of bytes available
  int bytesAvailable = PDM.available();

  // read into the sample buffer
  PDM.read(sampleBuffer, bytesAvailable);

  // 16-bit, 2 bytes per sample
  samplesRead = bytesAvailable / 2;
}
APDS-9960 - Digital Proximity, Ambient Light, RGB and Gesture Sensor
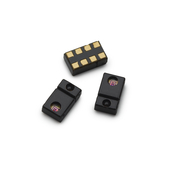
The Broadcom APDS-9960 is a digital RGB, ambient light, proximity, and gesture sensor device in a single 8-pin package. The device has an I2C compatible interface providing red, green, blue, clear (RGBC), proximity, and gesture sensing with IR LED. The RGB and ambient light sensing feature detects light intensity under various lighting conditions and through various attenuation materials, including darkened glass. In addition, the integrated UV-IR blocking filter enables accurate ambient light and correlated color temperature sensing.
The proximity and gesture feature is factory-trimmed and calibrated to 100mm proximity detection distance without requiring customer calibrations. Gesture detection utilizes four directional photodiodes, integrated with a visible blocking filter, to accurately sense simple UP-DOWN-RIGHT-LEFT gestures or more complex gestures. The addition of micro-optics lenses within the module provides high efficient transmission and reception of infrared energy. An internal state machine allows the device to be put into a low power state between RGBC, proximity, and gesture measurements, providing very low power consumption.
Resources:
Key features:
- Miniature Package Size: L3.94 x W2.36 x H1.35 mm
- I2C Interface Compatible with Dedicated Interrupt Pin
- High Sensitivity Enabling Operation Behind Darkened Glass
- RGBC Light Sensing with Integrated UV-IR Block Filter
- Geometrically Arranged RGBC Photodiodes Providing Uniform Angular Response
- Calibrated to 100mm Detection Distance Eliminating Customer End Product Calibration
- Four Separate Photodiodes Sensitive to Different Directions
- Proximity and Gesture Sensing with Integrated Visible Block Filter
- Patented Shield Design Minimizing Proximity Cross Talk
- Integrated Optical Lens Collimating IR LED Beam and Improving Photodiode Sensitivity.
- Low Power Consumption: 1.0 µA typical in Sleep Mode
Code Example
The APDS-9960 sensor on the Arduino Nano 33 BLE Sense can be accessed through the ArduinoAPDS9960 library.
FullExample.ino:
#include <Arduino_APDS9960.h>
void setup() {
Serial.begin(9600);
while (!Serial); // Wait for serial monitor to open
if (!APDS.begin()) {
Serial.println("Error initializing APDS9960 sensor.");
while (true); // Stop forever
}
}
int proximity = 0;
int r = 0, g = 0, b = 0;
unsigned long lastUpdate = 0;
void loop() {
// Check if a proximity reading is available.
if (APDS.proximityAvailable()) {
proximity = APDS.readProximity();
}
// check if a gesture reading is available
if (APDS.gestureAvailable()) {
int gesture = APDS.readGesture();
switch (gesture) {
case GESTURE_UP:
Serial.println("Detected UP gesture");
break;
case GESTURE_DOWN:
Serial.println("Detected DOWN gesture");
break;
case GESTURE_LEFT:
Serial.println("Detected LEFT gesture");
break;
case GESTURE_RIGHT:
Serial.println("Detected RIGHT gesture");
break;
default:
// ignore
break;
}
}
// check if a color reading is available
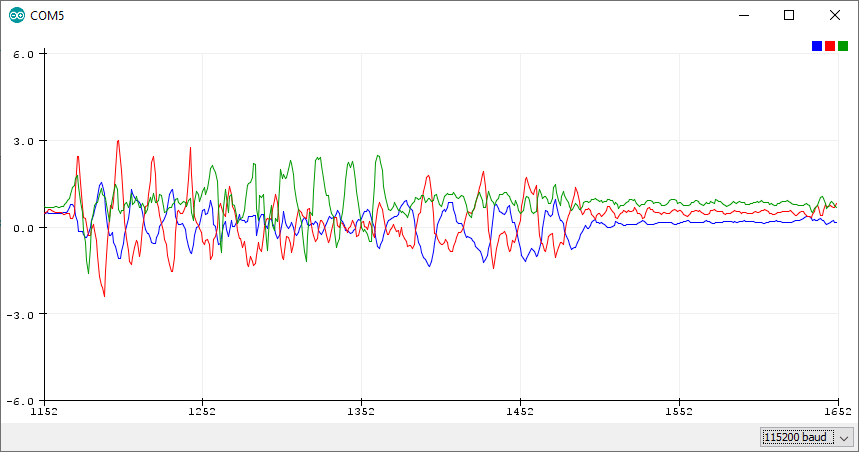
if (APDS.colorAvailable()) {
APDS.readColor(r, g, b);
}
// Print updates every 100ms
if (millis() - lastUpdate > 100) {
lastUpdate = millis();
Serial.print("PR=");
Serial.print(proximity);
Serial.print(" rgb=");
Serial.print(r);
Serial.print(",");
Serial.print(g);
Serial.print(",");
Serial.println(b);
}
}
Output:
PR=248 rgb=6,5,4
PR=250 rgb=6,5,5
PR=252 rgb=6,5,5
PR=253 rgb=6,5,4
PR=252 rgb=6,5,5
PR=250 rgb=6,5,5
PR=253 rgb=6,5,4
PR=251 rgb=6,5,4
...
LSM9DS1 - iNEMO inertial module, 3D magnetometer, 3D accelerometer, 3D gyroscope, I2C, SPI
The LSM9DS1 is a system-in-package featuring a 3D digital linear acceleration sensor, a 3D digital angular rate sensor, and a 3D digital magnetic sensor.
The LSM9DS1 has a linear acceleration full scale of ±2g/±4g/±8/±16 g, a magnetic field full scale of ±4/±8/±12/±16 gauss, and an angular rate of ±245/±500/±2000 dps.
The LSM9DS1 includes an I2C serial bus interface supporting standard and fast modes (100 kHz and 400 kHz) and an SPI serial standard interface.
Magnetic, accelerometer, and gyroscope sensing can be enabled or set in power-down mode separately for smart power management.
The LSM9DS1 is available in a plastic land grid array package (LGA), and it is guaranteed to operate over an extended temperature range from -40 °C to +85 °C.
Resources:
Key features:
- 3 acceleration channels, 3 angular rate channels, 3 magnetic field channels
- ±2/±4/±8/±16 g linear acceleration full scale
- ±4/±8/±12/±16 gauss magnetic full scale
- ±245/±500/±2000 dps angular rate full scale
- 16-bit data output
- SPI / I2C serial interfaces
- Analog supply voltage 1.9 V to 3.6 V
- "Always-on" eco power mode down to 1.9 mA
- Programmable interrupt generators
- Embedded temperature sensor
- Embedded FIFO
- Position and motion detection functions
- Click/double-click recognition
- Intelligent power saving for handheld devices
- ECOPACK®, RoHS, and "Green" compliant
Code Examples
The LSM9DS1 sensor on the Arduino Nano 33 BLE Sense can be accessed through the Arduino LSM9DS1 library.
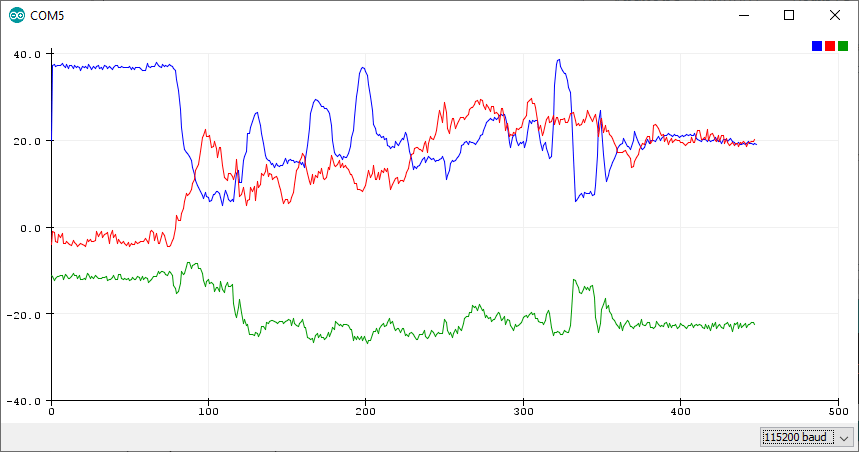
SimpleAccelerometer Example:
#include <Arduino_LSM9DS1.h>

void setup() {
  Serial.begin(9600);
  while (!Serial);
  Serial.println("Started");

  if (!IMU.begin()) {
    Serial.println("Failed to initialize IMU!");
    while (1);
  }

  Serial.print("Accelerometer sample rate = ");
  Serial.print(IMU.accelerationSampleRate());
  Serial.println(" Hz");
  Serial.println();
  Serial.println("Acceleration in G's");
  Serial.println("X\tY\tZ");
}

void loop() {
  float x, y, z;

  if (IMU.accelerationAvailable()) {
    IMU.readAcceleration(x, y, z);

    Serial.print(x);
    Serial.print('\t');
    Serial.print(y);
    Serial.print('\t');
    Serial.println(z);
  }
}
Output:
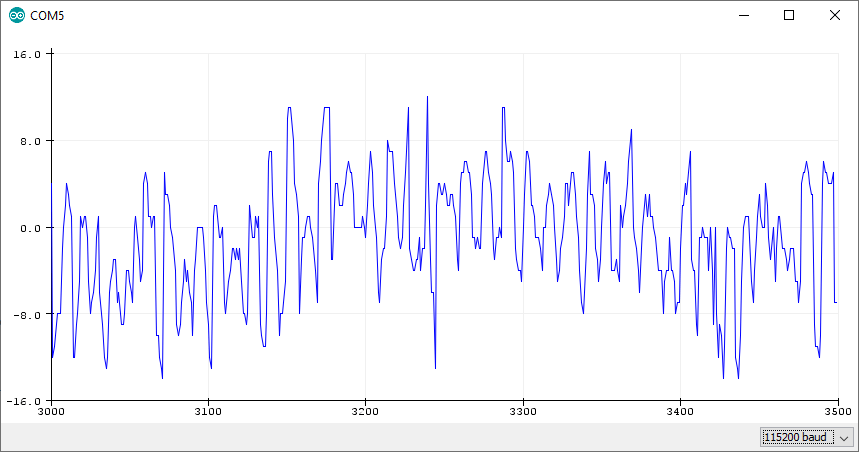
SimpleGyroscope Example:
#include <Arduino_LSM9DS1.h>

void setup() {
  Serial.begin(9600);
  while (!Serial);
  Serial.println("Started");

  if (!IMU.begin()) {
    Serial.println("Failed to initialize IMU!");
    while (1);
  }
  Serial.print("Gyroscope sample rate = ");
  Serial.print(IMU.gyroscopeSampleRate());
  Serial.println(" Hz");
  Serial.println();
  Serial.println("Gyroscope in degrees/second");
  Serial.println("X\tY\tZ");
}

void loop() {
  float x, y, z;

  if (IMU.gyroscopeAvailable()) {
    IMU.readGyroscope(x, y, z);

    Serial.print(x);
    Serial.print('\t');
    Serial.print(y);
    Serial.print('\t');
    Serial.println(z);
  }
}
Output:

SimpleMagnetometer Example:
#include <Arduino_LSM9DS1.h>

void setup() {
  Serial.begin(9600);
  while (!Serial);
  Serial.println("Started");

  if (!IMU.begin()) {
    Serial.println("Failed to initialize IMU!");
    while (1);
  }
  Serial.print("Magnetic field sample rate = ");
  Serial.print(IMU.magneticFieldSampleRate());
  Serial.println(" uT");
  Serial.println();
  Serial.println("Magnetic Field in uT");
  Serial.println("X\tY\tZ");
}

void loop() {
  float x, y, z;

  if (IMU.magneticFieldAvailable()) {
    IMU.readMagneticField(x, y, z);

    Serial.print(x);
    Serial.print('\t');
    Serial.print(y);
    Serial.print('\t');
    Serial.println(z);
  }
}
Output:
BLE - Bluetooth Low Energy

Quick Introduction to BLE
Bluetooth Low Energy is a version of Bluetooth wireless technology specially optimized for low power use at low data rates.
Unlike standard Bluetooth communication, which is based on an asynchronous serial connection (UART), a Bluetooth LE radio acts like a community bulletin board.
For more information, check out the following resources:
Code Example
Bluetooth central or peripheral devices can be created with the ArduinoBLE library. The ArduinoBLE library has multiple examples. For simplicity, I chose to work through the LED example.
The LED example has two scripts - a central script and a peripheral script. The peripheral script creates a BLE Service that turns on the built-in LED if the send value isn't 0.
Peripheral/LED.ino:
#include <ArduinoBLE.h>

BLEService ledService("19B10000-E8F2-537E-4F6C-D104768A1214"); // BLE LED Service

// BLE LED Switch Characteristic - custom 128-bit UUID, read and writable by central
BLEByteCharacteristic switchCharacteristic("19B10001-E8F2-537E-4F6C-D104768A1214", BLERead | BLEWrite);

const int ledPin = LED_BUILTIN; // pin to use for the LED

void setup() {
  Serial.begin(9600);
  while (!Serial);

  // set LED pin to output mode
  pinMode(ledPin, OUTPUT);

  // begin initialization
  if (!BLE.begin()) {
    Serial.println("starting BLE failed!");

    while (1);
  }

  // set advertised local name and service UUID:
  BLE.setLocalName("LED");
  BLE.setAdvertisedService(ledService);

  // add the characteristic to the service
  ledService.addCharacteristic(switchCharacteristic);

  // add service
  BLE.addService(ledService);

  // set the initial value for the characeristic:
  switchCharacteristic.writeValue(0);

  // start advertising
  BLE.advertise();

  Serial.println("BLE LED Peripheral");
}

void loop() {
  // listen for BLE peripherals to connect:
  BLEDevice central = BLE.central();

  // if a central is connected to peripheral:
  if (central) {
    Serial.print("Connected to central: ");
    // print the central's MAC address:
    Serial.println(central.address());

    // while the central is still connected to peripheral:
    while (central.connected()) {
      // if the remote device wrote to the characteristic,
      // use the value to control the LED:
      if (switchCharacteristic.written()) {
        if (switchCharacteristic.value()) {   // any value other than 0
          Serial.println("LED on");
          digitalWrite(ledPin, HIGH);         // will turn the LED on
        } else {                              // a 0 value
          Serial.println(F("LED off"));
          digitalWrite(ledPin, LOW);          // will turn the LED off
        }
      }
    }

    // when the central disconnects, print it out:
    Serial.print(F("Disconnected from central: "));
    Serial.println(central.address());
  }
}
Now the LED can be controlled by connecting to the service. This can be done with the Central/LedControl.ino script or a smartphone app like nRF Connect or LightBlue.
Mbed
Mbed OS is an open-source operating system for platforms using Arm microcontrollers designed specifically for Internet of Things (IoT) devices: low-powered, constrained devices that need to connect to the internet. Mbed OS provides an abstraction layer for the microcontrollers it runs on, so that developers can focus on writing C/C++ applications that call functionality available on a range of hardware. Mbed OS applications can be reused on any Mbed-compatible platform. - Mbed OS documentation
For more information, check out:
Code Examples
Mbed can be used inside the Arduino IDE by simply importing mbed.h
#include "mbed.h"
Now we can use mbed to, for example, control a LED:
#include "mbed.h"

void setup() {
  pinMode(LED_BUILTIN, OUTPUT);
}

void loop() {
  digitalWrite(LED_BUILTIN, HIGH);
  wait_ms(1000);
  digitalWrite(LED_BUILTIN, LOW);
  wait_ms(1000);
}
As you can see, we are mixing Arduino functions like digitalWrite and pinMode with wait_ms, which is a mbed function.
With Mbed it's also really simple to implement Threads:
#include <mbed.h>
#include <rtos.h>

using namespace rtos;

Thread blinker;

void blink() {
  while (true) {
    digitalWrite(LED_BUILTIN, HIGH);
    thread_sleep_for(1000);
    digitalWrite(LED_BUILTIN, LOW);
    thread_sleep_for(1000);
  }
}

void setup() {
  pinMode(LED_BUILTIN, OUTPUT);
  blinker.start(mbed::callback(blink));
}

void loop() {}
Conclusion
In this article, you got an overview of the Arduino Nano 33 BLE Sense, an evolution of the traditional Arduino Nano but featuring a more powerful processor, the nRF52840 from Nordic Semiconductors.
If you have any questions or want to chat with me, feel free to contact me via EMAIL or social media.