
TensorFlow.js is a deep learning library providing you with the power to train and deploy your favorite deep learning models in the browser and Node.js. It doesn't matter if you are a Javascript developer with no Machine Learning experience whatsoever or an ML developer searching for a new opportunity to use his/her knowledge inside the browser; Tensorflow.js can provide you with huge benefits.
This is because Tensorflow.js provides us with both a simple high-level API called layers API, which is very similar to the Keras deep learning framework and can be used to create new models, as well as a low-level API — the Core API (previously deeplearn.js) — which lets you implement a lot of custom functionality.
In this article, I'll show you the basics of Tensorflow.js, including:
- Getting started
- Basics
- Building Linear Regression with the Core API
- Using the Layers API
- Converting existing Tensorflow/Keras models to Tensorflow.js
- Using ML5.js
Use Cases of Tensorflow.js
TensorFlow.js supports three main workflows as specified by Josh Gordon in "Introducing TensorFlow.js: Machine Learning in Javascript".
- Use a pre-trained model for inference. TensorFlow.js can be used with any pre-existing TensorFlow or Keras model by simply transforming them into TensorFlow.js format.
- Re-train an existing model. Use transfer learning to augment an existing model trained offline to enable it to perform correctly for each unique user.
- Create models directly in the browser. Use TensorFlow.js to define, train, and run models entirely in the browser using JavaScript.
Example Applications
Google provides us with a few demo applications that show us the real power of Tensorflow.js. These include computer vision examples like their Emoji Scavenger Hunt game and their Pac-Man Webcam Controller.

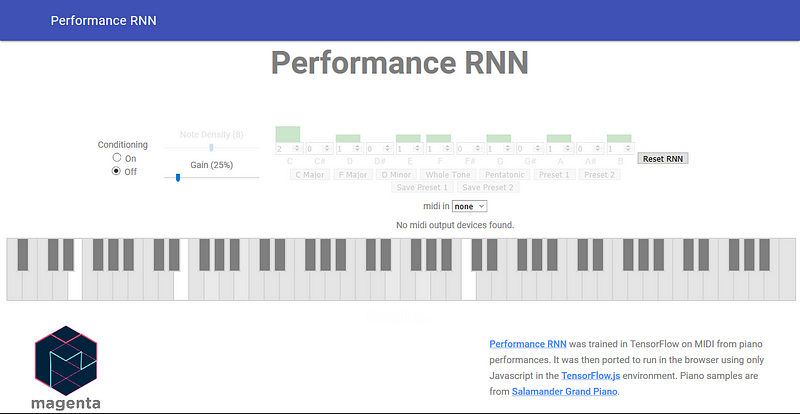
They also include examples of using Recurrent Neural Networks to play music, explore pictures using pose estimation, and teach a model to recognize images and play sound.
Setup
Browser Setup
There are two main ways to get TensorFlow.js in your browser-based projects:
- Using script tags.
- Installation via Yarn or NPM
script tags:
<script src="https://cdn.jsdelivr.net/npm/@tensorflow/tfjs@2.0.0/dist/tf.min.js"></script>
Installation via Yarn or NPM:
yarn add @tensorflow/tfjs
or
npm install @tensorflow/tfjs
Node.js Setup
Tensorflow.js can also be run with Node.js. Here you can either install it with native C++ bindings or if you're on a Linux machine and have a supported NVIDIA® GPU with CUDA support, you can use the GPU package for even higher performance.
Option 1: Install TensorFlow.js with native C++ bindings.
yarn add @tensorflow/tfjs-node
or
npm install @tensorflow/tfjs-node
Option 2: (Linux Only) If your system has an NVIDIA GPU with CUDA support, use the GPU package even for higher performance.
yarn add @tensorflow/tfjs-node-gpu
or
npm install @tensorflow/tfjs-node-gpu
Tensors
If you are familiar with deep learning frameworks like TensorFlow or PyTorch, you should already be familiar with the concepts of Tensors. If not, here is a quick overview. Tensors are the central unit of data in TensorFlow, and mathematically a Tensor represents an n-dimensional array that is optimized for hardware usage.
A tf.Tensor also contains the following properties:
- rank: defines how many dimensions the tensor contains
- shape: which defines the size of each dimension of the data
- dtype: which defines the data type of the tensor.
In Tensorflow.js, we can create a scalar-tensor by typing:
const tensor = tf.scalar(1);
To log the tensor to a console, use the .print method.
tensor.print();
You can also create a tensor from an array:
const tensor = tf.tensor([2, 2]);
To get the shape of a tensor, use the .shape method.
const tensor = tf.tensor([2, 2]);
tensor.print();
console.log('Shape:', tensor.shape);

Out:
Tensor
    [2, 2]
Shape: [ 2 ]
To transform a tensor back to an array, TensorFlow.js provides us with the .array method.
const tensor = tf.zeros([2, 2]);
tensor.array().then(array => console.log(array));
Operators
Tensorflow.js also provides us with a wide variety of operations that allow you to manipulate the data. If we, for example, want to find the square of a tensor, we can use the square method.
const x = tf.tensor([1, 2, 3, 4]);
const y = x.square(); // square tensor
y.print(); // print tensor to the console
This outputs a tensor of [1, 4, 9, 16].
Tensorflow.js also allows chaining operations like squaring a tensor and then adding a constant to it.
const x = tf.tensor([1, 2, 3, 4]);
const y = x.square().add(tf.ones([4]));
y.print();
Tensor Disposal (Memory Cleaning)
When using the WebGL backend, memory must be managed explicitly. This means that it's not sufficient to let a tf.Tensor go out of scope for its memory to be released. To destroy the memory of a tf.Tensor, we need to perform a call to the dispose method.
const a = tf.tensor([1, 2, 3]);
a.dispose(); // or tf.dispose(a);
This is fine for single tensors but can get inconvenient quickly as you write more code. But not disposing of tensors can cause memory overhead, and therefore Tensorflow.js offers a special operator that can dispose of multiple tensors automatically — the tidy method.
// y = 2 ^ 2 + 1
const y = tf.tidy(() => {
  // a,b and one will be cleaned up when the tidy call ends.
  const one = tf.scalar(1);
  const a = tf.scalar(2);
  const b = a.square();

  console.log('numTensors (in tidy): ' + tf.memory().numTensors);

  return b.add(one);
})

console.log('numTensors (outside tidy): ' + tf.memory().numTensors);
y.print();
Output:
numTensors (in tidy): 3
numTensors (outside tidy): 1
Tensor
    5
Using the tidy method, TensorFlow.js automatically disposed of the tf.Tensor variables that weren't needed for the final calculation anymore.
Building Linear Regression with the Core API
The CoreAPI isn't made for creating big Neural Networks primarily. Instead, it is used for customizations, but nonetheless, it is useful if you have some basic understanding of how you could use the Core API to create something like a simple Linear Regression model that fits some random uniform data, which is what we are going to do.
const tf = require('@tensorflow/tfjs-node');

// Creating dataset
const x = tf.randomUniform([100], -1, 1);
const y = x.mul(0.5).add(tf.randomUniform([100], -0.1, 0.1));

// Creating variables
const m = tf.variable(tf.scalar(Math.random()*2-1));
const b = tf.variable(tf.scalar(Math.random()*2-1));

// Specifying a learning rate and an optimizer
const learningRate = 0.1;
const optimizer = tf.train.sgd(learningRate);

// Mean Squared Error Loss
function loss(pred, label) {
  return pred.sub(label).square().mean();
}

function predict(xs) {
  // y = mx+b
  const ys = xs.mul(m).add(b)
  return ys
}

// Training model for 50 epochs
for(let i = 0; i < 50; i++) {
  optimizer.minimize(() => loss(predict(x), y))
}

// Printing our weights (slope, intercept)
m.print()
b.print()
This code first creates a random uniform data-set and two tf.variable variables initialized between -1 and 1. After that, we set Stochastic Gradient Descent(SGD) as our optimizer, implement mean squared error as our loss function, and implement our prediction function. Lastly, we create a loop that runs for 50 epochs and optimizes our two tf.Variables — m and b — using our optimizer and loss function.
Layers API
The Tensorflow.js Layers API allows us to quickly prototype and create a Machine Learning model. It is modeled after the popular Keras deep learning library.
To create a model with the Layers API, we need to create a tf.sequential object and then use the add() method to add some layers. So if we, for example, want to create a model for the XOR problem, we can use the following code.
const x = tf.tensor2d([[0, 0], [0, 1], [1, 0], [1, 1]]);
const y = tf.tensor2d([[0], [1], [1], [0]]);
const model = tf.sequential();
model.add(tf.layers.dense({units: 8, inputShape:2, activation: 'relu'}));
model.add(tf.layers.dense({units: 1, activation: 'sigmoid'}))
model.compile({optimizer: 'sgd', loss: 'binaryCrossentropy', lr: 0.1})
You can also use an Array of already-constructed Layers to create a tf.Sequential model:
const model = tf.sequential({
  layers: [tf.layers.dense({units: 8, inputShape:2, activation: 'relu'}),
           tf.layers.dense({units: 1, activation: 'sigmoid'})]
})
After creating the model, you can train it with the fit or fitDataset method.
If your data-set fits in main memory and is available as a single tensor, you can train a model by calling the fit() method.
model.fit(x, y, {
  batchSize: 1,
  epochs: 3000
})
If your data doesn't fit entirely in memory or is being streamed, you can train a model using the fitDataset method.
Convolutional Neural Networks
A Convolutional Neural Network (CNN/ConvNet) is a kind of Deep Learning algorithm that enables us to extract features from an image. It can be used for almost every computer vision task and completely redefined the way computers 'see'.
The Layers API already has all the building blocks we need to create a CNN — Convolutional Layers, Pooling Layers, … — so we only need to use them. For example, we can create a simple model that can be used with the MNIST data-set.
const model = tf.sequential();
// Create a conv layer
model.add(tf.layers.conv2d({
  inputShape: [28, 28, 1],
  kernelSize: 3,
  filters: 16,
  strides: 1,
  activation: 'relu'
}));
// Create a max pooling layer
model.add(tf.layers.maxPooling2d({
  poolSize: [2, 2]
}))
// Another conv layer
model.add(tf.layers.conv2d({
  kernelSize: 3,
  filters: 32,
  strides: 1,
  activation: 'relu'
}));
// Another max pooling layer
model.add(tf.layers.maxPooling2d({
  poolSize: [2, 2]
}))
// flatten the output of the max pooling layer
model.add(tf.layers.flatten());
// output layer
model.add(tf.layers.dense({
  units: 10,
  activation: 'softmax'
}))
This code above creates a Neural Network with two Convolutional blocks (a block is a convolutional + pooling layer). Then it flattens the output so it can be used with a fully connected layer.
After creating the model, we can compile it and start with the training. Now instead of using Stochastic Gradient Descent (SGD) — the veteran under the optimizers — we will use Adam because of its faster converge time.
model.compile({
  optimizer: 'adam',
  loss: 'categoricalCrossentropy',
  metrics: ['accuracy']
})
We didn't really load in the MNIST data-set. But if we did, we could train the model with the following code.
model.fit(x, y, {
  batchSize: 32,
  epochs: 10
});
This would result in a model that could predict the class of a picture of a digit with over 90% accuracy. If you're interested in a detailed walkthrough on training a model on the MNIST data-set take a look at the 'TensorFlow.js — Handwritten digit recognition with CNNs' codelab.
Recurrent Neural Network
CNNs are great when working with images, but they can't capture temporal patterns. Therefore they can't be used for problems including weather forecasting and stock price predictions, which rely heavily on temporal patterns.
This is where Recurrent Neural Networks (RNNs) come into play. They allow us to operate over sequences of input vectors by providing a kind of memory. For more information, check out this excellent article.
Just like for CNNs, the LayerAPI provides us with all the needed layers to build our RNN.
// Creating model
const model = tf.sequential()
// Addind LSTM and Dropout layers
model.add(tf.layers.lstm({units:96, returnSequences:true, inputShape:[x_train.shape[1], 1]}))
model.add(tf.layers.dropout(0.2))
model.add(tf.layers.lstm({units:96, returnSequences:true}))
model.add(tf.layers.dropout(0.2))
model.add(tf.layers.lstm({units:96}))
model.add(tf.layers.dropout(0.2))
model.add(tf.layers.dense({units:1}))
This code creates a RNN model. A long short-term memory (LSTM) model, if we want to be exact. We can use such an architecture to, for example, create a model that learns to predict the next word in the alphabet.
const alphabet = "ABCDEFGHIJKLMNOPQRSTUVWXYZ"
let dataX =[], dataY = [];

// Creating the data
for(let i=0; i<alphabet.length-1; i++) {
    dataX.push([[parseInt(alphabet.indexOf(alphabet.charAt(i)))]]);
    // One-hot-encoding the output values
    let arr = new Array(alphabet.length).fill(0)
    arr[alphabet.indexOf(alphabet.charAt(i+1))] = 1;
    dataY.push(arr);
}

// Transforming the data to tensors
const x = tf.tensor(dataX);
const y = tf.tensor(dataY);

// Printing the tensors
x.print()
y.print()

// Creating the RNN Model
const model = tf.sequential();
model.add(tf.layers.lstm({units:32, inputShape:[1, 1]}))
model.add(tf.layers.dense({units:32, activation:'relu'}));
model.add(tf.layers.dense({units:alphabet.length, activation:'softmax'}));

// Compiling the model
model.compile({
    optimizer: 'adam',
    loss: 'categoricalCrossentropy',
    metrics: ['accuracy']
});

// Fitting the model
model.fit(x, y, {
    batchSize: alphabet.length,
    epochs: 500
}).then((history) => {
    // printing loss and predictions
    console.log(history.history.loss);
    console.log(model.predict(x).argMax(1).dataSync())
})
This script trains a RNN model to predict the next character of the alphabet. The first 20 lines are used to create the data-set. The only thing to keep in mind here is that we are one-hot-encoding the output vectors in lines 8–9 (could also be done using the oneHot method provided by Tensorflow.js).
After that, we create a model with one LSTM layer and one hidden, fully connected layer. And lastly, we are training the model and making predictions.
This script should print the following outputs to the developer console:
Tensor [ [[0 ],],
         [[1 ],],
         [[2 ],],
         ...
         [[24],]]
Tensor [[0, 1, 0, ..., 0, 0, 0],
        [0, 0, 1, ..., 0, 0, 0],
        [0, 0, 0, ..., 0, 0, 0],
        ...,
        [0, 0, 0, ..., 0, 0, 1]]
Array(500) [ 3.2607433795928955, 3.254556179046631, 3.2485499382019043, 3.2427122592926025, 3.2370247840881348, 3.231477975845337, 3.226048469543457, 3.2207353115081787, 3.215571165084839, 3.210493803024292, … ]
Int32Array(25) [ 1, 2, 3, 4, 5, 6, 7, 8, 9, 10, … ]
I know this is an oversimplified example and undoubtedly not useful in the real world, but the basic process of creating the Recurrent Neural Network will stay the same for other RNN models. If you are interested in a more complicated example, check out this post showing how to predict stock prices with Tensorflow.js.
Convert an existing model to Tensorflow.js
Even though it is useful to create your own models from scratch in the browser, it won't be the primary use-case of Tensorflow.js. Instead, you will convert pre-trained models from Tensorflow or Keras to Tensorflow.js and use them for inference.
To convert the models, we need the Tensorflow.js converter python module.
pip install tensorflowjs
Converting a Keras H5 model to Tensorflow.js
Now that we have the Tensorflow.js module installed, we can either use the command-line tool or the Python API to convert our models. To convert a Keras model to Tensorflow.js, we need to specify Keras as our input format.
Command Line:
# execute in command line
tensorflowjs_converter \
    --input_format=keras \
    /tmp/my_keras_model.h5 \
    /tmp/my_tfjs_model
Python API:
import tensorflowjs as tfjs
import keras

def train(...):
	model = keras.models.Sequential() # for example
    ...
    model.compile(...)
    model.fit(...)
    tfjs.converters.save_keras_model(model, tfjs_target_dir)
Converting a Tensorflow model to Tensorflow.js
When converting from Tensorflow to Tensorflow.js, we need to look out for the specific Tensorflow model type. The converter supports the conversion of the three main types — SavedModel, Frozen Graph, Tensorflow Hub.
Convert SavedModel example:
tensorflowjs_converter \
    --input_format=tf_saved_model \
    --output_format=tfjs_graph_model \
    --signature_name=serving_default \
    --saved_model_tags=serve \
    /mobilenet/saved_model \
    /mobilenet/web_model
Convert frozen model example:
tensorflowjs_converter \
    --input_format=tf_frozen_model \
    --output_node_names='MobilenetV1/Predictions/Reshape_1' \
    /mobilenet/frozen_model.pb \
    /mobilenet/web_model
Tensorflow Hub module example:
tensorflowjs_converter \
    --input_format=tf_hub \
    'https://tfhub.dev/google/imagenet/mobilenet_v1_100_224/classification/1' \
    /mobilenet/web_model
Output formats
The Tensorflow.js converter doesn't create the same output format for every input format. Keras models will be converted to tfjs_layers_model format, while Tensorflow models will be converted to tfjs_graph_model format.
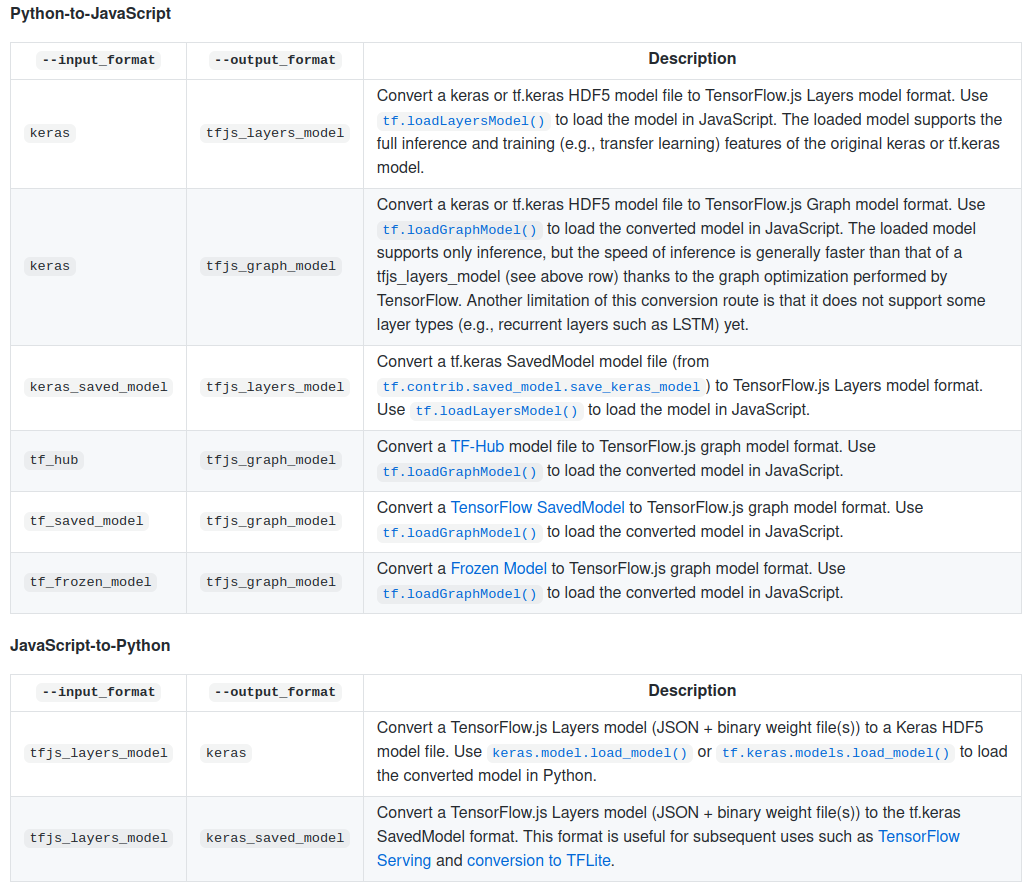
This is important to know for loading the model into Tensorflow.js later.
Use a converted model.
After converting your favorite models to a Tensorflow.js ready format, you are ready to use them for your application.
Models with the tfjs_layers_model format can be loaded into Tensorflow.js using the loadLayersModel method.
const model = await tf.loadLayersModel('<filename>.json')
Models in tfjs_graph_model format can be loaded using the loadGraphModel method.
const model = await tf.loadGraphModel('<filename>.json')
After loading the model, it can be used like any other model.
const prediction = model.predict(X)
...
Working with data - Tensorflow.js Data
TensorFlow.js Data provides simple APIs to load and parse data from disk or over the web in a variety of formats, and to prepare that data for use in machine learning models (e.g. via operations like filter, map, shuffle, and batch). - TF.js repository
There are two ways to import/use Tensorflow.js Data:
- You can use TF.js data through the @tensorflow/tfjs package.
- You can get TF.js Data as a standalone module: @tensorflow/tfjs-data. Note that
tfjs-datarequirestfjs-core, so if you import@tensorflow/tfjs-data, you also need to import@tensorflow/tfjs-core.
Example: Importing the Boston Housing data-set:
// code from https://github.com/tensorflow/tfjs/tree/master/tfjs-data
import * as tf from '@tensorflow/tfjs';

const csvUrl = 'https://storage.googleapis.com/tfjs-examples/multivariate-linear-regression/data/boston-housing-train.csv';

async function run() {
  // We want to predict the column "medv", which represents a median value of a
  // home (in $1000s), so we mark it as a label.
  const csvDataset = tf.data.csv(
    csvUrl, {
      columnConfigs: {
        medv: {
          isLabel: true
        }
      }
    });
  // Number of features is the number of column names minus one for the label
  // column.
  const numOfFeatures = (await csvDataset.columnNames()).length - 1;

  // Prepare the Dataset for training.
  const flattenedDataset =
    csvDataset
    .map(({xs, ys}) => {
      // Convert xs(features) and ys(labels) from object form (keyed by column
      // name) to array form.
      return {xs: Object.values(xs), ys: Object.values(ys)};
    })
    .batch(10);

  // Define the model.
  const model = tf.sequential();
  model.add(tf.layers.dense({
    inputShape: [numOfFeatures],
    units: 1
  }));
  model.compile({
    optimizer: tf.train.sgd(0.000001),
    loss: 'meanSquaredError'
  });

  // Fit the model using the prepared Dataset
  return model.fitDataset(flattenedDataset, {
    epochs: 10,
    callbacks: {
      onEpochEnd: async (epoch, logs) => {
        console.log(epoch, logs.loss);
      }
    }
  });
}

run().then(() => console.log('Done'));
For more information, check out the TensorFlow.js Data Github README.
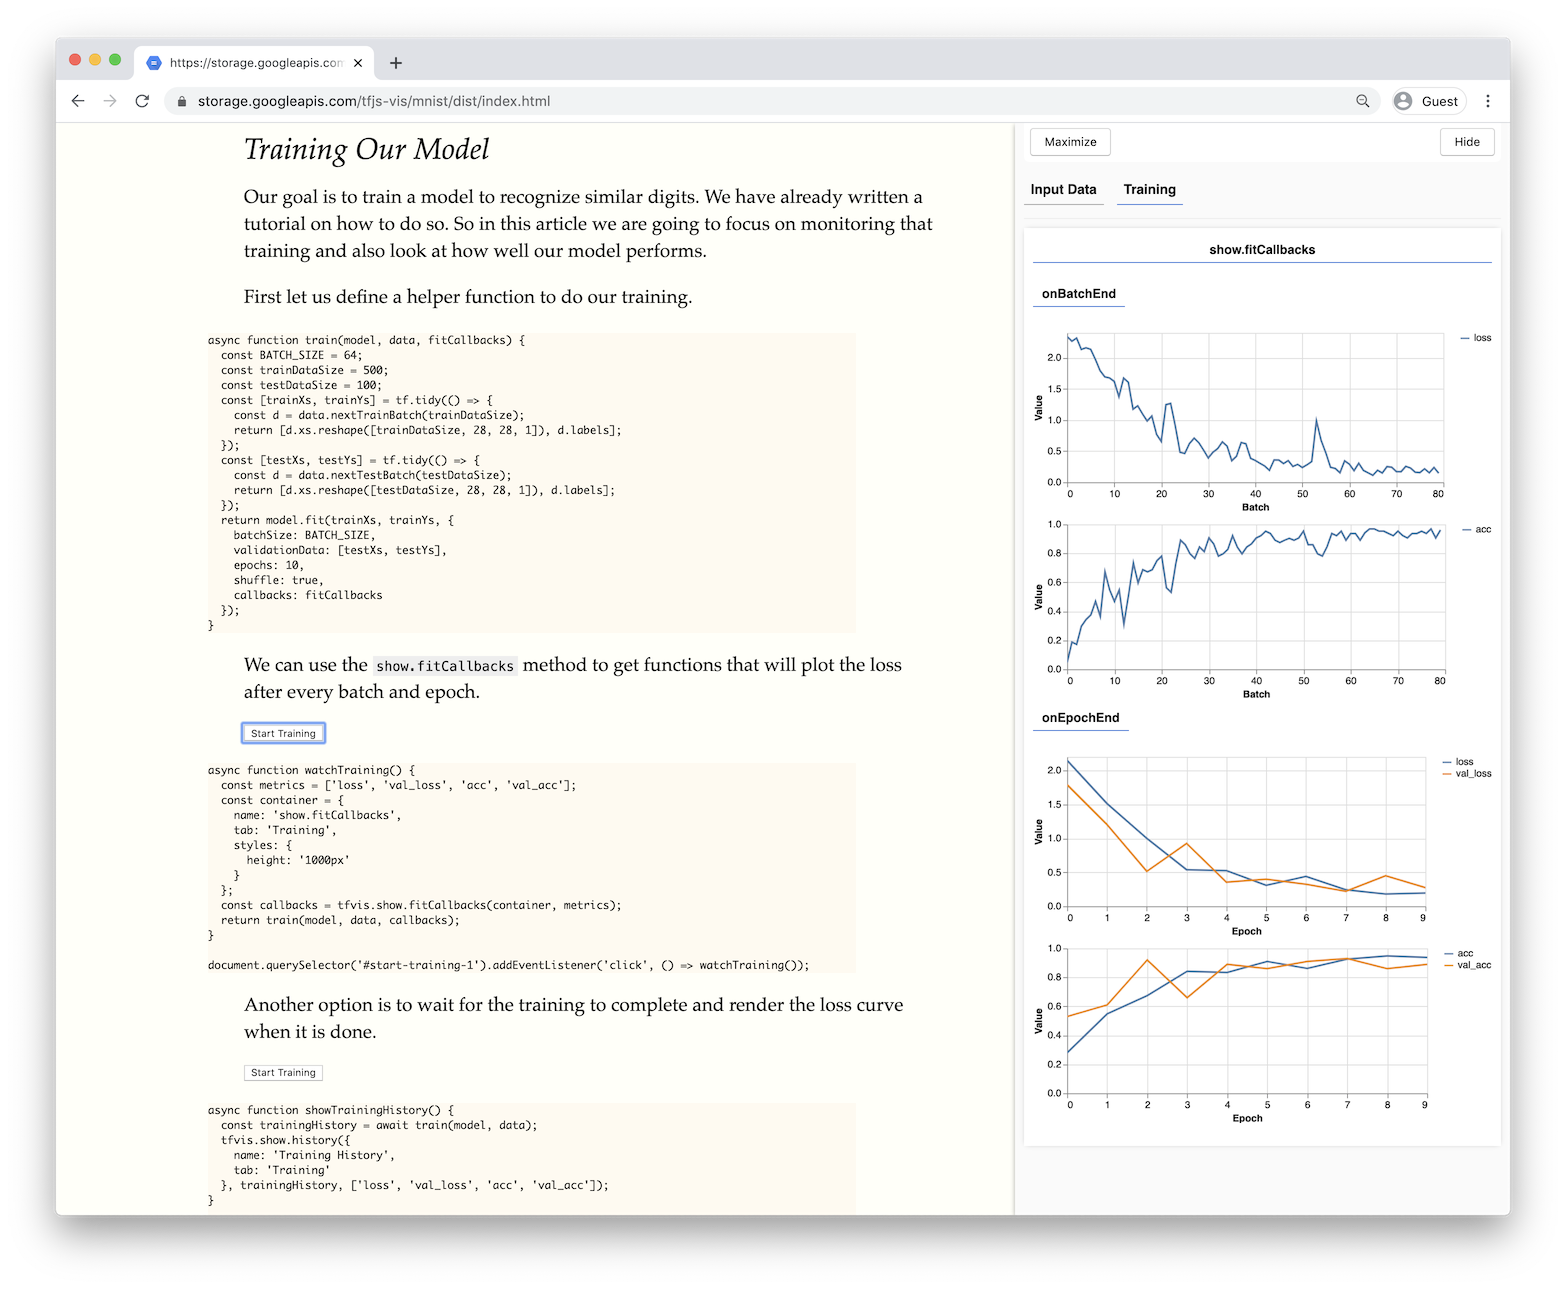
Tensorflow.js Visualization - tfjs-vis
tfjs-vis is a small library for in-browser visualization intended for use with TensorFlow.js. It allows you to visualize model behavior and Tensorflow.js specific object and also offers you a way of organizing visualizations.
You can install tfjs-vis with NPM or Yarn:
npm install @tensorflow/tfjs-vis
or
yarn add @tensorflow/tfjs-vis
If you want to learn how to use the library, I recommend checking out the two demos available on Github:
ML5JS - Friendly Machine Learning for the Web
ml5js is a high-level Machine Learning library built on top of TensorFlow.js. It is heavily inspired by Processing and p5.js and aims to make machine learning approachable for a broad audience of artists, creative coders, and students.
It allows you to train and use state-of-the-art models with only a few lines of code.
Image Classification:
// Initialize the Image Classifier method with MobileNet
const classifier = ml5.imageClassifier('MobileNet', modelLoaded);

// When the model is loaded
function modelLoaded() {
  console.log('Model Loaded!');
}

// Make a prediction with a selected image
classifier.classify(document.getElementById('image'), (err, results) => {
  console.log(results);
});
If you want to learn more about ML5JS, I recommend checking out the documentation as well as Coding Trains "A Beginner's Guide to Machine Learning with ml5.js", which gives you an excellent introduction to the library.
Resources
- TensorflowJS Homepage
- TensorflowJS API Documentation
- TensorflowJS Github Repository
- TensorflowJS Gallery
- TensorflowJS Examples
Summary
Tensorflow.js is a powerful deep learning library that enables us to use the power of Machine Learning in the browser. It can not only be used to train your own model inside the browser, but it also supports using models written in another Deep Learning library like Tensorflow or Keras.