In this article, I'll go over what Mask R-CNN is, how to use it in Keras to perform object detection and instance segmentation, and how to train a custom model.
What is Mask R-CNN?
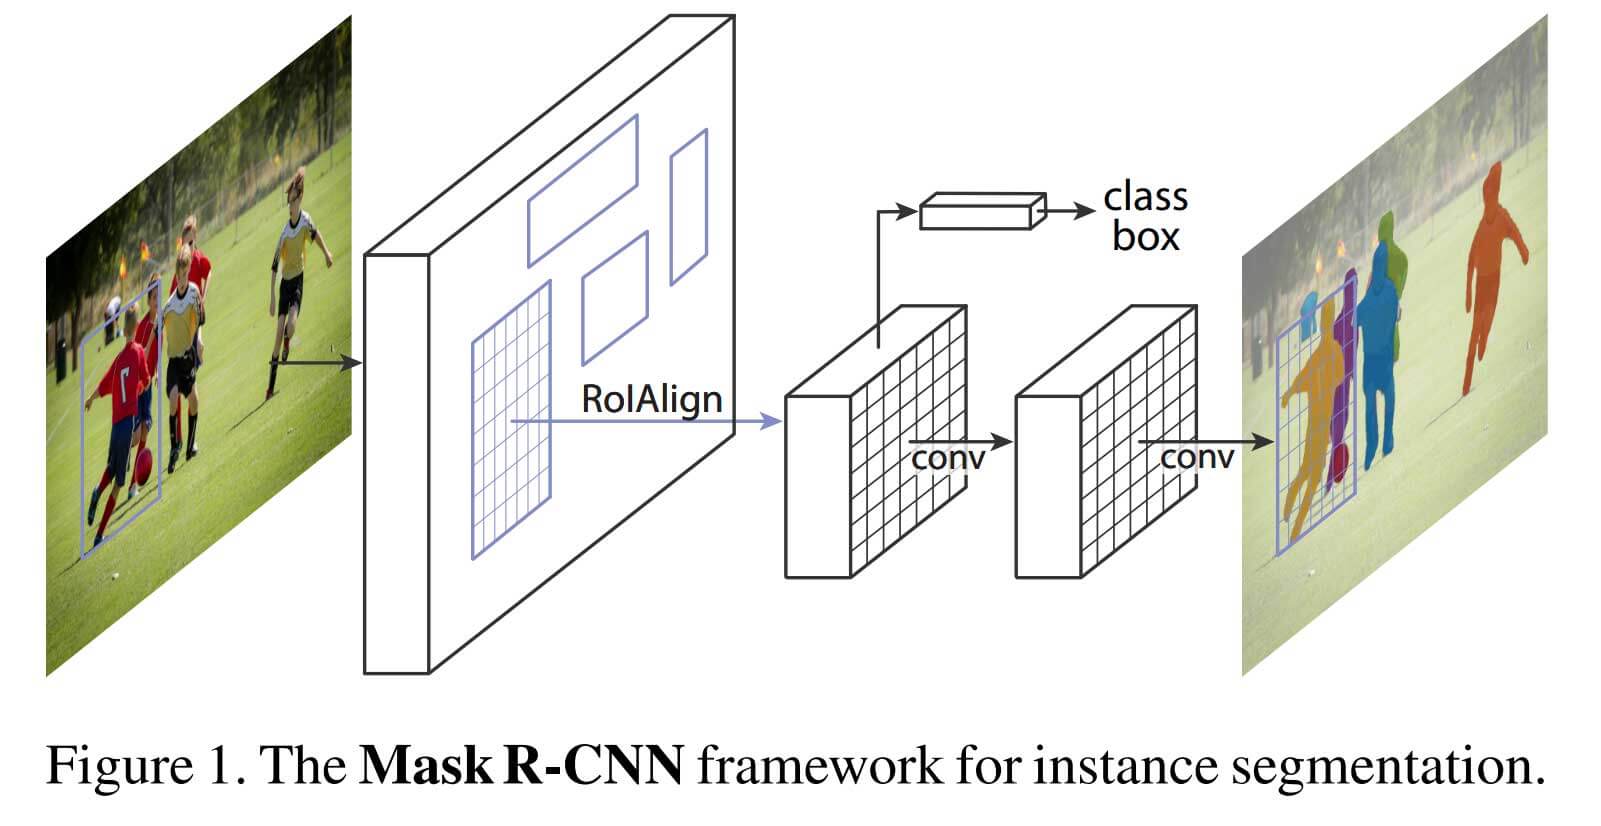
Mask R-CNN is an extension of Faster R-CNN, a popular object detection algorithm. Mask R-CNN extends Faster R-CNN by adding a branch for predicting an object mask in parallel with the existing branch for bounding box recognition.
Matterport Mask R-CNN Installation
To get started, you'll have to install Mask R-CNN on your machine. For this, you'll have to work through the following steps:
1. Clone the repository git clone https://github.com/matterport/Mask_RCNN
2. Install dependencies
cd Mask_RCNN
pip3 install -r requirements.txt
3. Run setup.py script
python3 setup.py install
4. (Optional) To train or test on MS COCO install pycocotools from one of these repos. They are forks of the original pycocotools with fixes for Python3 and Windows (the official repo doesn't seem to be active anymore).
- Linux: https://github.com/waleedka/coco
- Windows: https://github.com/philferriere/cocoapi. You must have the Visual C++ 2015 build tools on your path (see the repo for additional details)
Running a pre-trained model
We'll start by looking at how to load in a pre-trained model and use it to perform inference. You can find the complete code for this example on my Github.
1. Download Model Weights
Matterport Mask_RCNN provides pre-trained models for the COCO and Balloon dataset, which are both available on the release page.
For this article, we'll use the model pre-trained on the COCO dataset.
wget https://github.com/matterport/Mask_RCNN/releases/download/v2.0/mask_rcnn_coco.h5
2. Create configuration
To create the model- we first need to create a configuration object. This object defines properties for both training and prediction, including the number of classes, the GPU count, and the learning rate.
There is already a configuration available for the MS-COCO dataset that only needs to be slightly modified for inference.
class InferenceConfig(coco.CocoConfig):
    # Set batch size to 1 since we'll be running inference on
    # one image at a time. Batch size = GPU_COUNT * IMAGES_PER_GPU
    GPU_COUNT = 1
    IMAGES_PER_GPU = 1

config = InferenceConfig()
config.display()
Configurations:
BACKBONE                       resnet101
BACKBONE_STRIDES               [4, 8, 16, 32, 64]
BATCH_SIZE                     1
BBOX_STD_DEV                   [0.1 0.1 0.2 0.2]
COMPUTE_BACKBONE_SHAPE         None
DETECTION_MAX_INSTANCES        100
DETECTION_MIN_CONFIDENCE       0.7
DETECTION_NMS_THRESHOLD        0.3
FPN_CLASSIF_FC_LAYERS_SIZE     1024
GPU_COUNT                      1
GRADIENT_CLIP_NORM             5.0
IMAGES_PER_GPU                 1
IMAGE_CHANNEL_COUNT            3
IMAGE_MAX_DIM                  1024
IMAGE_META_SIZE                93
IMAGE_MIN_DIM                  800
IMAGE_MIN_SCALE                0
IMAGE_RESIZE_MODE              square
IMAGE_SHAPE                    [1024 1024    3]
LEARNING_MOMENTUM              0.9
LEARNING_RATE                  0.001
LOSS_WEIGHTS                   {'rpn_class_loss': 1.0, 'rpn_bbox_loss': 1.0, 'mrcnn_class_loss': 1.0, 'mrcnn_bbox_loss': 1.0, 'mrcnn_mask_loss': 1.0}
MASK_POOL_SIZE                 14
MASK_SHAPE                     [28, 28]
MAX_GT_INSTANCES               100
MEAN_PIXEL                     [123.7 116.8 103.9]
MINI_MASK_SHAPE                (56, 56)
NAME                           coco
NUM_CLASSES                    81
POOL_SIZE                      7
POST_NMS_ROIS_INFERENCE        1000
POST_NMS_ROIS_TRAINING         2000
PRE_NMS_LIMIT                  6000
ROI_POSITIVE_RATIO             0.33
RPN_ANCHOR_RATIOS              [0.5, 1, 2]
RPN_ANCHOR_SCALES              (32, 64, 128, 256, 512)
RPN_ANCHOR_STRIDE              1
RPN_BBOX_STD_DEV               [0.1 0.1 0.2 0.2]
RPN_NMS_THRESHOLD              0.7
RPN_TRAIN_ANCHORS_PER_IMAGE    256
STEPS_PER_EPOCH                1000
TOP_DOWN_PYRAMID_SIZE          256
TRAIN_BN                       False
TRAIN_ROIS_PER_IMAGE           200
USE_MINI_MASK                  True
USE_RPN_ROIS                   True
VALIDATION_STEPS               50
WEIGHT_DECAY                   0.0001
3. Create Model and Load Trained Weights
Now that we have downloaded the weights and created the config, we can create a model object and load the weights.
# Create model object in inference mode.
model = modellib.MaskRCNN(mode="inference", model_dir=MODEL_DIR, config=config)

# Load weights trained on MS-COCO
model.load_weights(COCO_MODEL_PATH, by_name=True)
4. Use model
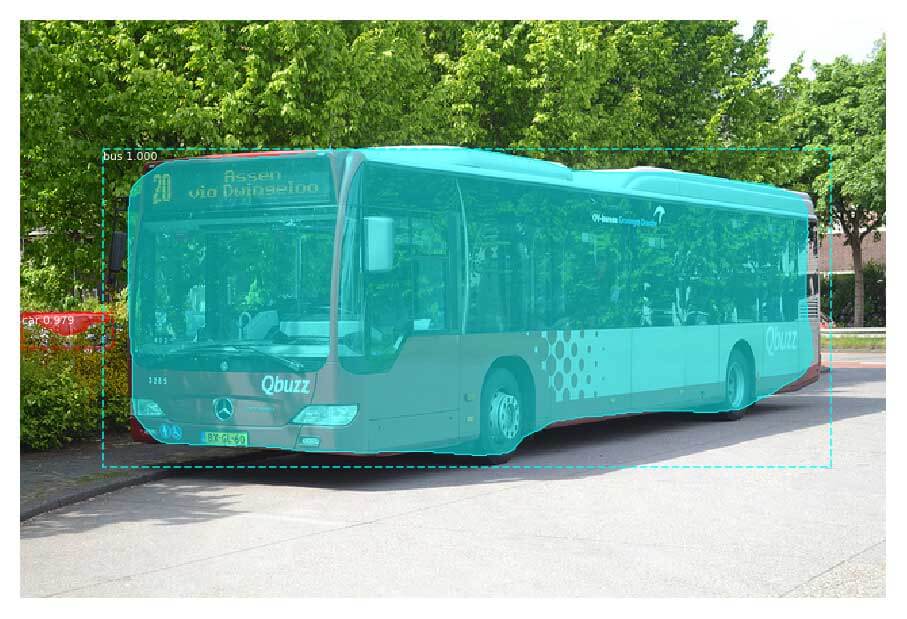
To test the model, we can load a random image from the images directory and make a prediction on it by calling the detect method.
# Load a random image from the images folder
file_names = next(os.walk(IMAGE_DIR))[2]
image = skimage.io.imread(os.path.join(IMAGE_DIR, random.choice(file_names)))

# Run detection
results = model.detect([image], verbose=1)

# Visualize results
r = results[0]
visualize.display_instances(image, r['rois'], r['masks'], r['class_ids'],
                            class_names, r['scores'])

Using model on video
I also created a script to run a model on a video or a webcam stream.
wget http://www.robots.ox.ac.uk/ActiveVision/Research/Projects/2009bbenfold_headpose/Datasets/TownCentreXVID.avi

python video_detection.py -v TownCentreXVID.avi -sp pedestrian_detection.avi
Train custom model on an object detection dataset
MaskRCNN also allows you to train custom object detection and instance segmentation models. To train a model, you'll need to create a class that loads in your data and a training config that defines properties for training. You can find the complete code inside the MaskRCNN Microcontroller Detection.ipynb file.
Creating the dataloader class
As an example, I'll use my Microcontroller Detection dataset, which was labeled with labelImg.
The annotation files are in PascalVOC format. So every annotations file looks as follows:
<annotation>
	<folder>object_detection</folder>
	<filename>IMG_20181228_101826.jpg</filename>
	<path>object_detection/IMG_20181228_101826.jpg</path>
	<source>
		<database>Unknown</database>
	</source>
	<size>
		<width>800</width>
		<height>600</height>
		<depth>3</depth>
	</size>
	<segmented>0</segmented>
	<object>
		<name>Arduino_Nano</name>
		<pose>Unspecified</pose>
		<truncated>0</truncated>
		<difficult>0</difficult>
		<bndbox>
			<xmin>317</xmin>
			<ymin>265</ymin>
			<xmax>556</xmax>
			<ymax>342</ymax>
		</bndbox>
	</object>
</annotation>
The dataloader class has three methods we need to implement:
load_dataset()load_mask()image_reference()
class MicrocontrollerDataset(utils.Dataset):
    def load_dataset(self, dataset_dir):
        pass

    def load_mask(self, image_id):
        pass

    def image_reference(self, image_id):
        pass
The load_dataset method will define all the classes and add the images using the add_image method. The load_mask method will load in the masks for a given image, and the image_reference method will return the path to an image given its id.
For the Microcontroller dataset, the dataloader class looks as follows:
class MicrocontrollerDataset(utils.Dataset):
    def load_dataset(self, dataset_dir):
        self.add_class('dataset', 1, 'Raspberry_Pi_3')
        self.add_class('dataset', 2, 'Arduino_Nano')
        self.add_class('dataset', 3, 'ESP8266')
        self.add_class('dataset', 4, 'Heltec_ESP32_Lora')

        # find all images
        for i, filename in enumerate(os.listdir(dataset_dir)):
            if '.jpg' in filename:
                self.add_image('dataset',
                               image_id=i,
                               path=os.path.join(dataset_dir, filename),
                               annotation=os.path.join(dataset_dir, filename.replace('.jpg', '.xml')))

    # extract bounding boxes from an annotation file
    def extract_boxes(self, filename):
        # load and parse the file
        tree = ET.parse(filename)
        # get the root of the document
        root = tree.getroot()
        # extract each bounding box
        boxes = []
        classes = []
        for member in root.findall('object'):
            xmin = int(member[4][0].text)
            ymin = int(member[4][1].text)
            xmax = int(member[4][2].text)
            ymax = int(member[4][3].text)
            boxes.append([xmin, ymin, xmax, ymax])
            classes.append(self.class_names.index(member[0].text))
        # extract image dimensions
        width = int(root.find('size')[0].text)
        height = int(root.find('size')[1].text)
        return boxes, classes, width, height

    # load the masks for an image
    def load_mask(self, image_id):
        # get details of image
        info = self.image_info[image_id]
        # define box file location
        path = info['annotation']
        # load XML
        boxes, classes, w, h = self.extract_boxes(path)
        # create one array for all masks, each on a different channel
        masks = np.zeros([h, w, len(boxes)], dtype='uint8')
        # create masks
        for i in range(len(boxes)):
            box = boxes[i]
            row_s, row_e = box[1], box[3]
            col_s, col_e = box[0], box[2]
            masks[row_s:row_e, col_s:col_e, i] = 1
        return masks, np.asarray(classes, dtype='int32')

    def image_reference(self, image_id):
        info = self.image_info[image_id]
        return info['path']
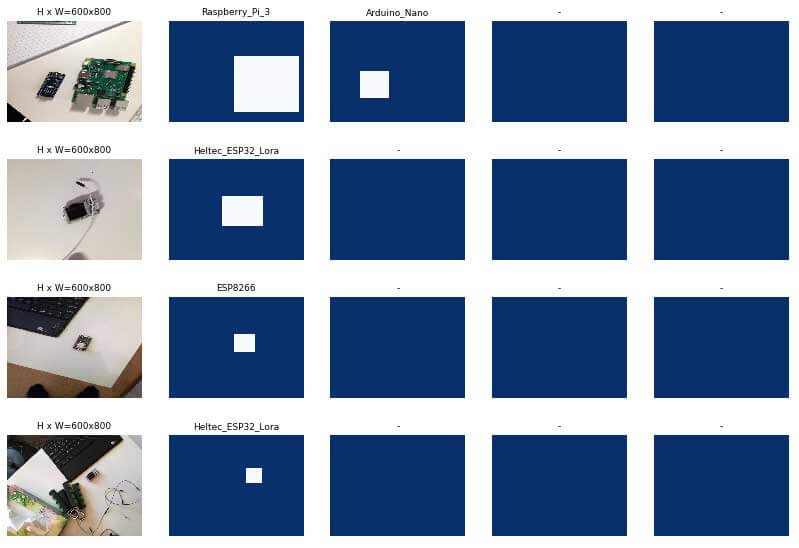
Now that we have the dataloader class, we can load in both the training and testing set and visualize a few random images and their masks.
# Create training and validation set
# train set
dataset_train = MicrocontrollerDataset()
dataset_train.load_dataset('Microcontroller Detection/train')
dataset_train.prepare()
print('Train: %d' % len(dataset_train.image_ids))

# test/val set
dataset_val = MicrocontrollerDataset()
dataset_val.load_dataset('Microcontroller Detection/test')
dataset_val.prepare()
print('Test: %d' % len(dataset_val.image_ids))

# Load and display random samples
image_ids = np.random.choice(dataset_train.image_ids, 4)
for image_id in image_ids:
    image = dataset_train.load_image(image_id)
    mask, class_ids = dataset_train.load_mask(image_id)
    visualize.display_top_masks(image, mask, class_ids, dataset_train.class_names)
Creating the config object
MaskRCNN has a Config class. It defines properties for both training and prediction, including the number of classes, GPU count, and the learning rate.
You can take a look at the default config using the following code:
from mrcnn.config import Config
config = Config()
config.display()
Configurations:
BACKBONE                       resnet101
BACKBONE_STRIDES               [4, 8, 16, 32, 64]
BATCH_SIZE                     2
BBOX_STD_DEV                   [0.1 0.1 0.2 0.2]
COMPUTE_BACKBONE_SHAPE         None
DETECTION_MAX_INSTANCES        100
DETECTION_MIN_CONFIDENCE       0.7
DETECTION_NMS_THRESHOLD        0.3
FPN_CLASSIF_FC_LAYERS_SIZE     1024
GPU_COUNT                      1
GRADIENT_CLIP_NORM             5.0
IMAGES_PER_GPU                 2
IMAGE_CHANNEL_COUNT            3
IMAGE_MAX_DIM                  1024
IMAGE_META_SIZE                13
IMAGE_MIN_DIM                  800
IMAGE_MIN_SCALE                0
IMAGE_RESIZE_MODE              square
IMAGE_SHAPE                    [1024 1024    3]
LEARNING_MOMENTUM              0.9
LEARNING_RATE                  0.001
LOSS_WEIGHTS                   {'rpn_class_loss': 1.0, 'rpn_bbox_loss': 1.0, 'mrcnn_class_loss': 1.0, 'mrcnn_bbox_loss': 1.0, 'mrcnn_mask_loss': 1.0}
MASK_POOL_SIZE                 14
MASK_SHAPE                     [28, 28]
MAX_GT_INSTANCES               100
MEAN_PIXEL                     [123.7 116.8 103.9]
MINI_MASK_SHAPE                (56, 56)
NAME                           None
NUM_CLASSES                    1
POOL_SIZE                      7
POST_NMS_ROIS_INFERENCE        1000
POST_NMS_ROIS_TRAINING         2000
PRE_NMS_LIMIT                  6000
ROI_POSITIVE_RATIO             0.33
RPN_ANCHOR_RATIOS              [0.5, 1, 2]
RPN_ANCHOR_SCALES              (32, 64, 128, 256, 512)
RPN_ANCHOR_STRIDE              1
RPN_BBOX_STD_DEV               [0.1 0.1 0.2 0.2]
RPN_NMS_THRESHOLD              0.7
RPN_TRAIN_ANCHORS_PER_IMAGE    256
STEPS_PER_EPOCH                1000
TOP_DOWN_PYRAMID_SIZE          256
TRAIN_BN                       False
TRAIN_ROIS_PER_IMAGE           200
USE_MINI_MASK                  True
USE_RPN_ROIS                   True
VALIDATION_STEPS               50
WEIGHT_DECAY                   0.0001
For training, we need to change at least two properties: the NAME and the NUM_CLASSES.
class MicrocontrollerConfig(Config):
    # Give the configuration a recognizable name
    NAME = "microcontroller_detection"

    NUM_CLASSES = 1 + 4 # background + classes

    GPU_COUNT = 1
    IMAGES_PER_GPU = 1

config = MicrocontrollerConfig()
config.display()
Creating and training the model.
Now that we have both the Config and Dataset class, we can create and train a model using the following code.
# Create model in training mode
model = modellib.MaskRCNN(mode="training", config=config,
                          model_dir=MODEL_DIR)

# Which weights to start with?
init_with = "coco"  # imagenet, coco, or last

if init_with == "imagenet":
    model.load_weights(model.get_imagenet_weights(), by_name=True)
elif init_with == "coco":
    # Load weights trained on MS COCO, but skip layers that
    # are different due to the different number of classes
    # See README for instructions to download the COCO weights
    model.load_weights(COCO_MODEL_PATH, by_name=True,
                       exclude=["mrcnn_class_logits", "mrcnn_bbox_fc",
                                "mrcnn_bbox", "mrcnn_mask"])
elif init_with == "last":
    # Load the last model you trained and continue training
    model.load_weights(model.find_last(), by_name=True)

# Train the head branches
# Passing layers="heads" freezes all layers except the head
# layers. You can also pass a regular expression to select
# which layers to train by name pattern.
model.train(dataset_train, dataset_val,
            learning_rate=config.LEARNING_RATE,
            epochs=5,
            layers='heads')

# Fine tune all layers
# Passing layers="all" trains all layers. You can also
# pass a regular expression to select which layers to
# train by name pattern.
model.train(dataset_train, dataset_val,
            learning_rate=config.LEARNING_RATE / 10,
            epochs=10,
            layers="all")
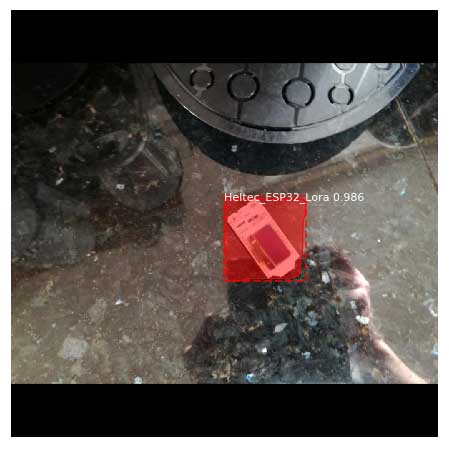
Evaluating the model on the test-set
We can evaluate the trained model by making predictions on the test dataset.
class InferenceConfig(MicrocontrollerConfig):
GPU_COUNT = 1
IMAGES_PER_GPU = 1
inference_config = InferenceConfig()
# Recreate the model in inference mode
model = modellib.MaskRCNN(mode="inference",
config=inference_config,
model_dir=MODEL_DIR)
# Get path to saved weights
# Either set a specific path or find last trained weights
# model_path = os.path.join(ROOT_DIR, ".h5 file name here")
model_path = model.find_last()
# Load trained weights
print("Loading weights from ", model_path)
model.load_weights(model_path, by_name=True)
# Test on a random image
image_id = random.choice(dataset_val.image_ids)
original_image, image_meta, gt_class_id, gt_bbox, gt_mask =\
modellib.load_image_gt(dataset_val, inference_config,
image_id, use_mini_mask=False)
log("original_image", original_image)
log("image_meta", image_meta)
log("gt_class_id", gt_class_id)
log("gt_bbox", gt_bbox)
log("gt_mask", gt_mask)
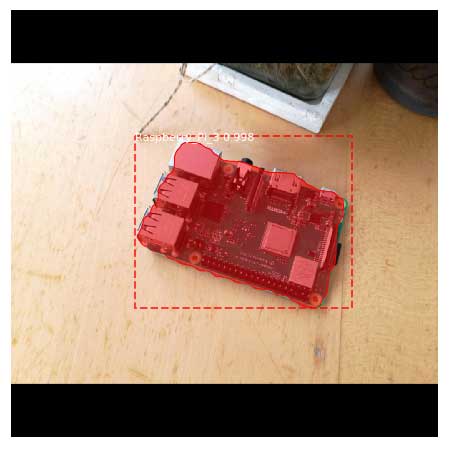
visualize.display_instances(original_image, gt_bbox, gt_mask, gt_class_id,
dataset_train.class_names, figsize=(8, 8))
Train custom model on instance segmentation dataset
For instance segmentation, I'll use my Microcontroller instance segmentation dataset, which I labeled with labelme.
Instead of XML files, we now have JSON files with the following format:
{
  "version": "4.2.9",
  "flags": {},
  "shapes": [
    {
      "label": "Arduino_Nano",
      "points": [
        [
          318.9368770764119,
          307.30897009966776
        ],
        [
          328.4053156146179,
          307.1428571428571
        ],
        [
          323.75415282392026,
          293.0232558139535
        ],
        [
          530.2839116719243,
          269.4006309148265
        ],
        [
          549.2146596858638,
          315.9685863874345
        ],
        [
          339.79057591623035,
          341.0994764397906
        ],
        [
          336.1256544502618,
          327.7486910994764
        ],
        [
          326.1780104712042,
          328.5340314136125
        ]
      ],
      "group_id": null,
      "shape_type": "polygon",
      "flags": {}
    }
  ],
  "imagePath": "IMG_20181228_101826.jpg",
  "imageData": "...",
  "imageHeight": 600,
  "imageWidth": 800
}
To load in the polygon annotations, we will have to change the load_mask method.
class MicrocontrollerDataset(utils.Dataset):
    def load_dataset(self, dataset_dir):
        self.add_class('dataset', 1, 'Raspberry_Pi_3')
        self.add_class('dataset', 2, 'Arduino_Nano')
        self.add_class('dataset', 3, 'ESP8266')
        self.add_class('dataset', 4, 'Heltec_ESP32_Lora')

        # find all images
        for i, filename in enumerate(os.listdir(dataset_dir)):
            if '.jpg' in filename:
                self.add_image('dataset',
                               image_id=i,
                               path=os.path.join(dataset_dir, filename),
                               annotation=os.path.join(dataset_dir, filename.replace('.jpg', '.json')))

    def extract_masks(self, filename):
        json_file = os.path.join(filename)
        with open(json_file) as f:
            img_anns = json.load(f)

        masks = np.zeros([600, 800, len(img_anns['shapes'])], dtype='uint8')
        classes = []
        for i, anno in enumerate(img_anns['shapes']):
            mask = np.zeros([600, 800], dtype=np.uint8)
            cv2.fillPoly(mask, np.array([anno['points']], dtype=np.int32), 1)
            masks[:, :, i] = mask
            classes.append(self.class_names.index(anno['label']))
        return masks, classes

    # load the masks for an image
    def load_mask(self, image_id):
        # get details of image
        info = self.image_info[image_id]
        # define box file location
        path = info['annotation']
        # load XML
        masks, classes = self.extract_masks(path)
        return masks, np.asarray(classes, dtype='int32')

    def image_reference(self, image_id):
        info = self.image_info[image_id]
        return info['path']
Everything else stays the same as in the object detection example. You can find the full code in the MaskRCNN Microcontroller Segmentation file.
Summary
In this article, you discovered how to use Matterport Mask R-CNN to run a pre-trained Mask R-CNN model on an image or a video and how to train a custom model with both a object detection and instance segmentation dataset.