
Update Feb/2020: Facebook Research released pre-built Detectron2 versions, making local installation a lot easier. (Tested on Linux and Windows)
Alongside PyTorch version 1.3, Facebook also released a ground-up rewrite of their object detection framework Detectron. The new framework is called Detectron2 and is now implemented in PyTorch instead of Caffe2.
Detectron2 allows us to easily use and build object detection models. This article will help you get started with Detectron2 by learning how to use a pre-trained model for inferences and how to train your own model.
You can find all the code covered in the article on my Github.
Install Detectron2
Installing Detectron2 is easy compared to other object detection frameworks like the Tensorflow Object Detection API.
Installation on Google Colab
If you are working in Google Colab, it can be installed with the following four lines:
!python -m pip install pyyaml==5.1
# Detectron2 has not released pre-built binaries for the latest pytorch (https://github.com/facebookresearch/detectron2/issues/4053)
# so we install from source instead. This takes a few minutes.
!python -m pip install 'git+https://github.com/facebookresearch/detectron2.git'

# Install pre-built detectron2 that matches pytorch version, if released:
# See https://detectron2.readthedocs.io/tutorials/install.html for instructions
#!pip install detectron2 -f https://dl.fbaipublicfiles.com/detectron2/wheels/{CUDA_VERSION}/{TORCH_VERSION}/index.html

# exit(0)  # After installation, you may need to "restart runtime" in Colab. This line can also restart runtime
After executing the cell, click the "RESTART RUNTIME" button at the bottom of the output for the installation to take effect.
Installation on a local machine
If you are working on a local machine, it isn't quite that easy but still manageable.
First, you need to have all the requirements installed.
Requirements:
- Python >= 3.6
- PyTorch >=1.6
- torchvision that matches the PyTorch installation. You can install them together at pytorch.org to make sure of this.
- OpenCV, needed for demo and visualization
- GCC >= 5 (if building from source)
Build Detectron2 from Source
After having the above dependencies, you can install detectron2 from source by running:
python -m pip install 'git+https://github.com/facebookresearch/detectron2.git'
# (add --user if you don't have permission)

# Or, to install it from a local clone:
git clone https://github.com/facebookresearch/detectron2.git
python -m pip install -e detectron2

# Or if you are on macOS
CC=clang CXX=clang++ ARCHFLAGS="-arch x86_64" python -m pip install ......
Installing Pre-built Detectron2
On Linux, you can now install a pre-built with the following command:
python -m pip install detectron2 -f \
  https://dl.fbaipublicfiles.com/detectron2/wheels/cu111/torch1.8/index.html
You can replace cu111 with "cu{110,102,101,100,92}" depending on your CUDA version or "cpu" if you don't have a GPU.
For most machines, this installation should work fine. However, if you are experiencing any errors, take a look at the Common Installation Issues section of the official installation guide.
Install using Docker
Another great way to install Detectron2 is by using Docker. Docker is great because you don't need to install anything locally, which allows you to keep your machine nice and clean.
If you want to run Detectron2 with Docker, you can find a Dockerfile and docker-compose.yml file in the docker directory of the repository.
For those of you who also want to use Jupyter notebooks inside their container, I created a custom Docker configuration, which automatically starts Jupyter after running the container. If you're interested, you can find the files on my Github.
Inference with a pre-trained model
Using a pre-trained model is super easy in Detectron2. You only need to load in a config and some weights and then create a DefaultPredictor. After that, you can make predictions and display them using Detectron's Visualizer utility.
# import some common detectron2 utilities
from detectron2.engine import DefaultPredictor
from detectron2.config import get_cfg
from detectron2.utils.visualizer import Visualizer
from detectron2.data import MetadataCatalog
import cv2

# get image
!wget http://images.cocodataset.org/val2017/000000439715.jpg -O input.jpg
im = cv2.imread("./input.jpg")

# Create config
cfg = get_cfg()
cfg.merge_from_file("./detectron2_repo/configs/COCO-Detection/faster_rcnn_R_101_FPN_3x.yaml")
cfg.MODEL.ROI_HEADS.SCORE_THRESH_TEST = 0.5  # set threshold for this model
cfg.MODEL.WEIGHTS = "detectron2://COCO-Detection/faster_rcnn_R_101_FPN_3x/137851257/model_final_f6e8b1.pkl"

# Create predictor
predictor = DefaultPredictor(cfg)

# Make prediction
outputs = predictor(im)
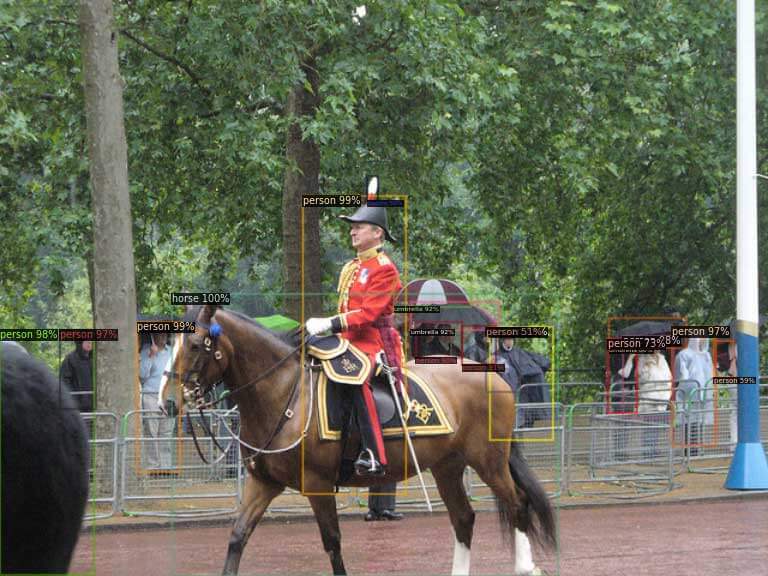
The above code imports detectron2, downloads an example image, creates a config, downloads the weights of a Mask RCNN model, and makes a prediction on the image.
After making the prediction, we can display the results using the following code:
v = Visualizer(im[:, :, ::-1], MetadataCatalog.get(cfg.DATASETS.TRAIN[0]), scale=1.2)
v = v.draw_instance_predictions(outputs["instances"].to("cpu"))
cv2.imshow(v.get_image()[:, :, ::-1])
You can find all the available models on the "Detectron2 Model Zoo and Baselines" site.
To find the config file's path, you need to click on the name of the model and then look at the location.
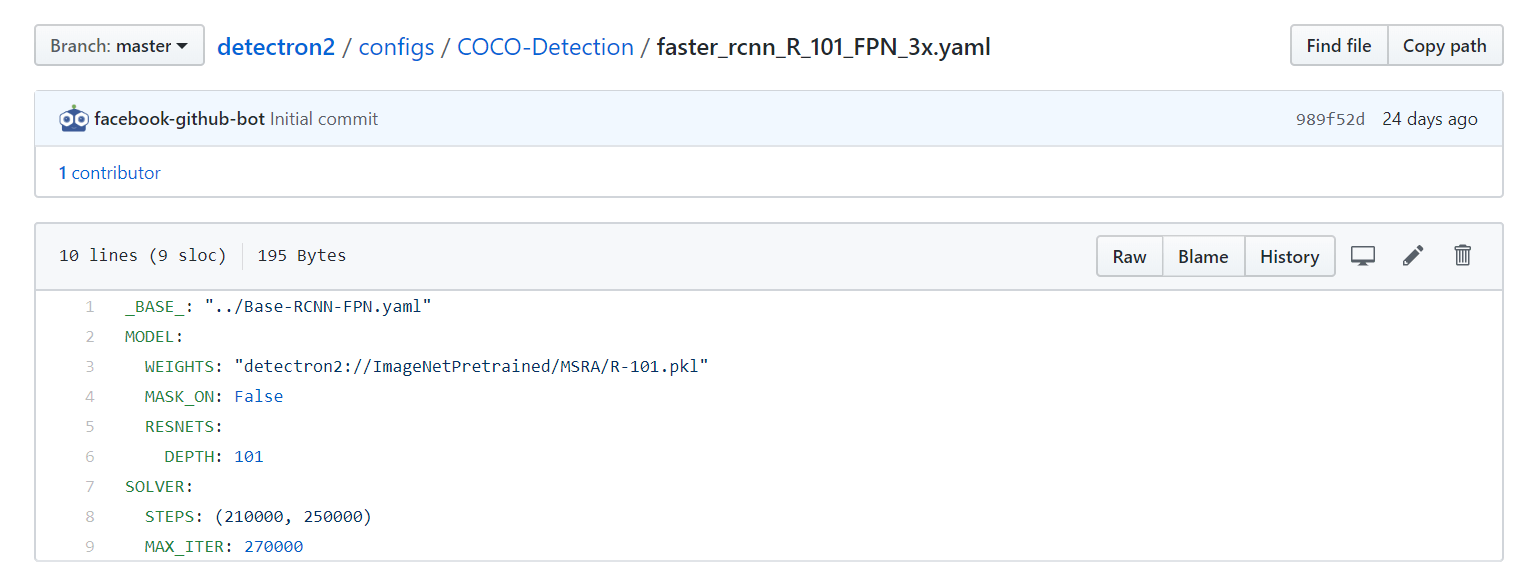
The URL of the model weights can be copied directly from the link saying model.

You can either paste in the link directly like
cfg.MODEL.WEIGHTS = "https://dl.fbaipublicfiles.com/detectron2/COCO-InstanceSegmentation/mask_rcnn_R_101_FPN_3x/138205316/metrics.json"
Or you can use the following shortcut:
cfg.MODEL.WEIGHTS = "detectron2://COCO-Detection/faster_rcnn_R_101_FPN_3x/137851257/model_final_f6e8b1.pkl"
Other models – Instance Segmentation, Person Keypoint Detection and Panoptic Segmentation
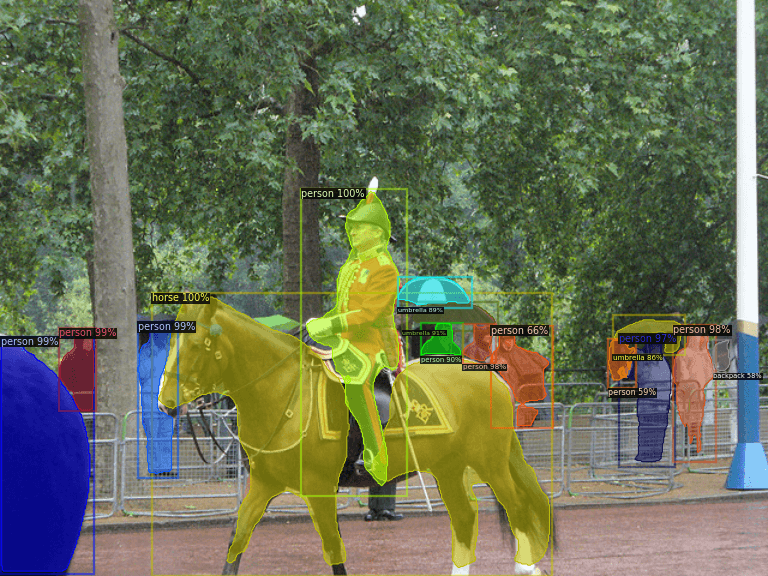
As you might have noticed when looking through the Model zoo, Detectron2 supports object detection and other vision tasks like Instance Segmentation, Person Keypoint Detection and Panoptic Segmentation, and switching from one to another is incredibly easy.
The only thing we need to change to perform image segmentation instead of object detection is to use the config and weights of an image segmentation model instead of an object detection model.
cfg = get_cfg()
cfg.merge_from_file("./detectron2_repo/configs/COCO-InstanceSegmentation/mask_rcnn_R_50_FPN_3x.yaml")
cfg.MODEL.ROI_HEADS.SCORE_THRESH_TEST = 0.5  # set threshold for this model
cfg.MODEL.WEIGHTS = "detectron2://COCO-InstanceSegmentation/mask_rcnn_R_50_FPN_3x/137849600/model_final_f10217.pkl"
predictor = DefaultPredictor(cfg)
outputs = predictor(im)

v = Visualizer(im[:, :, ::-1], MetadataCatalog.get(cfg.DATASETS.TRAIN[0]), scale=1.2)
v = v.draw_instance_predictions(outputs["instances"].to("cpu"))
cv2.imshow(v.get_image()[:, :, ::-1])
If you are interested, you can also try out Person Keypoint Detection or Panoptic Segmentation by choosing a pre-trained model from the model zoo.
Train a custom model
To train a model on a custom data-set, we need to register our data-set to use the predefined data loaders.
Registering a data-set can be done by creating a function that returns all the needed information about the data as a list and passing the result to DatasetCatalog.register.
def get_dicts():
  ...
  return list[dict] in the following format

from detectron2.data import DatasetCatalog
DatasetCatalog.register("my_dataset", get_dicts)
For more information about what format a dictionary should have, check out the "Register a Dataset" section of the documentation.
After registering the data-set, we can train a model using the DefaultTrainer class.
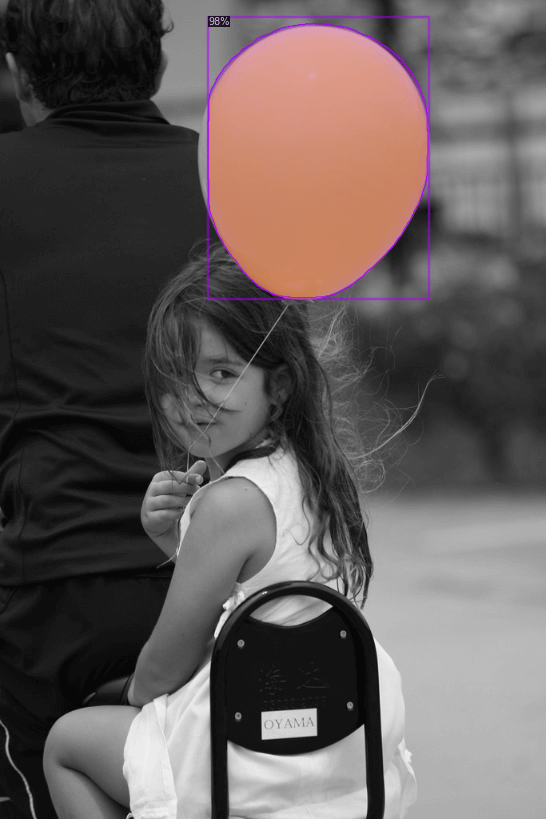
Training a model to detect balloons
In their Detectron2 Tutorial notebook, the Detectron2 team shows how to train a Mask RCNN model to detect all the ballons inside an image.
To do so, they first downloaded the data-set.
# download, decompress the data
!wget https://github.com/matterport/Mask_RCNN/releases/download/v2.1/balloon_dataset.zip
!unzip balloon_dataset.zip > /dev/null
After downloading, the data has to be registered as discussed above.
import os
import numpy as np
import json
from detectron2.structures import BoxMode
import itertools

# write a function that loads the dataset into detectron2's standard format
def get_balloon_dicts(img_dir):
    json_file = os.path.join(img_dir, "via_region_data.json")
    with open(json_file) as f:
        imgs_anns = json.load(f)

    dataset_dicts = []
    for _, v in imgs_anns.items():
        record = {}

        filename = os.path.join(img_dir, v["filename"])
        height, width = cv2.imread(filename).shape[:2]

        record["file_name"] = filename
        record["height"] = height
        record["width"] = width

        annos = v["regions"]
        objs = []
        for _, anno in annos.items():
            assert not anno["region_attributes"]
            anno = anno["shape_attributes"]
            px = anno["all_points_x"]
            py = anno["all_points_y"]
            poly = [(x + 0.5, y + 0.5) for x, y in zip(px, py)]
            poly = list(itertools.chain.from_iterable(poly))

            obj = {
                "bbox": [np.min(px), np.min(py), np.max(px), np.max(py)],
                "bbox_mode": BoxMode.XYXY_ABS,
                "segmentation": [poly],
                "category_id": 0,
                "iscrowd": 0
            }
            objs.append(obj)
        record["annotations"] = objs
        dataset_dicts.append(record)
    return dataset_dicts

from detectron2.data import DatasetCatalog, MetadataCatalog
for d in ["train", "val"]:
    DatasetCatalog.register("balloon/" + d, lambda d=d: get_balloon_dicts("balloon/" + d))
    MetadataCatalog.get("balloon/" + d).set(thing_classes=["balloon"])
balloon_metadata = MetadataCatalog.get("balloon/train")
Lastly, the pre-trained model can be fine-tuned for the new data-set using the DefaultTrainer.
from detectron2.engine import DefaultTrainer
from detectron2.config import get_cfg

cfg = get_cfg()
cfg.merge_from_file("./detectron2_repo/configs/COCO-InstanceSegmentation/mask_rcnn_R_50_FPN_3x.yaml")
cfg.DATASETS.TRAIN = ("balloon/train",)
cfg.DATASETS.TEST = ()   # no metrics implemented for this dataset
cfg.DATALOADER.NUM_WORKERS = 2
cfg.MODEL.WEIGHTS = "detectron2://COCO-InstanceSegmentation/mask_rcnn_R_50_FPN_3x/137849600/model_final_f10217.pkl"  # initialize from model zoo
cfg.SOLVER.IMS_PER_BATCH = 2
cfg.SOLVER.BASE_LR = 0.00025
cfg.SOLVER.MAX_ITER = 300    # 300 iterations seems good enough, but you can certainly train longer
cfg.MODEL.ROI_HEADS.BATCH_SIZE_PER_IMAGE = 128   # faster, and good enough for this toy dataset
cfg.MODEL.ROI_HEADS.NUM_CLASSES = 1  # only has one class (ballon)

os.makedirs(cfg.OUTPUT_DIR, exist_ok=True)
trainer = DefaultTrainer(cfg)
trainer.resume_or_load(resume=False)
trainer.train()
And that's it! That's how easy it is to train a custom model with Detectron2.
Now that the model is trained, it can be used for inference on the validation set:
from detectron2.utils.visualizer import ColorMode

# load weights
cfg.MODEL.WEIGHTS = os.path.join(cfg.OUTPUT_DIR, "model_final.pth")
cfg.MODEL.ROI_HEADS.SCORE_THRESH_TEST = 0.7   # set the testing threshold for this model
# Set training data-set path
cfg.DATASETS.TEST = ("balloon/val", )
# Create predictor (model for inference)
predictor = DefaultPredictor(cfg)

dataset_dicts = get_balloon_dicts("balloon/val")
for d in random.sample(dataset_dicts, 3):
    im = cv2.imread(d["file_name"])
    outputs = predictor(im)
    v = Visualizer(im[:, :, ::-1],
                   metadata=balloon_metadata,
                   scale=0.8,
                   instance_mode=ColorMode.IMAGE_BW   # remove the colors of unsegmented pixels
    )
    v = v.draw_instance_predictions(outputs["instances"].to("cpu"))
    cv2_imshow(v.get_image()[:, :, ::-1])
Save your model and config
After training, the model is getting saved under cfg.OUTPUT_DIR+"/model_final.pth". To use the model for inference, you need both the model weights and config. To save the config, use:
f = open('config.yml', 'w')
f.write(cfg.dump())
f.close()
For an inference example, check out my detect_from_webcam_or_video.py script.
Data Augmentation
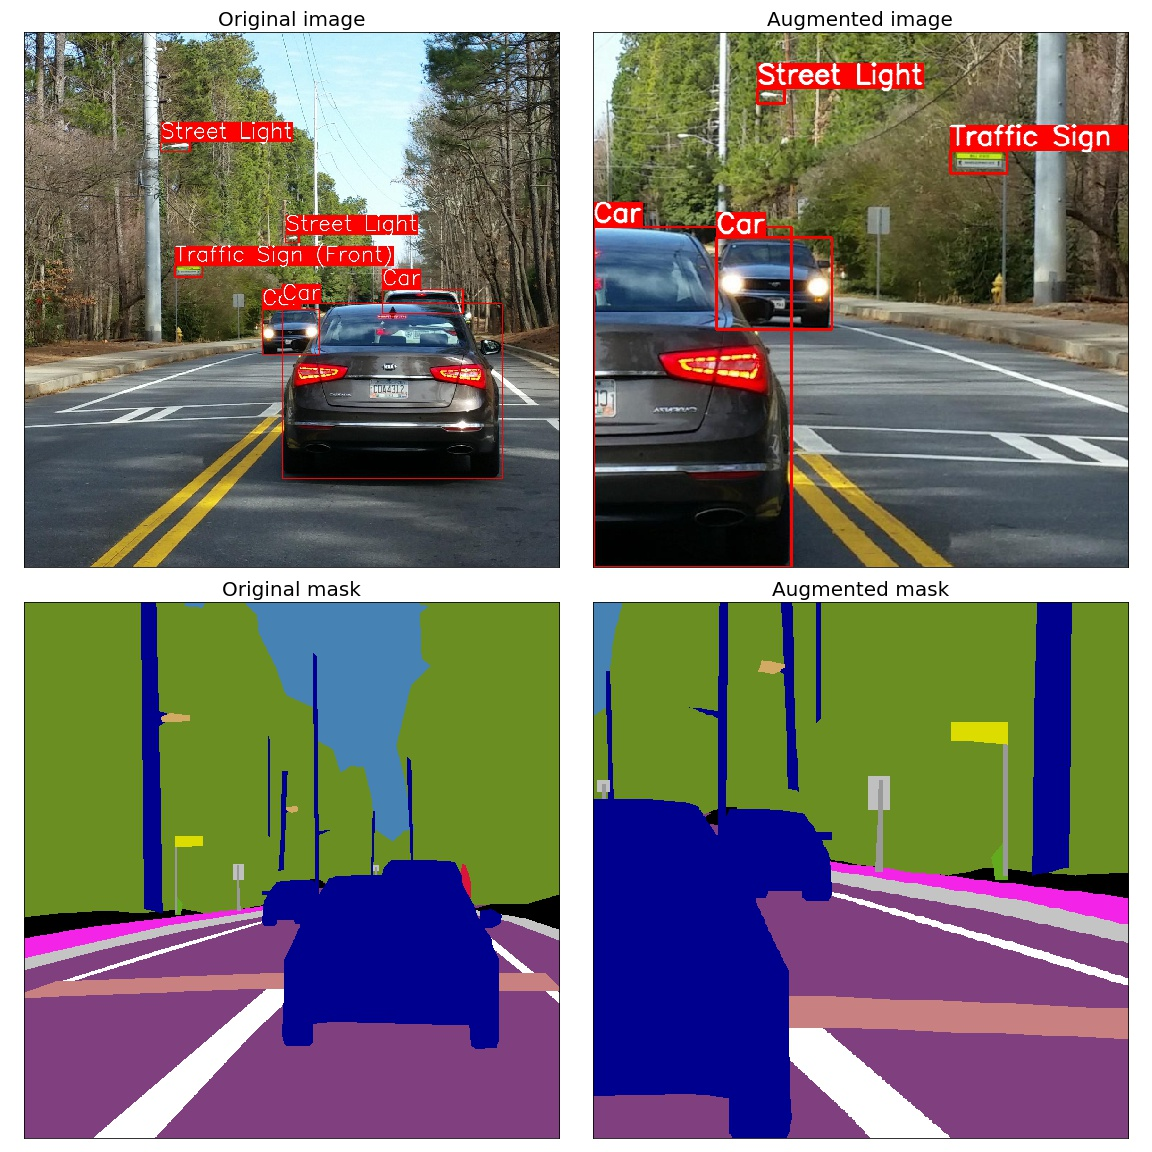
Augmentation is an integral part of training a model, as it allows practitioners to significantly increase the diversity of data available without actually having to collect new data.
Data Augmentation is most commonly used for image classification, but it can also be used in many other areas, including object detection, instance segmentation, and keypoint detection.
Detectron2 allows you to perform data augmentation by writing a custom DatasetMapper. The role of the mapper is to transform the lightweight representation of a data-set into a format that is ready for the model to consume.
A mapper could look like:
from detectron2.data import detection_utils as utils
import detectron2.data.transforms as T
import copy

def custom_mapper(dataset_dict):
    dataset_dict = copy.deepcopy(dataset_dict)  # it will be modified by code below
    image = utils.read_image(dataset_dict["file_name"], format="BGR")
    transform_list = [
        T.Resize((800,600)),
        T.RandomBrightness(0.8, 1.8),
        T.RandomContrast(0.6, 1.3),
        T.RandomSaturation(0.8, 1.4),
        T.RandomRotation(angle=[90, 90]),
        T.RandomLighting(0.7),
        T.RandomFlip(prob=0.4, horizontal=False, vertical=True),
    ]
    image, transforms = T.apply_transform_gens(transform_list, image)
    dataset_dict["image"] = torch.as_tensor(image.transpose(2, 0, 1).astype("float32"))

    annos = [
        utils.transform_instance_annotations(obj, transforms, image.shape[:2])
        for obj in dataset_dict.pop("annotations")
        if obj.get("iscrowd", 0) == 0
    ]
    instances = utils.annotations_to_instances(annos, image.shape[:2])
    dataset_dict["instances"] = utils.filter_empty_instances(instances)
    return dataset_dict
To use the mapper inside the dataloader, you need to overwrite the build_train_loader method of the trainer:
from detectron2.engine import DefaultTrainer
from detectron2.data import build_detection_test_loader, build_detection_train_loader

class CustomTrainer(DefaultTrainer):
    @classmethod
    def build_train_loader(cls, cfg):
        return build_detection_train_loader(cfg, mapper=custom_mapper)
Now for training, instead of saying:
trainer = DefaultTrainer(cfg)
use:
trainer = CustomTrainer(cfg)
For more information, check out:
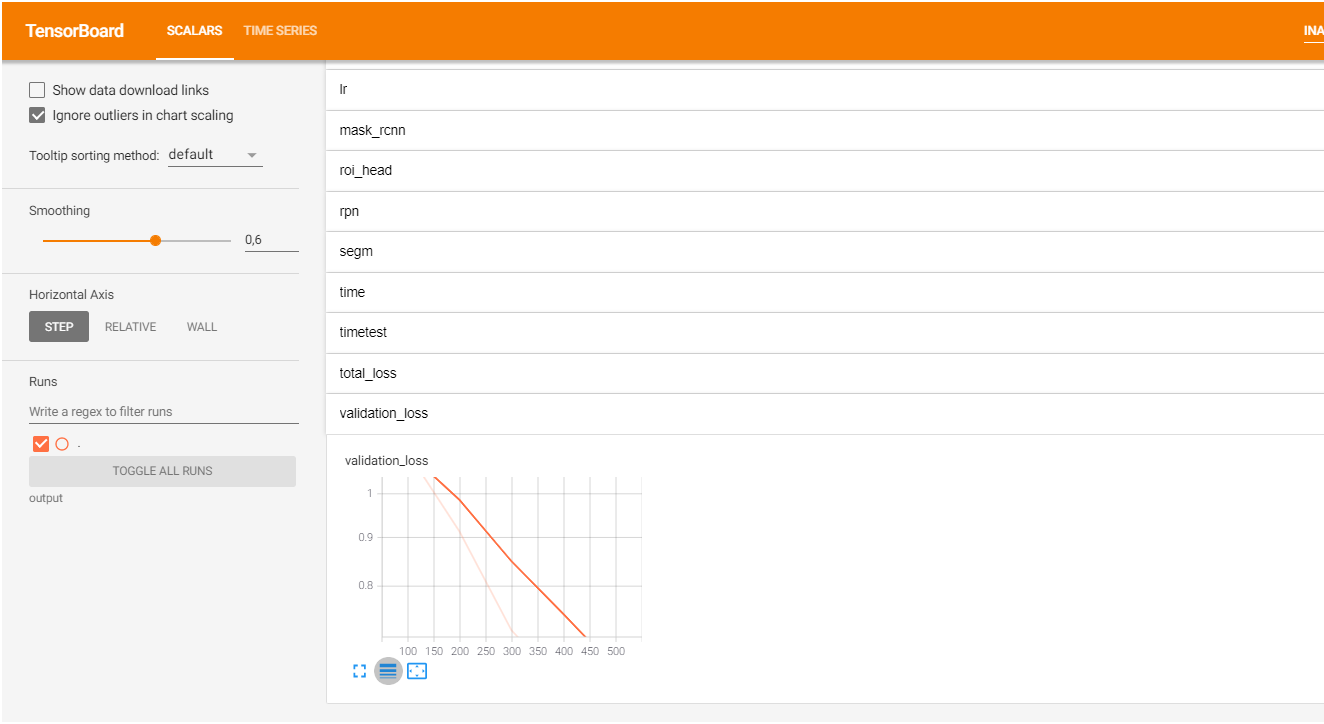
Print Accuracy on Validation-Set while training.
When training, we often want to know how well the model is doing on the validation set to assess if the model is overfitting on the training data.
This functionality is available out-of-the-box in most deep learning frameworks, but unfortunately, Detectron2 doesn't support it out-of-the-box.
To get this to work in Detectron2, we need to create a hook that evaluates the model on the validation set and then insert this hook into the model by building a custom Trainer class that extends from DefaultTrainer.
Marcelo Ortega went over the complete code needed for this in his post "Training on Detectron2 with a Validation set, and plot loss on it to avoid overfitting", so I recommend checking this out if you're interested in evaluating your model on the validation set while training.
Resources
Conclusion
Detectron2 is Facebook's new vision library that allows us to easily use and create object detection, instance segmentation, keypoint detection, and panoptic segmentation models. In addition, it has a simple, modular design that makes it easy to rewrite a script for another data-set.
Overall I really like the workflow of Detectron2 and look forward to using it more. With that said, that's all from this article. If you have any questions or want to chat with me, feel free to contact me via EMAIL or social media.