Update 27.07.2020: The Tensorflow Object Detection API now officially supports Tensorflow 2. You can find a Tensorflow 2 version of this article here.
Object detection is the craft of detecting instances of a certain class, like animals, humans, and many more, in an image or video.
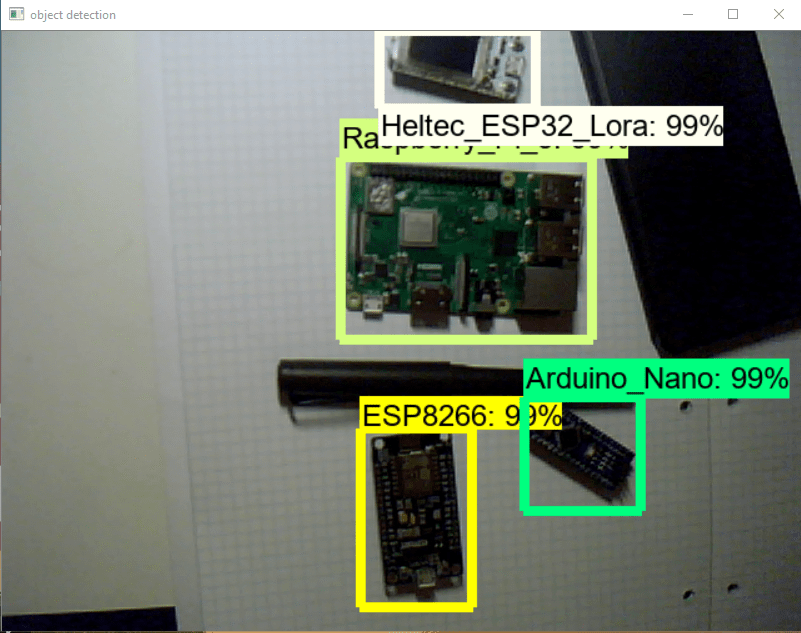
In this article, we will go through training your own object detector for whichever objects you like. I chose to create an object detector that can distinguish between four different microcontrollers.
This article is based on a video I made.
Introduction
This article will go over all the steps needed to create our object detector, from gathering the data to testing our newly created object detector.
The steps needed are:
- Installing the Tensorflow OD-API
- Gathering data
- Labeling data
- Generating TFRecords for training
- Configuring training
- Training model
- Exporting inference graph
- Testing object detector
Installing the Tensorflow OD-API
You can install the TensorFlow Object Detection API with Python Package Installer (pip) or Docker, an open-source platform for deploying and managing containerized applications. For running the Tensorflow Object Detection API locally, Docker is recommended. If you aren't familiar with Docker though, it might be easier to install it using pip.
First clone the master branch of the Tensorflow Models repository:
git clone https://github.com/tensorflow/models.git
Docker Installation
# From the root of the git repository
docker build -f research/object_detection/dockerfiles/tf1/Dockerfile -t od .
docker run -it od
Python Package Installation
cd models/research
# Compile protos.
protoc object_detection/protos/*.proto --python_out=.
# Install TensorFlow Object Detection API.
cp object_detection/packages/tf1/setup.py .
python -m pip install .
Note: The *.proto designating all files does not work protobuf version 3.5 and higher. If you are using version 3.5, you have to go through each file individually. To make this easier, I created a python script that loops through a directory and converts all proto files one at a time.
import os
import sys
args = sys.argv
directory = args[1]
protoc_path = args[2]
for file in os.listdir(directory):
    if file.endswith(".proto"):
        os.system(protoc_path+" "+directory+"/"+file+" --python_out=.")
python use_protobuf.py <path to directory> <path to protoc file>
To test the installation, run:
# Test the installation.
python object_detection/builders/model_builder_tf1_test.py
If everything is installed correctly, you should see something like:
Running tests under Python 3.6.9: /usr/bin/python3
[ RUN      ] ModelBuilderTF1Test.test_create_context_rcnn_from_config_with_params(True)
[       OK ] ModelBuilderTF1Test.test_create_context_rcnn_from_config_with_params(True)
[ RUN      ] ModelBuilderTF1Test.test_create_context_rcnn_from_config_with_params(False)
[       OK ] ModelBuilderTF1Test.test_create_context_rcnn_from_config_with_params(False)
[ RUN      ] ModelBuilderTF1Test.test_create_experimental_model
[       OK ] ModelBuilderTF1Test.test_create_experimental_model
[ RUN      ] ModelBuilderTF1Test.test_create_faster_rcnn_from_config_with_crop_feature(True)
[       OK ] ModelBuilderTF1Test.test_create_faster_rcnn_from_config_with_crop_feature(True)
[ RUN      ] ModelBuilderTF1Test.test_create_faster_rcnn_from_config_with_crop_feature(False)
[       OK ] ModelBuilderTF1Test.test_create_faster_rcnn_from_config_with_crop_feature(False)
[ RUN      ] ModelBuilderTF1Test.test_create_faster_rcnn_model_from_config_with_example_miner
[       OK ] ModelBuilderTF1Test.test_create_faster_rcnn_model_from_config_with_example_miner
[ RUN      ] ModelBuilderTF1Test.test_create_faster_rcnn_models_from_config_faster_rcnn_with_matmul
[       OK ] ModelBuilderTF1Test.test_create_faster_rcnn_models_from_config_faster_rcnn_with_matmul
[ RUN      ] ModelBuilderTF1Test.test_create_faster_rcnn_models_from_config_faster_rcnn_without_matmul
[       OK ] ModelBuilderTF1Test.test_create_faster_rcnn_models_from_config_faster_rcnn_without_matmul
[ RUN      ] ModelBuilderTF1Test.test_create_faster_rcnn_models_from_config_mask_rcnn_with_matmul
[       OK ] ModelBuilderTF1Test.test_create_faster_rcnn_models_from_config_mask_rcnn_with_matmul
[ RUN      ] ModelBuilderTF1Test.test_create_faster_rcnn_models_from_config_mask_rcnn_without_matmul
[       OK ] ModelBuilderTF1Test.test_create_faster_rcnn_models_from_config_mask_rcnn_without_matmul
[ RUN      ] ModelBuilderTF1Test.test_create_rfcn_model_from_config
[       OK ] ModelBuilderTF1Test.test_create_rfcn_model_from_config
[ RUN      ] ModelBuilderTF1Test.test_create_ssd_fpn_model_from_config
[       OK ] ModelBuilderTF1Test.test_create_ssd_fpn_model_from_config
[ RUN      ] ModelBuilderTF1Test.test_create_ssd_models_from_config
[       OK ] ModelBuilderTF1Test.test_create_ssd_models_from_config
[ RUN      ] ModelBuilderTF1Test.test_invalid_faster_rcnn_batchnorm_update
[       OK ] ModelBuilderTF1Test.test_invalid_faster_rcnn_batchnorm_update
[ RUN      ] ModelBuilderTF1Test.test_invalid_first_stage_nms_iou_threshold
[       OK ] ModelBuilderTF1Test.test_invalid_first_stage_nms_iou_threshold
[ RUN      ] ModelBuilderTF1Test.test_invalid_model_config_proto
[       OK ] ModelBuilderTF1Test.test_invalid_model_config_proto
[ RUN      ] ModelBuilderTF1Test.test_invalid_second_stage_batch_size
[       OK ] ModelBuilderTF1Test.test_invalid_second_stage_batch_size
[ RUN      ] ModelBuilderTF1Test.test_session
[  SKIPPED ] ModelBuilderTF1Test.test_session
[ RUN      ] ModelBuilderTF1Test.test_unknown_faster_rcnn_feature_extractor
[       OK ] ModelBuilderTF1Test.test_unknown_faster_rcnn_feature_extractor
[ RUN      ] ModelBuilderTF1Test.test_unknown_meta_architecture
[       OK ] ModelBuilderTF1Test.test_unknown_meta_architecture
[ RUN      ] ModelBuilderTF1Test.test_unknown_ssd_feature_extractor
[       OK ] ModelBuilderTF1Test.test_unknown_ssd_feature_extractor
----------------------------------------------------------------------
Ran 21 tests in 0.163s

OK (skipped=1)
Gathering data
Before we can start creating the object detector, we need data that we can use for training.
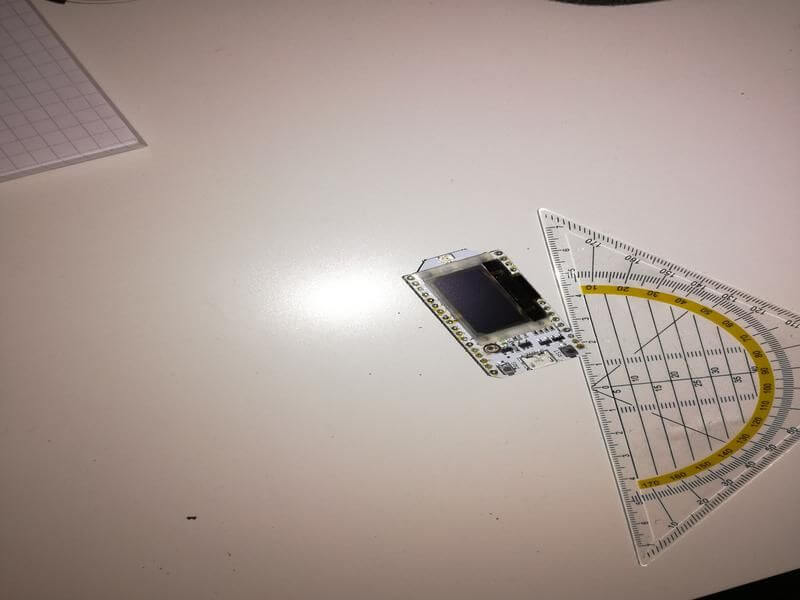
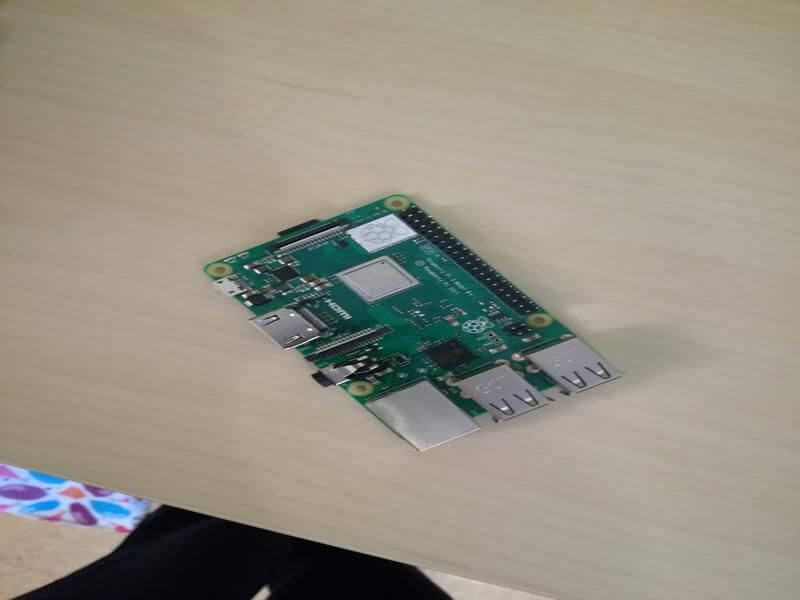
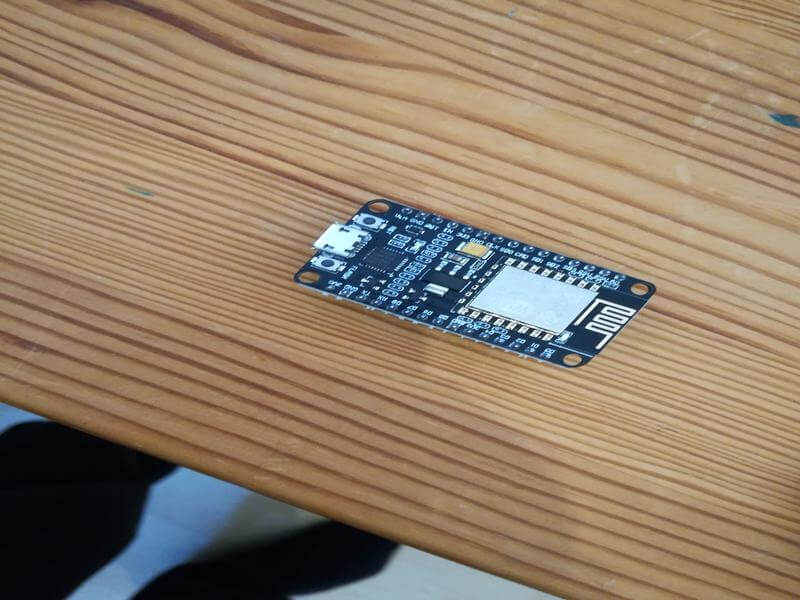
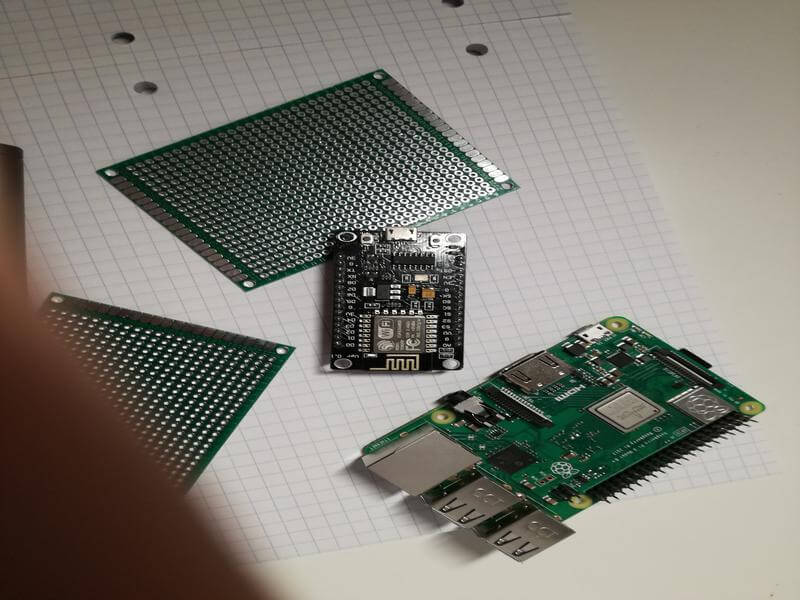
To train a robust classifier, we need a lot of pictures that should differ a lot from each other. So they should have different backgrounds, random objects, and varying lighting conditions.
You can either take the pictures yourself or download them from the internet. For example, I took about 25 photos of each microcontroller and 25 pictures containing multiple microcontrollers for my microcontroller detector.


These images are pretty big because they have a high resolution, so we want to downscale them, so the training process is faster.
I wrote a little script that makes it easy to transform the resolution of images.
from PIL import Image
import os
import argparse

def rescale_images(directory, size):
    for img in os.listdir(directory):
        im = Image.open(directory+img)
        im_resized = im.resize(size, Image.ANTIALIAS)
        im_resized.save(directory+img)

if __name__ == '__main__':
    parser = argparse.ArgumentParser(description="Rescale images")
    parser.add_argument('-d', '--directory', type=str, required=True, help='Directory containing the images')
    parser.add_argument('-s', '--size', type=int, nargs=2, required=True, metavar=('width', 'height'), help='Image size')
    args = parser.parse_args()
    rescale_images(args.directory, args.size)
To use the script, we need to save it in the parent directory of the images as something like transform_image_resolution.py and then go into the command line and type:
python transform_image_resolution.py -d images/ -s 800 600
Labeling data
Now that we have our images, we need to move about 80 percent of the images into the object_detection/images/train directory and the other 20 percent into the object_detection/images/test directory.
To label our data, we need an image labeling software. LabelImg is an excellent tool for labeling images. It's also freely available on Github, and prebuilts can be downloaded easily.
After downloading and opening LabelImg, you can open the training and testing directory using the "Open Dir" button.
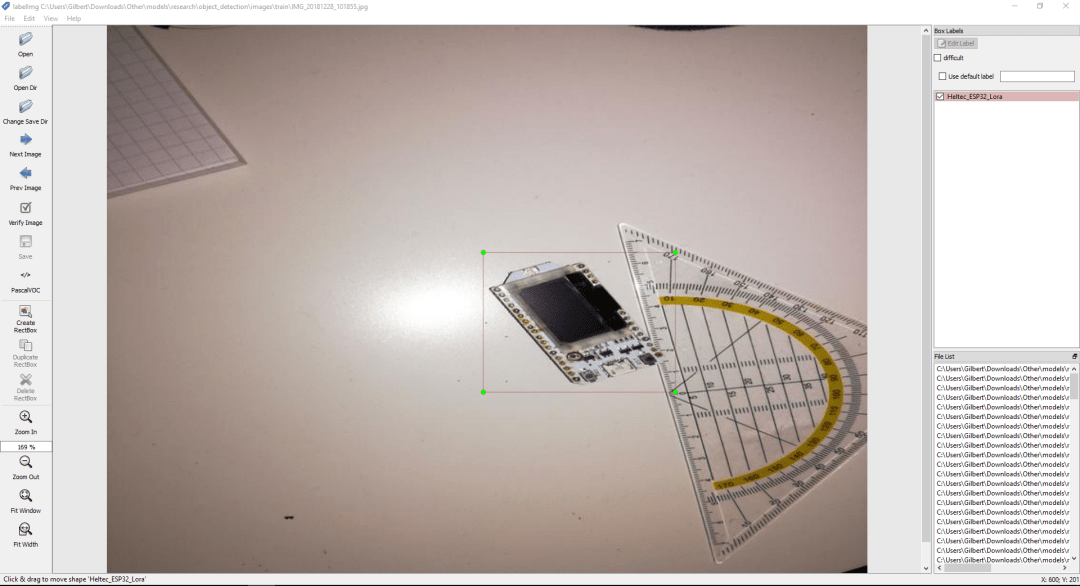
The "Create RectBox" button can be used to create the bounding box. After annotating the image with bounding boxes, you need to click save. This process needs to be repeated for all images in the training and testing directory.
Generating TFRecords for training
With the images labeled, we need to create TFRecords that can be served as input data for training the object detector. To create the TFRecords, we will use two scripts from Dat Tran's raccoon detector. Namely, the xml_to_csv.py and generate_tfrecord.py files.
After downloading both scripts, we can first change the main method in the xml_to_csv file to correctly transform the created XML files to CSV.
# Old:
def main():
    image_path = os.path.join(os.getcwd(), 'annotations')
    xml_df = xml_to_csv(image_path)
    xml_df.to_csv('raccoon_labels.csv', index=None)
    print('Successfully converted xml to csv.')
# New:
def main():
    for folder in ['train', 'test']:
        image_path = os.path.join(os.getcwd(), ('images/' + folder))
        xml_df = xml_to_csv(image_path)
        xml_df.to_csv(('images/'+folder+'_labels.csv'), index=None)
	print('Successfully converted xml to csv.')
Now we can transform our XML files to CSV by opening the command line and typing:
python xml_to_csv.py
This creates two files in the images directory. One is called test_labels.csv, and another one is called train_labels.csv.
Before we can transform the newly created files to TFRecords, we need to change a few lines in the generate_tfrecords.py file.
From:
# TO-DO replace this with label map
def class_text_to_int(row_label):
    if row_label == 'basketball':
        return 1
    elif row_label == 'shirt':
        return 2
    elif row_label == 'shoe':
        return 3
    else:
        return None
To:
def class_text_to_int(row_label):
    if row_label == 'Raspberry_Pi_3':
        return 1
    elif row_label == 'Arduino_Nano':
        return 2
    elif row_label == 'ESP8266':
        return 3
    elif row_label == 'Heltec_ESP32_Lora':
        return 4
    else:
        return None
If you are using a different dataset, you need to replace the class names with your own.
Now the TFRecords can be generated by typing:
python generate_tfrecord.py --csv_input=images/train_labels.csv --image_dir=images/train --output_path=train.record
python generate_tfrecord.py --csv_input=images/test_labels.csv --image_dir=images/test --output_path=test.record
These two commands generate a train.record and a test.record file, which can be used to train our object detector.
Configuring training
The last thing we need to do before training is create a label map and a training configuration file.
Creating a label map
The label map maps an id to a name. We will put it in a folder called training, which is located in the object_detection directory. For example, the labelmap for my detector can be seen below.
item {
    id: 1
    name: 'Raspberry_Pi_3'
}
item {
    id: 2
    name: 'Arduino_Nano'
}
item {
    id: 3
    name: 'ESP8266'
}
item {
    id: 4
    name: 'Heltec_ESP32_Lora'
}
The id number of each item should match the id specified in the generate_tfrecord.py file.
Creating a training configuration
Now we need to create a training configuration file. I will use the faster_rcnn_inception model, which can be downloaded from the Tensorflow OD model zoo page like many other models. I will start with a sample config (faster_rcnn_inception_v2_pets.config), which can be found in the sample folder.
First, I will copy the file into the training folder, and then I will open it using a text editor to change a few lines in the config.
Line 9: change the number of classes to the number of objects you want to detect (4 in my case)
Line 106: change fine_tune_checkpoint to the path of the model.ckpt file:
fine_tune_checkpoint: "C:/Users/Gilbert/Downloads/Other/models/research/object_detection/faster_rcnn_inception_v2_coco_2018_01_28/model.ckpt"
Line 123: change input_path to the path of the train.records file:
input_path: "C:/Users/Gilbert/Downloads/Other/models/research/object_detection/train.record"
Line 135: change input_path to the path of the test.records file:
input_path: "C:/Users/Gilbert/Downloads/Other/models/research/object_detection/test.record"
Line 125 and 137: change label_map_path to the path of the label map:
label_map_path: "C:/Users/Gilbert/Downloads/Other/models/research/object_detection/training/labelmap.pbtxt"
Line 130: change num_example to the number of images in your test folder.
Training model
To train the model, we will use the train.py file located in the object_detection/legacy folder. First, we will copy it into the object_detection folder, and then we will open a command line and type:
Update: Use the model_main.py file in the object_detection folder instead.
python model_main.py --logtostderr --model_dir=training/ --pipeline_config_path=training/faster_rcnn_inception_v2_pets.config
If everything was set up correctly, the training should begin shortly.
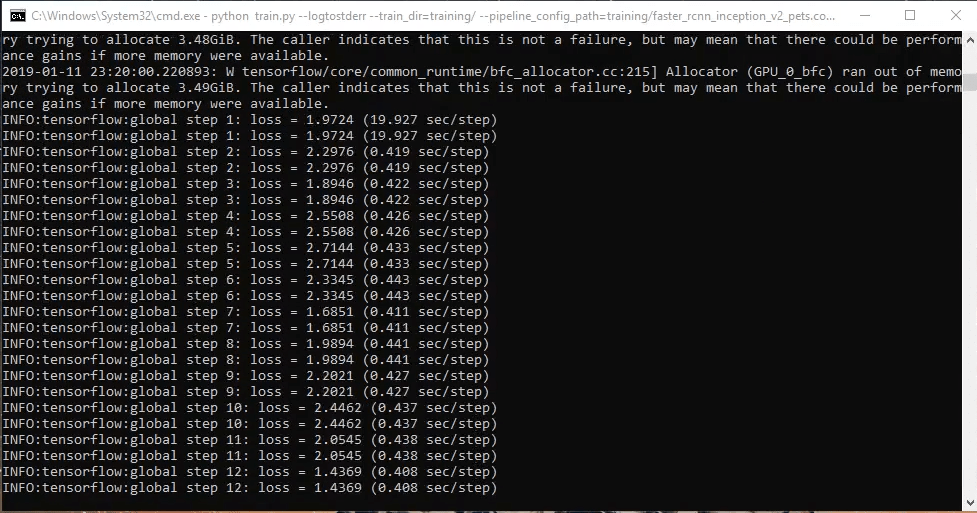
About every 5 minutes, the current loss gets logged to Tensorboard. We can open Tensorboard by opening a second command line, navigating to the object_detection folder, and typing:
tensorboard --logdir=training
This will open a webpage at localhost:6006.
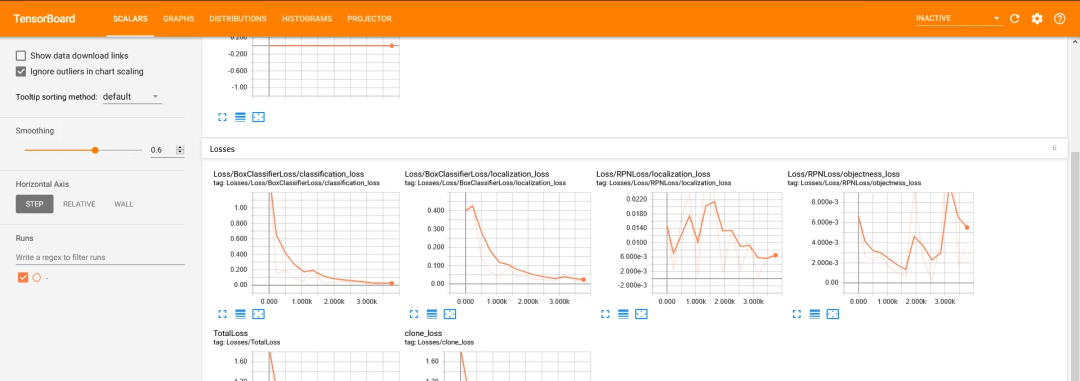
You should train the model until it reaches a satisfying loss. The training process can then be terminated by pressing Ctrl+C.
Exporting inference graph
Now that we have a trained model, we need to generate an inference graph, which can be used to run the model. For doing so we need to first find out the highest saved step number. For this, we need to navigate to the training directory and look for the model.ckpt file with the biggest index.
Then we can create the inference graph by typing the following command in the command line.
python export_inference_graph.py --input_type image_tensor --pipeline_config_path training/faster_rcnn_inception_v2_pets.config --trained_checkpoint_prefix training/model.ckpt-XXXX --output_directory inference_graph
XXXX represents the highest number.
Testing object detector
We can use the object_detection_tutorial.ipynb file to test our newly created object detector. We only need to rewrite the fourth code cell.
From:
# What model to download.
MODEL_NAME = 'ssd_mobilenet_v1_coco_2017_11_17'
MODEL_FILE = MODEL_NAME + '.tar.gz'
DOWNLOAD_BASE = 'http://download.tensorflow.org/models/object_detection/'

# Path to frozen detection graph. This is the actual model that is used for the object detection.
PATH_TO_FROZEN_GRAPH = MODEL_NAME + '/frozen_inference_graph.pb'

# List of the strings that are used to add a correct label for each box.
PATH_TO_LABELS = os.path.join('data', 'mscoco_label_map.pbtxt')
To:
MODEL_NAME = 'inference_graph'
PATH_TO_FROZEN_GRAPH = MODEL_NAME + '/frozen_inference_graph.pb'
PATH_TO_LABELS = 'training/labelmap.pbtxt'
Now we can run all the cells, and we will see a new window with a camera stream opening.
